Sunday, November 28, 2021

Seok Hyun Kim: Week 10 Project 4 Pepakura Creature Sculpture

CONCEPT:

For this project, I wanted to create an Egyptian creature because I love the charismatic designs of Egyptian culture. After having my research and references, I decided to create a guardian creature that is protecting the king's tomb to have basic story that will help the design. Therefore, I chose a big dog's face since the dogs are people's best friends, guardians of the livestock or houses, and often represent loyalty to their master. I also added spiky lion's mane around the face to have more relationship with the king, since the lion represents the glorious king among the wild animals. The creature has a lot of eyes and huge ears to sense the intruders in the king's tomb, and its mouth is wide open to threaten them. Additionally, the sculpture has a flat big pedestal at the bottom to maintain balance since it has a top-heavy design.

TECHNIQUES:

I modeled the creature in Maya. I started with creating a high poly model of the creature, and then reduced the polygons to make it suitable for a pepakura design. I imported the low poly design into a free software called Pepakura Designer. I unfolded the model in the Pepakura Designer, edited their flaps, gave edge identification numbers to them, aligned the pieces in appropriate sized sheet with select and move command, and color coded their lines by following the professor Andrew Scott's tutorial videos. Honestly, using the Pepakua Designer was the most fun part in this project since it was like creating 3D puzzle. After that, I exported the layout in one composition vector DXF file, and imported that file into Rhino to make the layout more suitable for laser cutting. I moved the position of the pieces in Rhino according to the reference rectangles that I drew, and most importantly, I assigned the proper colors and line types to the layers.

MATERIALS: 1/8" thick 24" x 48" Cardboard, Loctite, Black, Gold, and Brown Paints

I rendered the creature in Key Shot. I chose the light and environment of a desert, because Egyptian culture was developed mainly in desert area. I used the Paint Gloss Black and Paint Metallic Yellow materials because those are the two most iconic colors used in Egyptian designs, and I was aiming for a strong color contrast of light and dark colors to have obvious focal points in my design. That is why I did not painted the mane in gold, since it will lose the focal point. For the physical sculpture, me and my teammates used thin cardboard material to make it possible to fold when we are assembling the pepakura. It also helped the sculpture to be relatively light-weighted compared to its huge size. My teammates assembled and painted the sculpture with black and gold paints, and attached golden eyes. Andrew painted the base of the statue in dark brown color, and wrote hieroglyph with gold paint to decorate it.

Paragraph 1

In me, Andrew, and Gail's group, among the three different great designs came out for our team project, my creature design was selected to move forward with. It is a Egyptian guardian creature defending the king's tomb, and we were calling it as Good Boy while working on it since the sculpture was designed based on a dog's shape. There are several reasons for that we chose the design. Firstly, we all liked the charismatic Egyptian themed design that has strong contrast in it. Secondly, we agreed that my design has the highest quality 3D modeling and the most reasonable background story. Lastly, we believed that it will be the most challenging design to create, since we were aiming for a memorable statue that we can be proud of and will keep even after the course ends. As a group, we envisioned the final product to have less golden accessories than my original design to make it look more natural and have stronger focal point with color contrast. Additionally, we chose to use thin cardboard material to make it possible to fold and to help the sculpture to be relatively light-weighted.

Paragraph 2

My role and contribution in this team project was the original design and computer works. To go into detail, I designed the sculpture, did the 3D modeling in Maya, unfolding in Pepakura Designer, and created the layout for laser cutting in Rhino. After everything is finished, transferred all the needed files through Box to Andrew and Gail to move forward. Andrew prepared all the cardboard materials, and Gail was responsible for laser cutting in TheLab Makerspace with those. After that, Andrew and Gail assembled the cut out pieces and did post processing. I did my best for the computer works because I am not great at handcrafting, and I was so relieved when the layouts were successfully cut out with no issue.

Paragraph 3

Since I was familiar with all the required software, such as Maya, Pepakura Designer, and Rhino, but not confident in handcrafting, it was great for me that I could focus on computer works in the group. Gail said that she is completely opposite, she was not confident in 3D workflow but great at post processing, so I believe that was nicely divided pros and cons in our group. On the other hand, I experienced a lot of trials and errors while working on this team project. Even after choosing the design to move forward with, all of us tried to revise the design, so I tried various different 3D models in Maya. I spent long time while revising the errors of overlapping flaps in Pepakura design, and Andrew helped me in that process with his keen eyes. I also had to deal with a lot of trials and errors while creating layout for laser cutting in Rhino, since we had to use laser bed that is different sized from what we have been using, because the school's machine was still not working. But generally, I believe everything came out successfully in the end before the deadline, and I love how our teamwork went through this project smoothly like I wrote in the Team Member Review.

Gail Givens: Week 12 Project 4 Pepakura Creature Sculpture

Original Creature

Concept:

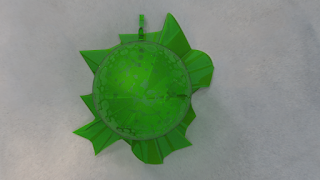
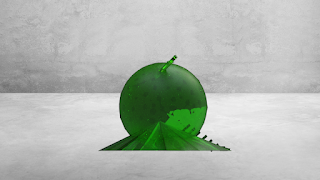
     The concept for my original creature was to create a slime blob-like creature. It was inspired by such creatures as seen in many popular fictional media, such as D&D and Slime Rancher. I really enjoyed the concept of this slime creature having bits of weapons and bones inside it forming features for it, so I went with those as well. I ultimately wanted to make it both scary/creepy and cute.

Techniques:
    To create my creature in Rhino I used multiple basic tools to keep things simple. For the main body, I create a sphere. The objects inside the creature were made using the polyline tool to draw images, then extract the created object (i.e. the skull, spine, and sword). The bottom part of the creature was made by using curves then lofting them in order to make them 3D.
    After the creature was made, I had to make a low poly version as if I was going to go through the whole Pepakura process to make it in real life.  To do this, I simply selected the entire model and used Reduced Mesh. This could only lower the poly count so much due to how my model was constructed.
Material:
Finally, I put the finished low poly model into KeyShot. I made the sculpture green, as I felt that fit the best for aesthetics and made it into a see-through material for the same reasons.

Group Creature

    We ended up going with Seok's design for our group project, as we really loved his design even from the beginning. We eventually called the creature "Good Boy", a play on it being dog-like. We chose Seok's as it had several aesthetically pleasing design elements. It was elegant, mysterious, and sleek. 

We divided the responsibilities of the project between the three of us. Seok would be in charge of the digital side of things; creating the 3D model and the Pepakura design sheet. Andrew would be in charge of most of the post-production end; painting and adding any additional material at the end. I would be in charge of the laser cutting and sharing assembly responsibility with Andrew.

For my end of the group project, I worked a lot on the physical creation of the creature as well as the post-production. I used the file given to me by Seok and checked it over before sending it to the laser cutter at MakerSpace.Lab in Richardson. I was given the pieces of cardboard by Seok and Andrew and switched them out for each piece to be cut. I had to chop up the file for the laser cutter to submit each piece individually. The other edits I made before actually cutting them with the laser was to remove the numberings to cut down on time taken to cut the cardboard and color coordinate the segments to ensure they cut correctly (i.e. outer cuts were different from inner cuts and etchings). After everything was cut, I looked back at the original file to correctly label and number each piece that would need to be attached together in order to ensure they would be built correctly. After this, Andrew and I worked together to put the pieces together to create our creature. We folded each piece the way it was labelled according to Pepakura then used loctite to superglue each piece together. Sometimes we had to use additional materials such as a hot glue gun and extra scrap cardboard in order to better glue the material and hide holes in the sculpture respectively. To attach the creature's body to its base we used gorilla glue to ensure it would attach correctly and strongly. One issue we ran into was that for the dashed and dashed-dotted lines the laser cutter did not cut through the cardboard sufficiently, thus it was more difficult to fold. The solution was that me and Andrew used a box cutter in order to re-create the lines where it would fold, thus making it easier to fold correctly. Otherwise the laser cutter worked very well and was very low-cost to use!

Kyle Kapischke: Week 10 Skateboard Deck Laser Engraving

 For this project I decided to do something I always enjoy drawing, which is ugly screaming faces. I did something similar for another final project, so I guess it's something of a running theme with me. I didn't use any inspiration for this, the only thing I think I was inspired by were the colors, but I didn't use any reference to match the coloring. I'm pretty sure old album covers would use the color scheme of blue skin and yellow eyes, but I couldn't find any.


Importing the design into Rhino was very easy. All I had to do was put the raster drawing into Illustrator, perform an image trace, then upload the vectorized image into Rhino. 

 
 Creating the 3D model for the Keyshot renders was slightly more difficult. All I did though was create the deck using curves and then extruded it. The trucks and wheels were far easier to do, though.


The design went onto the Keyshot rendering well. The warping on the faces was hardly noticeable.


The final skateboard was airbrushed, with the lineart painted in black.

Wednesday, November 24, 2021

Aleyna Enriquez: Week 12 Skateboard Deck Final Project

 Aleyna Enriquez: Week 12 Skateboard Deck Final Project

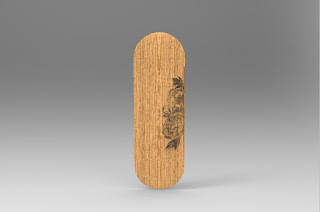
Concept: I always liked the idea of getting a tattoo, but I do not like that it is permanent. I created the design by looking at other peoples tattoos and seeing what they techniques they used. While, using a feminine touch to create my skateboard deck. I liked the simple tattoo designs more than the overworked and complicated tattoos. all of the tattoos had no color and just raw skin and black ink, the wood would have a flesh tone while the laser engraving will give it that black ink look.


Technique: To create my design I simply used Illustrator to create my initial design. I then imported my design into rhino. I created the skateboard making a rectangle by using the rectangle: corner to corner. I then used the arch tool to create the ends of the board. I then clicked and shift the two center points and lifted them up less than a quarter inch. I then created a surface with the loft tool to create the dip under the deck. then I used the surface from planer curves to make the rest of the skateboard deck. I don't plan to use the skateboard after, I intend to hang it so I did not create any extra parts or wheels. I used the surface from planer curves to make the raster look like it would be burned in. 

Materials: I used sandpaper, raw wood no polish skateboard deck, and wood conditioner/ sealer.
I engraved the skateboard first and then sanded. I used a simple two in one wood conditioner and sealer.


Monday, November 1, 2021

Santiago Perez-Isaza: Project 3 Makercase Lamp


 Concept
            My original references was based off of space travel and I wanted to represent that in a minimalistic and abstract way. Originally I wanted to incorporate some sort of alien writing in the lamp but felt that if I took the alphabet from the Star Wars saga it would be plagiarism so I decided against it. The original concept drawing shows a galaxy in the first panel and that was also removed in the final version due to my limited knowledge of Adobe Illustrator, I couldn't make it the way I envisioned.

Technique
            A lot the project involved extracting curves from hatches such as the more abstract circle shape and the one with multiple triangular shapes. It took some time but found that the "DupBorder" command gave the selected hatches curves on their borders, and then a "PlanarSurf" command to create the inner cuts on the 3D model. For the 3D model itself, to represent some of the vector cuts, I duplicated the curve and made it a surface. With that surface I just had to create a small extrusion and difference it from the larger mesh. To create that abstract stripes shape I made a row of 8 lines in Illustrator and then used a displacement tool to give it the shape and warping in the final image.

Materials
The material assignment in Keyshot was straight forward. I went with the material that best represented it in the real world which would be a light wood. Though if I planned my project differently from the start, I would have created a very dark coating on the wood then have for LED light panels placed directly on the sides and have that be my light source.