Sunday, December 6, 2020

Thuan Ha - FlatFab Project

FlatFab Model
Concept: Since I know I have to create organic shape, creating an animal would be ideal. After browsing through quite a few animal, I decided to settle with the shark, but not just any shark. To me, the hammerhead has always been a very unique animal because of the way its head is shaped. The wide head allow it to easily stand out from its counterpart especially from top view.
Technique: I started off by looking for a decent side view of the shark as a template for the overall silhouette. I loaded the image as an image template inside FlatFab so I can get the body shape correctly. 

After creating the main body shape, I proceed to create the tail shape separate from the body, because I want to avoid creating one big shape. Initially, the top fin was one piece, but later on I decide to have two pieces at an angle pointing toward each other in order to more accurately represent the fin shape. All the fin shape were created separately from the body in order to have a more interesting silhouette. 

Next up, the head shape was created with two separate pieces attached together since I cannot create one piece across, and the eye shape end up having to protrude further out from the head shape even though that is not accurate. To give the body more weight and depth, I took the base body shape and scale it down and put it at angle to kind of create the overall body shape of the shard. Finally, for the tail, instead of one piece, I created three pieces with a smaller in between pieces. Doing so, I can simulate movement in the model and make it feel less static.
Material: I created this model to look like those metal sheets model I have at home, so when rendering I turn on the metallic properties to give it a shinier look. I have a blueish gray color since I noticed the skin color is gray, but there are hints of blue in there possibly from light refraction in the water. I did use Blender to rendered this out with an ambient occlusion pass comp over the color. For the background it's a simple image of the ocean that happen to be the shark's habitat.


Kenny Tentri: Project 3 FlatFab Model

Concept: Toucans aren't necessarily my favorite animal, but I definitely find their colors and large beaks an interesting design found in nature. I wanted to create a model with angularity besides strictly right angles, because making curves in this medium is more difficult than boxes, but doing so results in some very cool organic designs. The wings and tail provided the perfect answer to this, because they extend from the main model to add visual complexity, but don't overwhelm me with a form that is too difficult to replicate.

Technique: I had a hard time visualizing what this model would look like, so the first thing I did was look at 3d puzzles to understand how I would design this. The model was made in FlatFab, and I made some rough layouts of what it potentially could look like to get familiar with the program. 


I started by drawing the basic silhouette shape with the pen tool, then built the rest of the layers off of it. I was able to design one piece each for the connection slots, the wings, and the tail. It was easy to then duplicate, resize, and move these pieces around to create a more interesting look to the Toucan. Once one side was done, I had to reflect pieces to the other side so the piece had a thickness and looked more three dimensional. I finally imported the model into Rhino, where I could texture and render it out.

Materials: The final design and interlocking shapes ended up looking like some sort of toy so I decided to render it with a plastic material. I used a vibrant color scheme, applying different colors to different parts of the Toucan, and it reflected the playful aesthetic you associate with children's toys.

Friday, December 4, 2020

Flat Fab Final Model - Hope Sherman


Concept

I had no idea what to do. I fiddled with sculptures, animals, vases, etc. I eventually settled upon an idea to attempt to make a mermaid. I decided on a mermaid figurine because I love mermaids. All of my tattoos are of mermaids, my room is decorated to the max with mermaids - how could I not at least try? I originally sketched out what I wanted her to look like, but I ended up not saving the sketch which I am extremely disappointed in myself for doing. At least I remembered to save the actual model, however. I think I would have cried if I didn't save the model considering this gal took 3+ hours to fully model, picture, etc.

Process

As stated previously, I originally sketched an idea of how I wanted her to look in Paint Tool Sai but in having to restart my computer after I finished the model to fix some program errors, I saved the FlatFab file but not the sketch. Here's a taste of what I originally had:

After I finished modeling in Flat Fab, I saved the file as both an SVG and OBJ and moved them over to Rhino. I used Rhino to...Pretty her up a bit. Here's the layout of the individual pieces as well as the dimensions of the mermaid model herself. She also ended up having a sort of visor like Geordi La Forge from Star Trek: The Next Generation because I needed something to hook that hair onto as well as give the poor girl some 'eyes'.


* Geordi La Forge for context


Materials

If I were to print her out, I would use cardboard. I would want to keep her at a size relatively around, or bigger than, a standard Barbie or Rainbow High doll, which ranges from 9 - 12 inches. I posed her atop my mermaid tail shelf underneath two of my dolls for the rendering photograph. I would want her to be a nice iridescent gradient of a cool purple to cyan versus a more humanoid color scheme because why not, she looks pretty let's give her some pretty colors that match a mermaid's aesthetic. 


FlatFab Finale Model

 CONCEPT:

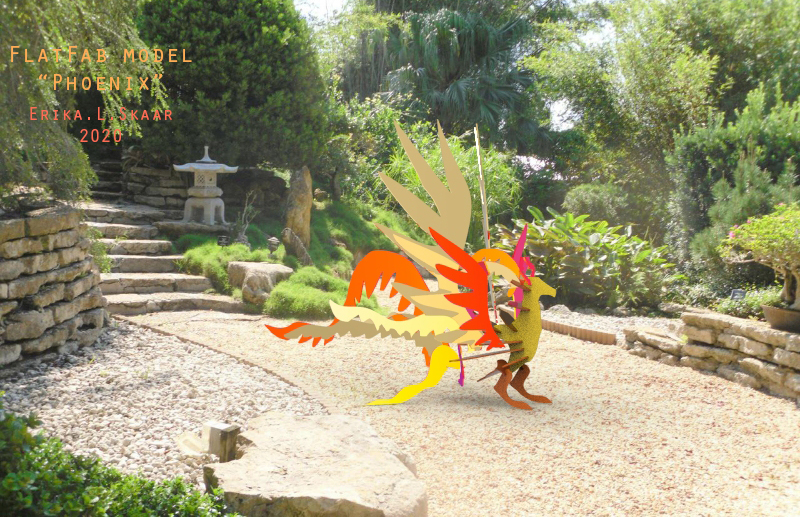
Like Godzilla, I love fantastic creatures, and I thought something with a great wingspan would look super cool in FlatFab. I also figured that it would be a mold that would be relatively "easy" to make look detailed and intense while not actually needing a lot of material. So I thought....wingspan, huh. I should make a Phoenix... One of my main drives was the location in which I wanted to take my finished model for photos, which was the Japanese gardens in Fort Worth.

Unfortunately, I did not get this cut before the shop shut down, but I have full intentions of making this bird. 


PROCESS:

I started in FlatFab playing around, like I do, getting used to drawing symmetrically and asymmetrically. I sketched out my general vision of what I wanted the Phoenix to look like and just attacked the beast head-on. I realized I would need to make sure it had good stability points, so I made the back tail feathers trail on the ground, which ultimately bulked up the Phoenix's luscious looks while serving a purpose.

I transferred the FlatFab into Adobe to get my printable file, and then into Rhino. I then imported the OBJ file and labeled each sublayer, and assigned a specific color and material. After placing my boundingbox, I was able to get my linear dimensions, and I made sure to drop my orthographics with the Make2d command.

I took my ghosted photos and then imported my finale model into KeyShot, where I tried to do this bird justice. The hardest part was getting 11 x 17 photos and not cropping off information. I made my model rather large because it would be lightweight, and I wanted it to be substantial in real space when I take it to the gardens for photographs. 


MATERIALS:

I originally was going to cut this out of the corrugated plastic up at the machine shop; however, when I want to email them about their holiday hours over Thanksgiving, there was an automatic reply that said they were closed. I will now have my friend use his CNC machine, and I will cut this and my box lamp from 1/8" red oak underlayment. I may also glue the Phoenix pieces together to be safe, as I will still be taking it to the Japanese gardens for photos. I will be priming it and then spray painting the wings and tail feathers with my gold and copper metallic paint. The main body I will paint in a satin gold solid color.


Tuesday, November 3, 2020

Sanika Dhawan: Laser Cut Lamp Project


Concept: I wanted to use stars on my lamp and ended up making a lamp with the theme of stars and a night sky. I envisioned a blue and yellow theme, but mostly blue. I had pentagons around each star with a light engraving, but unfortunately it wasn't working when I tried extruding multiple times so I had to get rid of them. I also added a nice quote I found that I really liked and found inspiring. 

Materials: I chose to use wood, specifically a bamboo wood, as it is around .5 inches thick and the thickness of my lamp is .5 inches as well. I wanted it to be strong and sturdy.

Technique: I made my design in Illustrator and then transferred it over to Rhino to continue the process and make the lamp. I then transferred my final lamp setup and final design to Illustrator to edit it to give it a nice background and titles. Rhino on my mac crashed unexpectedly while I was in the middle of working, so I had to restart in Rhino.

Monday, November 2, 2020

Eduardo Garcia: Week 11 Laser Box Project

My design is a simple lower to the ground box with hexagons cut out and sporadic lines zigzagging through. Its purpose is to hold things without hiding anything because this box is like me: transparent and bottles up everything. I consistently use hexagons and that cool iridescent rendering technique to resemble my last project as I am heavily influenced by the work inside of Neon Genesis Evangelion because I am in pain mostly.

Sunday, November 1, 2020

 Chanlyr Jordan: Lamp Project


Concept

            My thought process going into designing this lamp was to create one suitable for reading next to, so it should emit a small amount of light while still being fun to have on display. To do this, I've returned to my old buddy Kurt Vonnegut for inspiration. I decided on a lamp size proportional to that of a hardcover book; a literal book light. I studied a variety of Vonnegut's book covers from over the decades, and picked the design elements that I liked the most from a few of my favorite ones. Because of its form factor, the lamp became my own Frankenstein covers for The Sirens of Titan and Breakfast of Champions. On the sides, I adorned the lamp with imagery from each book. On the BofC side, I've chosen doodles from Vonnegut that are littered throughout the book. For the alternate side, I chose more in-depth greyscale adaptations of some important imagery from the book.

Techniques


            The techniques I employed to make this vision come to fruition were very simple. For the laser cut composition, I image traced the design elements that I had chosen in Illustrator, arranged them, and formatted them for laser cutting (pictured above). I decided that the light should primarily come from the text, so I gave the front and back texts a blue stroke. This applied to some portions of the side images as well, to make them pop. These are going to be the only parts of the lamp that are cut-through, for a small amount of light and some tasteful highlights.

The meat of my design lies in raster engravings, so I converted everything I wanted to engrave to greyscale to get a good tonal range across the whole lamp. Once I had the vectored curves, I imported the outer and inner cuts into Rhino to create a render. To do this, I extruded the outer cuts separately from the inner cut outlines of the letters and side portions. Once each was extruded, I used BooleanDifference to subtract the inner shapes from the large slabs of digital material. Rhino doesn't handle engravings well, so I captured viewport renders of each side of the lamp while it was "assembled" and laid the engravings over them in Photoshop (pictured below). 

Also represented in this illustration is the different colors of light that I imagine I'll achieve via colored paper inserts or acrylic.

Materials

           The materials I'll laser cut this lamp out of are 5.5mm plywood underlayment. It's fairly cheap, and I've heard that it burns well. For the light, I'll use a smaller candelabra bulb and the matching socket and cord to affix to the bottom of my lamp. For assembly, I'll use CA glue, hopes, and dreams.