Sunday, October 31, 2021

Yadira Anguiano : Week 8 MakerCase Lamp

Concept

For my concept, I wanted to create a lamp inspired by glowing Minecraft ore blocks. In Minecraft, there are a variety of different colored ores available for the player to mine, and I wanted to keep that concept so that each side of my lamp would be different. To keep the cube-like idea, I decided on making a square design instead of a rectangular lamp. I also decided LED lights would be a better choice of lighting, since it would make the final product adjustable and remove the need for a bulb. I also liked the idea that the user could change the lamp's color, or set it to change over time. The original design included a lava and glowstone side, but I replaced both sides to keep a more uniform look. 


Techniques

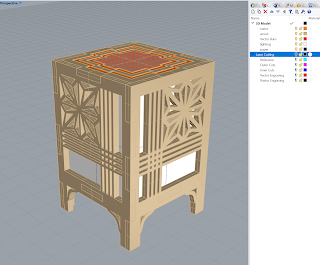
To create my laser cutting design, I began by adjusting my grid settings to .5 in spacing for every line. Since I was using boxes and straight lines, I found using grid snap to be the easiest way to align my design. From there, I created my curves using O-Snaps. To keep my shapes clean, I exploded each curve and deleted separating lines on boxes that spanned more than one row. To build my 3D model, I extruded the outer cut surfaces first, and used boolean difference on the inner cut surfaces afterward. I then created separate surfaces using extrude curve and planar surface for my raster and vector engravings, since I would be painting each section differently.


Materials

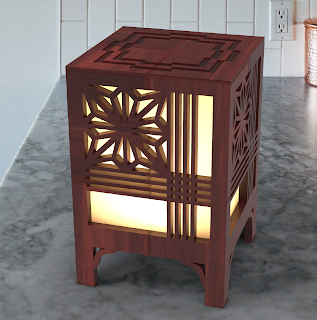
In Keyshot, I assigned a stone material to the base of my lamp, adjusting roughness settings so it would appear more textured and less smooth. Inside my lamp, I added a surface to each side so I could assign a color for each ore in keyshot. For this, I used a rough plastic material for every side except the red, which uses a colored glass for vibrancy. My raster areas use a rough cloth material, and the vector uses a hard grey plastic. I also used an inner light, which is assigned to a sphere inside of my model. For my physical model, I decided to spray paint the top and outer edges of my cube with a cement textured spray paint. The rest of the painting was done by hand using acrylics. I used transparent color overlay film on the inside of my cube for the different colored faces. After I completed my painting, I used a satin sealant overtop of the project. 


Anthony Lopez: Week 8 MakerCase Lamp


CONCEPT

    The masks in the images provided inspired the design and colors of the lamp. The masks portrayed are 2D representations of masks in the style of those found in Lucha Libre, the term used for Mexican professional wrestling. They are meant to reflect the masks worn by the wrestlers or luchadores. The common design is a stroke surrounding the inner cuts such as the eyes, nose, and mouth. The colors are bright and colorful and I thought this would go well against the light MDF wood.

TECHNIQUE

    After drawing up and tracing the designs into Rhino, I used extrude curve to extrude the curves into 3D objects. After that I used boolean difference to identify the inner cuts and subtract them from the lamp. Inner cuts included the holes used at the bottom of the box, the eyes, nose and mouth of the masks. Next, I rotated the sides so that they stand up straight and I used the move command to attach the sides of the lamp together. Then, I used planar surface on the outer line of the mask so that I would be able to define the separate surfaces of the mask needed for assigning a color in KeyShot and painting later on. After creating a surface across the mask, I had to use split to select the surfaces that covered the inner cuts, such as the eye and mouth, and then delete them.

MATERIALS

    I downloaded a MDF material from the KeyShot cloud and applied it to the case and the individual surfaces so it would reflect the material I used. I then selected colors from the colors section and applied them to the surfaces needed. I checked a box saying “Blend Color” so that the color would blend with the MDF material and create a realistic rendition of the lamp. I chose a table for the environment because I imagine that would be the best place for the lamp. I made sure to keep in mind not only the lighting of the environment but the lighting from the lightbulb inside the lamp as well.


Austen Sartain: Project 3 MakerCase Lamp


This project was far easier than Project 2. I think this was a result of how little 3D sculpting and building you actually have to do. It's more the equivalent of digitally cutting out designs on cardboard. For most of the project, I used the polyLine to create the different shapes. Once I used SrfPlanar to create a surface from the lamp outlines, I just too my designs i made with the polyLine and then used trim to remove pieces of the surface I made. After I finished cutting the design into the surface, all I had to do was extrude the surface to make it 3D, join the pieces, then fit each side together. Nothing super advanced.During the process of laser cutting, I ended up finding out that for both the inner and outer cuts, it is best to do at least 3 passes. The reason being is because the wood ends up being perferated instead of cleanly cut. This causes a lot of blowout when you push out the pieces, resulting in a bunch of damage. The last bit of work I did was just to make the lamp nice and presentable. I sanded the surface with 220 grit, stained it, and superglued the paper in.

Winston Huo: Week 8 MakerCase Lamp


For my inspiration, I once again turned to something sound-related. As I have been looking into retro video game music, I decided to focus there. I took waveform readings of the three pitch-generating channels of the programmable sound generator of the Game Boy (and by extension the Game Boy Color and Game Boy Advance). The front of the lamp depicts a graphic of the Game Boy Color. I decided to have the left, back, and right represent channels one, two, and three, respectively and show examples of waveforms they are capable of generating. Channel one is a pulse wave channel with variable duty cycle and frequency sweep, channel two is a pulse wave channel with variable duty cycle, and channel three is a 4-bit programmable wavetable channel. For channel three, I decided to sample programmed waves from Pokémon Gold and Pokémon Silver to use as my waveform examples.


The actual drawing of my design was done in Adobe Illustrator using the template provided by MakerCase. That process mostly involved tracing a picture of the Game Boy Color and the waveforms readings that I obtained. Most of it transferred cleanly into Rhino although minor adjustments had to be made to make sure things were aligned properly. For the engraving file, I used the Hatch command to define the areas that needed to be raster cut. For the rendering file, I used ExtrudeCurve on my outer and inner cuts to make them into polysurfaces and BooleanDifference to make the actual cutouts in the panels. I also used ExtrudeCurve on my vector lines so that they would actually appear when imported into Keyshot. For the raster cuts, I used ExtrudeCurve on my raster cuts' outlines, then did a BooleanDifference with copies of the resulting polysurface to create a slight recess in the main panels with inlaid ploysurfaces that I could later apply a material to.


For the material assignments, I used an MDF material that I found as my plan with my physical product is to not paint it but only apply a lacquer. My initial plan was to paint it black, but it would make the vectors difficult, if not impossible to see. It would have to be traced with a fine, light colored pen of some sort which would be difficult for the channel three panel and somewhat defeats the purpose of having vector engravings in the first place. My environment was simple, it was a desk in a loft HDRI that I found as that would most definitely be where I would put this lamp. For the "lightbulb," I applied a point light to a sphere that I created inside the lamp.


Travis Briney: Week 10 Makercase Lamp

Travis Briney: Week 9 Makercase Lamp


Concept: My references for my lamp design originated from organisms, mainly the desert to go with the idea of a bright sun shining down on them. I also thought the light colored wood would be fitting with the colors found in a desert. The only design I got from another source was the bird design, which I just got from a random picture of a bird.


Techniques: To start off, I dragged my reference image into Rhino and used the Circle command to make the inner cut template. I would then use the Curve command to trace the outlines of my designs. While doing so, I would snap the start of the curves to the circle so I could Split the circle later on and Join my curves with the original circle. I would then Mirror my design for one side along a line to eventually make 4 identical sides. Since my designs were 2 dimensional, I then used the ExtrudeCrv command to extrude my designs out to .25 inches exactly to fit the model. I would then just gumball rotate all of the sides to their correct position in 3 dimensions and use the Move command to snap them together. I also used the Hatch command to make the engravings for the star in my designs.


Materials: I used a light colored oak plywood material to model my lamp. I then applied a piece of geometry inside my lamp and applied a general light material on it. I then set the background as an inside environment and used the right amount of panning and rotation to get the best result for the post-processing pictures.