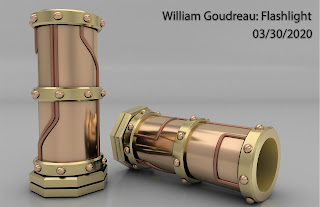
Concept:
My flashlight sleeve was inspired by the steampunk genre and the reference image below. I wanted to create a design that had a visual weight to it and could stand on its own.
Process:
For this project I spent a lot of time measuring out the led flashlight that my sleeve would encase before modeling. Once I had the measurements I needed, I modeled it using Rhino. I used Rhino's measurement tools to make sure the dimensions were correct, and made use of the curve, pipe, arrayPolar, and chanfer commands.
For this project I spent a lot of time measuring out the led flashlight that my sleeve would encase before modeling. Once I had the measurements I needed, I modeled it using Rhino. I used Rhino's measurement tools to make sure the dimensions were correct, and made use of the curve, pipe, arrayPolar, and chanfer commands.
Materials:
The materials I chose were based on my reference image and other steampunk style media. I chose bronze for the main body and rivitos of the object. For the pipes I used copper and for the fittings I chose gold. These materials work well together and give the object a very metallic appearance, which gives it the visual weight I had hoped to achieve.
The materials I chose were based on my reference image and other steampunk style media. I chose bronze for the main body and rivitos of the object. For the pipes I used copper and for the fittings I chose gold. These materials work well together and give the object a very metallic appearance, which gives it the visual weight I had hoped to achieve.
3D Print:
I printed my flashlight sleeve on an FDM printer using black PLA, since that is what I had available. I decided to print the object split down the center in two halves, in order to save material. The gold bands seen above overhang at 90 degrees. If I had printed it vertically It would have doubled the print time and material usage in support for those overhangs. Instead I was able to print it without support by splitting it, and gluing it together at the end. Going forward I plan to paint the object to look like the renders above.


No comments:
Post a Comment