Monday, September 14, 2020

Donte Castillo: Week 4 Surface Population


Concept: My concept for this project was mostly to come up with something interesting yet limited. I wanted to explore what I could figure out through a mix of tutorials and experimentation. I had different ideas originally going from a stylized bird, a paper weight, or a pencil holder. I found these ideas hard to create with what I understood. Over the course of experimenting I reached the point where my concept settled on created a large toy top, capable of being spun using the palms of ones hands. It would also be reasonable since the population added onto the top would increase the bulkiness of the top.


Techniques: Over the course of this project I learned how to identify when a model is a nurbs surface due to many trial and errors, where I would mistakingly make a polysurface. I practiced using the different tools such as the line tool, curve tool, curve network, lofting, boolean combine, and revolve tool. I'm not entirely sure how I ended up with a polysurface with some but I learned that I could reliably create a valid surface for grasshopper by using the curve tool, then lofting the the different segments into a surface, merging the separate surfaces together, and lastly populating them in grasshopper. I had gotten stuck quite a few times and had to refer back to the tutorials but after figuring out how to navigate the interface better and modeling the top to an acceptable degree the rest I picked up a bit quicker. Besides my process for constructing the top, I used the same process to create a population to use in grasshopper. This was because after trying a torus, some balloon like shapes, and having some failed models. I then decided the top would be both more aesthetically appealing an functional if I created a flattened quadrilateral, which I learned could be constructed through my process of lofting and merging curves into the shape. After I applied the material to the baked population, I checked for naked lines, double checked that my top was in centimeters, and began arranging the captures for the blog.


Material: The idea of making the top glass was an appealing thought simply because I thought it would look nice. It would likely also spin really well, but it would also probably be a safety risk since my idea for the top wasn't as mere decoration. I wanted it to be a toy and while glass can be hardened to a great degree, a very hard toy could be just as dangerous as a fragile one. So I decided the material should be plastic, which has a history of being used for toys due to its cheap material and sturdy build. Plastic is also light which would make the top easy to carry and spin, allowing the dim reflections and colors to blur together.


Revisions: For my blog revisions I went back and made a ghosted image shot which I had forgotten before. I also added my name and year to all my images and rescaled them to 2550 x 1650 pixels.

Rafael Villafane Week 4: Surface Population


Concept:

    Seeing as this was my first true test using Rhino as a modeling software coming from some moderate experience in Maya I wanted to put what I had learned in the concepts of Maya and put that into Rhino by recreating a flying saucer model in Rhino since that was my first model I ever did in Maya.


So to create my saucer I Modeled a sphere and disc together but upon later analysis I discovered that I couldn't make both the disc and the sphere together as one object and even looking it up was a little tough to do at least in such a way I could understand it so then I remembered I could model in Maya and have it imported onto Rhino. On doing so I was able to make it all one object and then add the surface population on top as a separate layer.


Render: 


Definitely I can say that although learning Rhino was very difficult and still in the future once I learn more it will be even more difficult I'm positive from the results of my render that my skills will improve overtime, my models will become more complex, and I'll have a better understanding of the software.


 Monday September 14, 2020


Sam Nguyen Surface Population Concept


Concept: I love photography. So I googled an outline of a basic camera. I wanted to create something that would portray photographers as great human beings. We always seem to strive and rise up. We help each other out mentally and with finances. We can connect with each other no matter that angle or perspective we give off. We can connect even if we have different backgrounds, ethnicity, and cultures. I kept this concept as simple as I could using the same designs and shapes. I liked how the root surface was like a rough draft and acted like a "case" for the camera. 


Technique: I used a picture of a basic camera. I outlined the camera with many points. Instead of extruding the points, I duplicated the points. After that, I used the loft command and it gave me a hollowed box. From here, I thought it would be a good idea to place the box out and do the previous steps again, but only this time, I added the lens from the camera. I extruded the lens out. From there, I cloned the cameras and stacked them. I also rotated them, lined them up, but also moved them around so that they weren't lined up straight. 


Materials: I made cubes and extrusions from the camera picture. I changed the color of the cameras by 
changing the object properties. If I had spent more time on this, I would have added other textures/gradients to make my compositions more interesting. 


Rhino was really frustrating to use. My workflow felt very pressured with so many concepts to understand in order to get what you want. Although this composition was not very complex, I should have an easier time for the next project. 


Sunday, September 13, 2020

Thuan Ha: Week 4 Surface Population


Concept


    As a 3D Modeler, I have always been fascinated by complex hard-surface model in film. As a result, I wanted to do something that resemble those hard-surface model I loved. Originally, I have no idea what to create in Rhino since I'm not very familiar with the interface as I've been working in Maya for years. As I was talking to my friend Kenny, he sent an image of a helix shape object wondering how I would create it. I then went and create it inside Rhino, and which I decide to test it with just a cube surface population and see how it would look. After a while of staring at it, the shape reminded me of Shockwave's Driller in Transformer: Dark of the Moon, a worm-like robotic organism. Even though the overall shape resemble an organic organism, it's composition and armor are made of very intricate hard-surface details, so I feel like this can be a good start for my project. 

Technique

    To start off, I create a helix curve with three or four rings. Since the tool create a uniform helix, I have to use the Taper tool, which I have no idea how to use, and somehow get it looking the way I wanted with a taper end. Afterward, I add in a simple circle curve at one end, and proceed to use Rail Sweep to create the basic helix shape with thickness. After finishing the base surface, I began to plan how to approach creating the armor exterior of the concept, and began to experimenting with different cube and cyclinder boolean union together. After a few tries, I got to the result I looking for creating the basic surface population object made of mainly box and a five-sides pyramid. Even though it is hard-surface, I don't want everything to be perfect ninety degree angle because that's too unrealistic, so I chamfer up some edges. The pyramid is meant to be sort of the spikes to make the shape seem more threatening. Finally, I populate the shape on the surface using Grasshopper, and experimenting with different U and V values. In this case, I am aware that my U value will be very high to compensate for the long shapes of the surface, I didn't want to have too much stretching.

Materials


    Since I do not have quick access to Keyshot, I decided to do basic materials available inside Rhino. At first I try having a metal shader on, since I assume the outside armor is most likely made of some kind of metal. The metal shader does not work out in the end, since the reflection is just too much, so I switched to a paint shader instead. My reasoning was that even though the the material is metal, it is likely that it's not raw metal, therefore it would have a coating of paints or some sort on the outside that would hide some of its metallic properties. Beside, the paint shader gave me a perfect mix of reflection while preserving the details which I couldn't with the metallic shader. For the color, I went with a slightly maroon color that is not very saturate since red represent danger which can be fitting with the concept.

    All in all, this was a fun project to start off my learning experience using Rhino, and that the way things work in Rhino is drastically different than that of Maya, and I'll just have to get used to it. 

Hope Sherman: Week 4 Surface Population


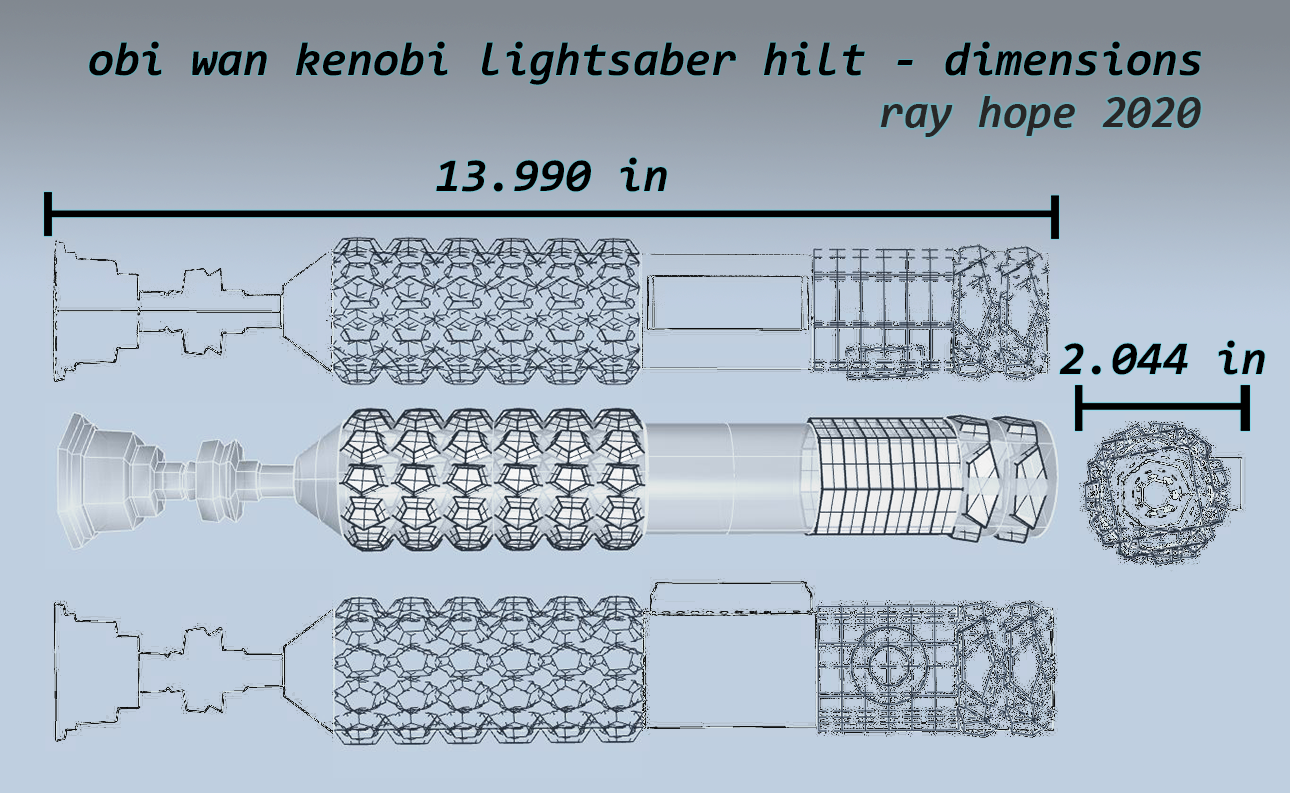
I wanted to make a lightsaber. I originally was going to make one of my Jedi Character's sabers but felt I needed to start off with one that people would recognize. In my research, I realized that Obi-wan's saber actually retracts when he presses the switch as seen here:

However, that sort of function I felt would work best later, once I get a better grip of Rhino. 


With the dimensions, I wanted to make it be able to be held if it was printed. I used Maya to sculpt the top part of the saber and the switch. I did use the create CV curve tool to outline the top part of the hilt, then the revolve tool to create the full 3D piece. I then went into Rhino to build the rest of the blade. I used decimal values to get the exact sizes of population objects once applied because solid numbers either inverted the shapes or made them way too big. 


I had to render using Rhino because I could not access KeyShot, however I am still pleased with how the finished look is. I used a gold metal texture on the top part of the hilt, while the black pieces of the hilt were a black paint texture. The switch is actually made with the diamond texture because I wanted it to stand out against the metal of the hilt behind it. I also used a silver metal texture on the bottom of the hilt.

EDIT 9/17/2020


I edited the main header to include the population object that I used while also editing the overall aesthetic of the piece.


I edited the second photo to have darker lines for the 2D outline as well as include my name and year on the piece. 


I edited the third image to include the title of the work and my name. I also added a slight glow to the lightsaber blade. 

Also, here is a photo of the exact picture I referenced while making this piece. It's a replica saber on amazon.


Roma Vipparthy: Project 1 Surface Population


 Concept:

For this project I didn’t really have a solid concept that I took inspiration from. I wanted to be as creative as possible when it came to my structure idea. I was basically playing around with rhino and created a shape that looks like lips and I thought it would look interesting as a population object. From there I started to create my actual root surface. I decided to create a shape that had different sides and dimensions, kind of resembling a face or head, sticking to the theme of lips/ facial features. 


Process:

I used Rhino to get the shape of my geometric population object first. Then I focused on getting a root surface to populate. I created the population object by using a torus shape and manipulating the control points. I also created the root surface by manipulating the control points on a sphere. I then used Grasshopper to combine the root surface and population object. I also used rhino to create an orthographic image to showcase the dimensions of the object. After this, I added colors to different sections of my structure. I tried to make an ombre effect with the color pink. Next I combined the images on photoshop and proceeded to use KeyShot to add material and more dimension into the structure.


Materials:

Because my population object resembled lips, I chose to keep my material as a plastic. This allowed my structure to look smooth and shiny when it was rendered. I then played around with the lighting effects and dimension of the structure to make it pop a bit more. I also used the background effects in KeyShot to make the structures shadows appear.


Jackson Lanphere week 4 surface population

Concept:

I set out to create this project, with no clear goal in mind. I wanted to create a sporadic, and spontaneous object, by manipulating basic shapes in rhino. I also used this project in an attempt to teach myself more of the ins and outs of rhino, without turning to a guide every five seconds when something unexpected would inevitably occur. In short, I started with the goal to learn through trial and error, and I feel I have become a bit more comfortable with the program through this endeavor.

Process:


The process for creating this design was simple, but was met with the challenge of learning rhino. I started by creating a truncated pyramid with seven edges on it's bases, a shape that I thought would be simple, but later learned that this would not be the case. From there I used the transform tools to manipulate the shape until I felt happy with it. I then exploded the object, and deleted the top and bottom base as I felt they were getting in the way. From there I built a simple population object from the ground up by extruding a square and then offsetting the surface by a value of one. I followed the same steps with a series of "s" shaped curves that I would later scrap as it was too messy of a design to understand once they were used as population objects.

 Next I loaded up Grasshopper and followed a tutorial I had used during the second week to learn surface population. This gave me some issues, as the tutorial is only for a single surface with a single population object. Once I realized this, I made the best of what I had, by creating four separate population codes, linked to four separate objects, that all apply to one surface. Here's a screenshot from grasshopper.


I would then bake the final morph of the four population objects, and clear the values for the surface and select a new one, until I had created the entire object. Clearly this is not the most efficient way of creating a populated surface, so I simplified this back to one object and one surface, and scrapped the "s" shaped curves, opting for a more is less approach the second time, with my final object.


Rendering and Materials:

Once I had a completed populated object, I felt that this design resembled a jungle gym with the square shape I used for the population object. I then assigned different colored metallic surfaces to each of the sides of my object. The result however, was less than satisfactory, with the colors clipping together in a strange way. I then switched all the materials to plaster, and the clipping issue was gone. I'm fairly certain this is an issue with my computer and not rhino, as I don't have the best computer as far as graphics are concerned. 


 Overall, I am happy with how much I learned through this project and am eager to learn more on the next.