Concept:
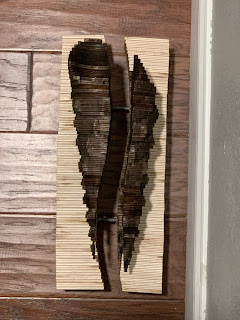
When thinking of the concept for this project, I thought about what would look interesting but also provide a challenge for me. After some initial ideas, I decided that I wanted to create a seashell. Seashells are very fascinating to me and have always been in my life from a young age. My family and I would always visit the beach in Galveston when I was younger and seashells always bring back those memories. I wanted to add more to this project than just a seashell and I wanted to use the memories I have from when I was younger. The seashells imprint on the base of the project is meaningful in how our fond memories can imprint onto us. I also wanted to add a stylistic element to the project by adding the "wave" when looking from the top down onto this project.
Technique:
To start modeling my design, I used AutoDesk Maya to create a polygon model to work from. I imported my orthographic drawings into the image planes to create a visual reference when modeling. I used a Cylinder to start out and added edge loops with the Insert Edge Loop tool in order to create some divets like a real seashell. Also, I used the Multi-Cut tool to create a spiral from the tip of the shell to the opening of the shell. Then added holding edges around the spiral and scaled the spiral smaller to make the divet. Next, I began to sculpt the opening of the shell by moving certain edge loops and using the scaling tool to create the desired shape. Once the basic part of my shell was modeled I started to add details and fixed any weird edges. By selecting various faces on the model, I was able to extrude them and create small spikes. Finally, I smoothed my model with a Mesh>Smooth and I was ready to export my model as a .OBJ and import it into Rhino 6.
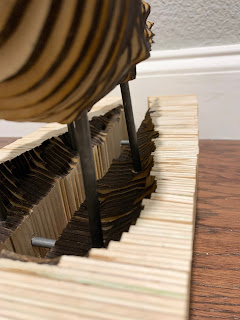
When importing into Rhino 6, checking that my units were set to inches was very important. I began importing and scaled my model to the desired length. Then, converted the polygon model into NURBS. Since I wanted to create an inverse image of my seashell in the base of my design, I created a solid rectangle and used the Boolean Subtract tool to create an imprint. In my desired concept I also wanted to split the model in half and add a curve to resemble a wave. I used the Plane command to create a planar surface and then added a bend to both sides to create a small S curve. To split both models, I used the Boolean Split command and separated the models by an inch. After creating the imprint and splitting both models, they were ready for serial slicing, I used the Contour command to slice both the seashell and the inverse base on the same plane. Before moving each curve to the layout I needed to use the ExtrudeCrv command to create a realistic serial sliced model. Then, I moved each curve into my 24x48 inch reference area and numbered them for later identification. My laser cutting layout was now ready for me to take it and my materials into the Machine Shop to get cut.
Materials:
When rendering in KeyShot, I chose a wood texture because I wanted the outside of the project to still resemble wood. I also added a metal material to the rods I inserted in Rhino 6. When adding lighting, I added a light that would give the project depth when rendering and wouldn't overexpose parts of the project. The backgrounds I chose were a simple white and a kitchen-type background.


No comments:
Post a Comment