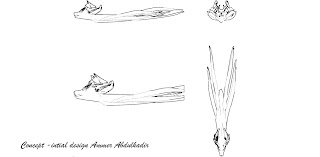
Concept
For my initial creature design, I
wanted to try and combine various animals. The animals that I decided to
combine were a sun bear, an axolotl, and a flamingo. Each had different characteristics
taken from them, such as the bear’s body, the flamingo’s neck, and the tail and
whiskers of the axolotl. I wanted to combine these animals as I mainly wanted
to create a lizard mammal hybrid. The main changes that were made while
creating the concept were if more bird features should be added, such as a beak
and wings. I ultimately decided against it as I did not want to make the design
too cluttered or confusing. For the color scheme and texture, I wanted to stick
with the mammal features of fur, attempting to simulate the texture with the
renders. I also decided to make the color scheme red as I wanted the creature
to stand out and seem less aquatic.
Techniques
I
started on the head of the creature with a quad ball that was created by using
the Smooth function on a cube twice. Next, I pulled on individual
vertices to create a slightly squished head. Then, I created the eye sockets by
using Extrude on the socket faces, pushing them inwards. I also extruded the front
mouth faces to create the mouth fold, adjusting the vertices as needed. Once
the head’s base was complete, I started work on the neck. Using a cylinder and
a NURBS curve, I positioned the curve’s points to create the arch of the
neck. I then positioned the bottom faces of the cylinder to the top of the
curve, extruding them and adding sections to create a more seamless neck. Once
the neck was complete, I created a new quad ball from a cube to start the body.
I stretched the ball and pulled the vertices as needed to create an oval-like
shape that would be tall enough to hold the legs and tail. With the body set, I
started creating the legs. Using a cylinder, I added edge loops with the Insert
Edge Loop tool and pulled the loops to create the bends of the legs. The feet
were made by starting with a cube that I added subdivisions to through the
input settings in the Channel Box. I duplicated one of the legs and applied the
second leg to the back of the body to prepare to attach the body together. To
make attaching easier, I first deleted half of the model, leaving only the left
side to work with. Next, I deleted faces that would be used to attach the head
to the neck. I made sure to have the same number of edges on each section to
then use the Bridge tool. With it, I was able to create additional faces
that connected the head and neck. To ensure the connection was smooth, I used
the Smooth Preview feature to see the connection. I moved vertices and
spaced out the edge loops to avoid lumps. This same process was used to attach
the two legs. However, extra edge loops were added to avoid excessive pulling.
Once the attachments were complete, I returned to the head. Using a cylinder
and NURBS curve again, I created the antenna that would hang from the sides of
the face. The attachment process was the same as the rest of the body. Some of
the edge loops of the head had to be changed as the antennas were so small that
the head would be lumpy with so many edge loops placed together. Once the antennas
were attached, I set the center pivot to the center of the model when whole. Any
vertices that were unaligned were adjusted. To be sure of having few problems occurring,
I froze the transformations and deleted the model’s history. Next, I duplicated
and flipped the model’s half and connected it by using the Combine tool
on the halves of the model and the Merge tool on the vertices. With the
main body complete, I extruded some of the back faces with a NURBS curve to
create the shape of the tail. The final cleanup of the model was done with
freeze transformations, delete history, and mesh cleanup of nonmanifold
geometry.


Materials
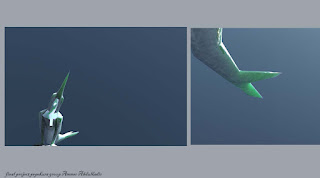
The
main colors and textures were made by using Substance Painter. Within keyshot,
I used a default hard plastic material to apply my own texture maps. Next, I changed
the type to generic, making the roughness 0.385 and the specularity 0.302. The texture
maps were applied as color and bump maps, each constraining to the model by
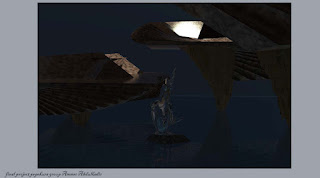
following the UVs. For the basic renders, I used the product lighting preset and
a grey lighting setup. For the environment render, I used an art gallery as the
backdrop as the sculpture would be displayed in a proper setting. If my design
was chosen, I would have liked to achieve the fur texture with the use of paper
mache and clay. The base color would be spray-painted on while the patches of
darker areas would be painted on afterward. The eyes would have been painted with
metallic paint so that they would be reflective and stand out.
Group Design Choice
Of my group, the design that was chosen of the three was
Paris’ merman design. We decided to name the sculpture The Merman of Trinity
River. The reason that we decided to choose the design was that it seemed to
be the most flexible for post-processing purposes as to what designs, colors,
and textures could be created. The design also lends itself to having a more
fun tone that played upon the expectations of the ideal image of a mermaid. We
were also able to tell a story through the sculpture the most directly with
this model in comparison to the other options.
Group and Individual Roles and Expectations
For work to be distributed as evenly as possible and to work
around any time constraints or transportation issues, Ammer was made
responsible for preparing the model for pepakura and the laser cutting within
Rhino. As the model belonged to Paris, he and Ammer cleaned up and simplified
the model to make the pepakura file preparation easier. Once the file was
prepped, I transitioned the file to Inkscape as SVG formats to comply with the
laser cutter’s format. In addition, I was the one who input the file and ran
the laser cutter while both Ammer and Paris checked the pieces and removed them
from the cardboard. Between the three of us, we folded the pieces and made sure
the pieces were accounted for. With the laser cutting complete, Paris and I
assembled and applied post-processing to the model and the model’s base.
Process and Contributions to Group Work
The model was first cleaned up and made to have as few faces
as possible, done by Ammer and Paris. Once a good footing was found with the
model, Ammer and Paris collaborated on making the pepakura file have as many
large pieces as possible to make assembly easier. When a version of the file
was complete, I would check the file and check for any pieces that seemed to
make little sense for physical construction. Once complete, Ammer made the Rhino
file that contained the pepakura file. With the Rhino file, I made the perforations
needed for the cuts and converted the Rhino into “sheets” of SVGs for the laser
cutter.
Once file preparation was completed, we met together at the
maker space to cut the pieces out. I ran the machine and monitored the cuts, giving
Ammer and Paris the cut sheets once they were complete to check for any pieces
that were cut incorrectly or were unusable. Once the laser cutting was
complete, the three of us folded the pieces and did a final inventory check on
the pieces.
With the pieces completed, Paris and I assembled the model
with the use of masking tape and loctite. As some of the pieces ended up
tugging on each other, the loctite would occasionally snap off, requiring tape to be
the main method of assembly. Another issue that was encountered was that due to
the twisted pose of the model, certain pieces were not able to attach as seamlessly.
This was mainly an issue for one of the arms as it was partially within the chest.
Despite minor issues with assembly, the model was able to stand on its own as
it has three points of contact with the ground: the two arms and a portion of
the tail.
The direction for the post-processing was decided to try to
have a gradient look between the tail and body, accomplished through spray paint.
Illustrations were added to the tail to act as ‘tattoos’ of what happened for our
creature to look the way that he does. To add to the macabre appearance of the
merman, we decided to use the contours of the eye socket to add multiple eyes
to the creature. In addition, clay coral, barnacles, and shells were added to
the body alongside seaweed, with inspiration being taken from fish and whales
who are covered in a variety of marine life.
Overall, the model and the assembly were able to be completed
in a timely manner. If there would be any changes that could be made, I would
have liked to have added a layer of paper mache to smooth out the sculpture’s
surface. This was originally taken into consideration but was ultimately decided
against in order to have time to complete the sculpture and whether the
cardboard would be able to handle being soggy and hold shape. Clay could have
been used as an alternative, but its fragility and long drying times also made
it a poor choice for full-body application.