Showing posts with label mouse. Show all posts

Monday, February 6, 2017

Anisha Chaudhary: Week 4 Mouse


Concept:
I got inspiration for the shape of my mouse from a Logitech wireless mouse. The head of that mouse was a rounded square shape that turned into an ellipse at the back. I want the user to have the option of using a wheel scroll or a touch pad to move their cursor. That is why I made a large gap in between the bottom of the mouse and the top.

Modeling:
I started by making a curve to get the general shape of the bird's eye view of the mouse. I then mirrored it, and used an arc to make the middle curve and manipulated it to the shape I wanted. I duplicated the base curve to make the very bottom part of the mouse, and extruded and patched it. I used Boolean Union to combine the objects. I then used a pipe and the command Boolean 2 Objects to make the indents on the top part of the mouse. I used a torus to make the scroll wheel, and an extruded curve to make the touch pad. The gap was made by a wide scaled paraboloid.

I remade this model twice because I was having a lot of trouble with combining the base with the top part of the mouse. It may have been because the bottom part was not a closed polysurface.

Materials:
I used Hard Red Shiny plastic for my mouse wheel. I used Matte Grey for the mouse's body. I used tire for the touch pad and the wire.

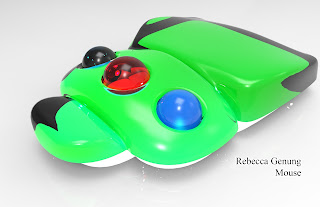
Rebecca Genung: Mouse


I wanted to make a jewel beetle (of no particular species), but when I got to the legs and antennae I decided that I didn't like them. I ended up with a simplified version of my original idea.

For the technique, I basically followed the tutorial but did things differently to fit my beetle idea. Turns out that was a bad idea, so I had to go back and redo a lot of parts to make everything work in the end.

For materials, I want to make something that looked like a literal jewel beetle. I used colors that are common in jewel beetles, such as their trademark bright green casing. The bottom was originally black but I found that any color made the rest of the mouse too dark, so I switched it to a light that would illuminate the whole top part. Coincidentally, this makes the top view resemble the insect even more.

Maizie Desmarais: Week 4 Mouse


My mouse was based off a typical gaming mouse. I wanted something a little more complex to work with and added all the detail around to make it somewhat unique. If there is one thing I would go back and fix, I would add a USB connector for the mouse.

Modeling techniques used were the curve tool, mirroring, surface loft, sweep rail 2, piping, and Boolean difference. Creating the curve was a little harder than expected and wasn't as smooth as I wanted it to be, but gave me more experience with how to use curves more efficiently.

Materials assigned were pretty simplistic. I didn't wanted it to be over-the-top and stand out so I stuck with a plastic base and black rubber for the details. If I made the USB I would have stuck with a hard metal and a black plastic end.

Sunday, February 5, 2017

David Rake - Mouse - Week 4


Concept:
For my mouse instead of doing smoothed pieces I tried a layered look. I had the two buttons break off from the rest of the layers and made into two separate pieces. After finishing the core features the gap at the front felt empty so a mouse-wheel type object was added with a cylinder through the middle instead of built onto a platform to add a suspended look.


Technique:
The bottom layer was drawn with curves. Each following layer was duplicated from the last and scaled down then manually edited with the control points to add shape from layer to layer. Such as the gap at the front had a short distance from layer to layer while the back had a larger gap. The core layers (all except the buttons) were union-ed then filleted with a heavy fillet at the bottom to be definitively smooth.


Materials:
Originally I went for a wood texture but it just wasn't looking as good as I hoped. I settled for a plastic material that most real world mouses share as well.


Brandon Wehenkel: Mouse


 Ghosted Black


Colored


ConceptLogitec Trackball mouse.  The one I was using while creating it.  I've grown accustomed to a trackball mouse and feel that any other mouse is weird.  But I didn't want to use the tutorial because it wasn't precisely the shape I was looking for.  The real Logitech mouse is a lot more curved.


Keyshot 1


Modeling Techniques:
I used loft to make all 30 curves. Then I painstakingly spent 19 hours straight moving individual control points to make the shape it is in.  After the first 5 hours, I felt like I had made a huge mistake to design the mouse this way.  And I spent the rest of the time struggling with its wobbliness,  I know there has to be a better way to do it.  So it might be lumpy due to this fact.  I used my lofted curves to make the buttons by using projected curves and extrudeSrf.  I just created a sphere for the trackball.
Also because I had such a hard time making this design, I couldn't figure out how to do the buttons right.  I didn't really like how they looked merged into the object, but I did the two main buttons just to signify it were a mouse and didn't put the scroll wheel or the mouse button 3 and 4.  I had a hard time getting the curves to not merge into each other around the sphere. Due to the loft curves around the sphere not cooperating I wasn't able to make a fillet edge on the bottom of the mouse..  I initially had a curve that was meant to be the fillet, but I couldn't get it to work with the inset trackball.  I had already spent 19 hours. I probably would have needed to spend another 10 more hours just getting the fillet edge.
The sphere is not protruding through the object.  It is "hovering" inside the holder.  Hovering because thats the closest I could manage to simulating something clicking/fitting exactly inside its the spot.


Sphere Spot Detail


Keyshot 2


Materials:
Hard Black Plastic. Hard Black Plastic Shiney. Clear Shiney Blue Plastic, then changed the Diffuse Transmission: since I wanted to make the sphere clear it would have used the same color of the plastic underneath; that wasn't something I was going for.


Keyshot 3


Monday, February 29, 2016

Travis Fowler: Mouse

Concept:

I had eggs over easy for breakfast before heading into the lab. Sometimes inspiration comes from a strange place, I don't even care for eggs that much. The idea popped into my head after I realized how much the blank rendered material looks like egg-shell white and the original form of the mouse was very egg-shaped. I stuck with the theme, making the buttons flakes of pepper and the scroll-wheel a cross-section of green onion.

Techniques:

The loft command on my first take seemed a bit lazy and unpredictable, I quickly began to think of how to complete the assigned tutorial using the sweep commands but I figured that wasn't in the spirit of the tutorial. I made a good decision in refining and adjusting my curves and retrying the loft command. The loft command makes very elegant and low-density surfaces that appear to be very good for adding detail to. Loft is a command that in my own free-time has only appeared in the beginning of my work flow for a piece.

Materials:

The materials I chose were based off of the egg design and therefore weren't too hard to find. I used a glossy material for both the egg yolk and egg white, while using soft plastics for the buttons and wheel. I think the preset range of materials that Keyshot provides is absolutely fantastic. I never knew there were so many different types of plastics and the sheer number provides a hint as to their importance in modeling/design for manufactured products.

Saturday, February 20, 2016

Tara Intyrath: Week 3 - Mouse

Concept: For this project I wanted to make a mouse that I had never really seen before but also usable. Then I came across an image of a hollow-like mouse and wanted to make something similar to it. I decided to make the front "empty" while having the back of the mouse heavy as all what makes a mouse move and work should reside inside it.
Technique: I had a lot more trouble than I thought I would making this. It started out smoothly as I molded what shape I wanted the mouse to be using the technique in the video tutorials which used a lot of the curve tools and finally using a network surface and then a sweep2, closing it off with a cap. After that I had difficulty keeping the whole thing a closed polysurface. I made some mistakes as I was splitting the objects and ended turning it into several open polysurfaces. I fixed this with a lot of "create solid" and creating curves, extruding them, and them capping them off to make a solid again. I also experimented with the tools bend and taper for the mouse clickers. Other tools I used for some minor details were boolean difference, fillet, and boolean join. 
Materials: I really like modern designs which is why I used a metal material for the "support" or base of the mouse. It also helps to think that it would be able to support the weight of whoever is using it while they click away. The scroller is a rubber material as most mouse scrollers are and for the "body" of the mouse I made it a wood finish to contrast with the metal support. The LR-clickers are from a black plastic.

Tuesday, February 9, 2016

Thomas Perugini: Week 3 Mouse

This mouse drew elements from iron kite shields of medieval times, as well as flint arrowheads. The result is the moniker "Arrowshield." I was going for a more angular design, while retaining some roundness for comfort.


To get the general shape, I used 5 curves(roughly the shape of half a kite shield) and lofted them together. After that was done, I copied the base shape and scaled it down, and connected that for a tapered base. The left and right mouse buttons are extruded curves that were chamfered on the front two faces. The middle mouse wheel is a filleted cylinder with another cylinder around it for a rubber grip. The wire is just a tube and a cylinder.


The main body of the mouse is a rough, black plastic. The right and left mouse buttons are a more reflective hard red plastic, and the middle wheel and base of the cord are rough orange plastic. The cable and the wheel grip are a black rubber.


Monday, February 8, 2016

Megan Heard: Week 3 Mouse


Concept: I wanted my mouse to be smooth and I really liked the mice that looked like animals, and I realized that a penguin face is built similarly to mouse buttons.


Technique: I used loft to create the mouse top then used project, extrude, and Boolean difference to create the buttons and scroll wheel. The bottom part was created using offset and Sweep2, then joining the surfaces. The edges off the button are filleted, the eyes are not to convey them being one piece.


Materials: I chose colorful, shiny plastic for the body and buttons to give a childish feel and chose a rubber plastic for the scroll wheel to give it more grip.


Christopher Rickett: Week 3 - Mouse


Concept: My concept was a mouse that was rather simple yet sleek.  I wanted to be something that could easily be used by anyone if it was real.  I added a cord coming out of the front just to help round out the whole look of it.


Technique: The main technique that I used was using the Split tool to cut out surface shapes and then Extrude Surfaces to create cut out pieces for the mouse buttons and the piece that is on the back.  I used the Fillet Edge tool to make smooth and rounded edges in places.  Another tool big tool that I used was the Sweep Rails command to create the main shell of the mouse.


Materials: I wanted to keep it simple, so the materials I used were just as simple.  For most of the pieces, I used a hard plastic, and the scroll wheel has a rubber material on it. As for color, I mentioned that it was a mouse that could be used by anyone, even kids; that is why I choose colors such as blues and orange. 


Charlotte Guzman-Russell Week 3: Mouse

  For this model, I based it off the mouse I use at home because I like the vents on the front it has that allows light to glow through. My mouse at home also has the "racing stripes" on it so I added those to the model as well. I also loosely based it off of the aesthetics in the Tron: Legacy movie.
Concept:
Modeling Techniques: I used the sweep 2 tool to make the mouse body and I used the boolean difference tool to make the vents and the hole for the scroll wheel to sit. I used the project tool to project the curves for the buttons onto the mouse and the fillet tool to smooth the edges.

Materials: Going along with the Tron theme, I used a shiny black plastic material for the mouse body and emissive light with a slight blue tinge for the racing stripes, vents, and buttons. I then used a matte plastic material for the scroll wheel.


Sunday, February 7, 2016

Alec McKay: Week 3 Mouse


Concept: I saw several mice that formed an arch with the main body of the mouse, rather than having the bottom flat. I wanted it to look sleek and modern. It’s also an even design that can be used in either the right or left hand.


Modeling Techniques: To create the arch shape, I created several curves and did sweeps between them. The texture on the wheel was created with several small tori in a polar array around the wheel. I trimmed parts of the tori off so they weren’t intersecting with the wheel and then used difference to cut the grooves out. Several parts of the mouse, including the split between the right and left buttons and the hole for the wheel were created with difference.


Materials: This mouse is built from plastic, as most of the mice I’ve seen are. The top plate on the mouse is shiny and red, for decorative purposes. The cord, wheel and the main structure of the mouse are a duller, more rubbery plastic, because they are areas that benefit from being softer or having more traction.