Showing posts with label ThomasPerugini. Show all posts

Sunday, May 1, 2016

Thomas Perugini: Pepakura

Pepakura first piqued my interest a few years ago, for its common use of prop making. Props have always been a fun thing for me to make at home, so I decided to try it with Pepakura. I decided to make a futuristic welding and cutting tool. Much of my inspiration came from the plasma cutter tool from Dead Space, as well as general industrial aesthetic.
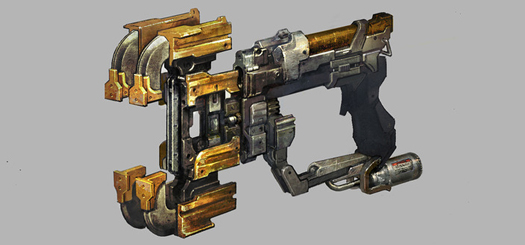


Most of the model was constructed from extruded straight curves. The pieces that go around the main body of the model were given a Boolean difference to hollow out the shape and holes. Then Pepakura was used to bring the unfolded shapes to the cutting board.


The shapes were cut from .25' cardboard, with rare earth magnets inserted in certain location between pieces so that they stick together and can move. I then got the idea to use cut pieces of empty water bottles for more accessories. All of the pieces were then painted with 2 to 3 layers of black Plasti-Dip, which is a latex paint coating. After that dried and set I took a grey acrylic paint and did heavy strokes on edges, and light strokes on surfaces for a worn texture and appearance.


Thomas Perugini: Waffle Structure

For a long time I was uninspired in what to do for this project. Then I came across some images of retro-futuristic ray guns. I believe this type of style is called "Gothic raygun." It is a bit of a 1940s-1950s prediction of what the technology of the future would look like.


 To create the model I drew a curve for the main body silhouette, and then extruded it around an axis. I then made a curve for the handle and trigger guard, and extruded it. The fin was also a curve that was extruded. The tip was a flat cone object with a sphere at the end. I then used the cut my ribs code to make the outlines for the laser cut.


 I used .25' cardboard for my final product, and I removed more extraneous pieces from the trigger guard and the handle to make it easier to hold. The main body was a little tight, but I got it all together in the end.


Thomas Perugini: Laser Engraving

The laser engraving is within the same theme as my 3D print model. It depicts a glass flask made of fragments. I wanted it to have a simplistic message and layout. "Survive" is what we do every day, and this can extend beyond physical to mental and moral survival. It is meant to be surrounded by embers.


To make the design, I projected a view of my bottle model, and added in more curves to create a fragmented appearance. I then added in type made out of curves, as well as small pentagons for the embers.


 I did not have many materials available to me, and I wanted to experiment. I then noticed the boxes of LEGOs on my shelf. They are made of ABS plastic, which is supposed to be a good material for the laser cutter, so I did a medium cut for the entire design. It is meant to be in front of a light source to illuminate it, but it did not turn out as visible as I would have liked. A deep cut may have been a better route. I can find a way to darken the plates outside the engravings as well.


Thomas Perugini: 3D Print

For my 3D print I was inspired by a game I play called Dark Souls. In the game, there is an item called the Estus Flask, which you drink out of to regain health. This is the image I based my model off of. This was the only image I could find of it and it is quite small and difficult to discern the details.


To model it, I drew a curve that served as a silhouette of the walls of the bottle. This curve was then projected around an axis at 360 degrees. 


 When I took my file to be printed, I originally intended to make it 6 inches tall. However, I made the walls much too thick and it would have used substantially more plastic, making the price about $60. I cut the scale in half, making it 3 inches tall instead. This brought the price to just over $11. The in-game object is meant to be made of dull green glass, and when filled it glows like fire.


Sunday, April 3, 2016

Thomas Perugini: Serial Slice

Concept: At first I wanted to do just a geometric shape, inspired by office buildings and abstract chess pieces. However, I found the design plain and uninteresting. To give the object a more intriguing design I twisted it, adding a more organic flow to an otherwise rigid subject.


Technique: I began with a rectangular prism. On each side, a series of holes were made, each narrower and deeper than the last. This created a closed stair case design. I then twisted the entire object to give the corkscrew design. The polysurface was then separated into curves and arranged onto the cyan work area.


Material: The keyshot rendering material chosen was black walnut wood. I needed to scale down the texture a bit, as well as darken the overlay to give it a less saturated appearance. The real piece is only cardboard so far.

Wednesday, March 2, 2016

Thomas Perugini: Week 4 Detergent Bottle

My main inspiration for the bottle design was that of hot rod cars. The curves and edges were heavily incorporated into the overall look, as well as the colors. The cap was loosely based off of a construction worker's hard hat.


For the main bottle shape, I did a 2 rail sweep between two curves. I then offset the curves to make a nice indent on the top and bottom. The handle was made by using a boolean subtraction from an extruded curve, and then filleting the edges to make it round. The ribbon was made by a 1 rail sweep of a circle. The rail was a curve projected onto the bottle model. The cap is a filleted cylinder with a few mirrors of a swept circle, and another cylinder at the bottom.


As with most other detergent bottles, mine is made of a hard, shiny plastic. The cap is a grey hard plastic, and the inner top of the bottle is a rough, clear plastic.


Monday, February 29, 2016

Thomas Perugini: Midterm Prosthetic Accessory

Concept: The idea behind this project is to emulate medieval leg and foot armor. While it draws from European armors of history, it remains within the proportions of the human leg, creating a more streamlined, and less bulky aesthetic. Inspiration mainly comes from sets of German Gothic knight armor. The name "Sabaton" is derived from the name of a knights foot armor, the sabatons.


Strategies: The general forms of the shin and foot were created with curve networks. The buckles are filleted curves that were extruded, and circles fixed on either side. The strap is two rectangles that were swept along a rail on the back of the boot. The purple plates on top of the base shape were made from larger versions of the leg/foot, but with many portions trimmed away. The bolts on the sides are spheres.


Materials: To keep with the lightweight and easily accessible material, much of the prosthetic is hard plastic. The belt is leather, and buckles are a rough brass metal.


Tuesday, February 9, 2016

Thomas Perugini: Week 3 Mouse

This mouse drew elements from iron kite shields of medieval times, as well as flint arrowheads. The result is the moniker "Arrowshield." I was going for a more angular design, while retaining some roundness for comfort.


To get the general shape, I used 5 curves(roughly the shape of half a kite shield) and lofted them together. After that was done, I copied the base shape and scaled it down, and connected that for a tapered base. The left and right mouse buttons are extruded curves that were chamfered on the front two faces. The middle mouse wheel is a filleted cylinder with another cylinder around it for a rubber grip. The wire is just a tube and a cylinder.


The main body of the mouse is a rough, black plastic. The right and left mouse buttons are a more reflective hard red plastic, and the middle wheel and base of the cord are rough orange plastic. The cable and the wheel grip are a black rubber.


Thomas Perugini: Week 3 Hammer

This is a stylized hammer with an adjustable weight to change applied force. The red piece is meant to be replaced with different sizes. I wanted to streamline the profile as much as possible to gain a simplistic and elegant design. I got some inspiration from heavy wrenches, as well as subtle Gothic ray gun influences.


The handle is an extruded curve that I drew, which was then filleted and given different shaped holes. Circular holes for the screws, and rows of rectangular curves on each side. The head was also an extruded curve, and given texture on one side similarly to the handle. A curve was extruded again for the nail puller, and a triangular hole was made to taper it. The rubber weight is a cylinder, but with multiple Tauruses subtracted from it.


The handle is made of a rough black plastic. The pin holding the weight and the screws are brushed aluminum, while the head is a roughly textured steel with high reflection. The weight is made of a rough plastic-y rubber. If this were a real hammer the weight would be metal, coated in the rubber.


Thursday, February 4, 2016

Thomas Perugini: Week 2 Flashlight

The flashlight takes heavy influence from medieval torches and braziers, which are cast iron frames that hold lit firewood and coals. Very archaic style.


The main handle of the flashlight is a hollowed out cylinder with a smaller cylinder plugging the back end of it, opposite the light. The light itself is a truncated cone, and the button a truncated prism with a hole. The metal strips are all one extruded shape, copied and reflected at 45 degree angles. The bolts on the strips are spheres. The back end is a series of hollow cylinders, spheres, and a Taurus. The outer handle was made by subtracting some of the surface of the main handle, and wrapping it in another hollow cylinder.


The lens is made of orange basic glass, while the handle is a less reflective and scaled down leather. The black is a metallic black paint with more roughness and less reflection to look like cast iron.