Monday, February 27, 2017

David Rake: Week 8 - Prosthetic


Concept:
As an avid Mechanical bike rider I aimed for a bike related prosthetic. From the original drawing to the actual model slight tweaks were made in favor of a more realistic design. Instead of trying to curve the gears around a leg shape they were laid flat so actual gears could be put in place and be kinetic as well. Another addition is at the bottom where the foot would normally be I put a typical clip design for clip in shoes on road bikes.


Technique:
Starting with the gears they were modeled with curves and the teeth were polar arrayed around the center and slightly modified for imperfections. The top gear has 16 teeth and the bottom gear has 12 teeth. The indents in the gears were subtracted later using booleanDifference along with the holes going through them. In regards to the chains they are made with curves as well. They contain of 2 circles and a small curvy hourglass shape with a larger version of the same shape just outside of it.
These hourglass shapes were alternated along the pattern to create the full chain link. The smaller gear is directly in the center of the larger gear and so the chain tapers off towards the bottom instead of going straight up and down which I found difficult to work with. After trying (unsuccessfully) polar arrays to wrap the chains around the gears I resorted to manually rotating the chain around, which was not near as hard as I thought it'd be.
 The 2 gears and chain were then duplicated and positioned around the origin. The Bottom gear was rotated inward to almost create a seal in between the sets of gears. A cylinder was added in the center with other cylinders matching the angle of the gears to ensure a flat looking cap. the gears were booleanUnion(ed) to the cylinders and the bottom piece was added on with more simple boolean cylinder cutouts in the bottom for clip in pedals.


Materials:
I used a darker metal (Anodized Black) for the inner cylinder and gears. The chain used a lighter metal to highlight it (Chrome polished). These two materials are ironic due to their real world counterparts where the chain would more likely be dark due to oil and more abusive wear than the gears. This reverse setup looked much better in this situation however. The other material scheme caused the inner pieces to be difficult to see in depth.

Maizie Desmarais: Week 8: Prosthetic


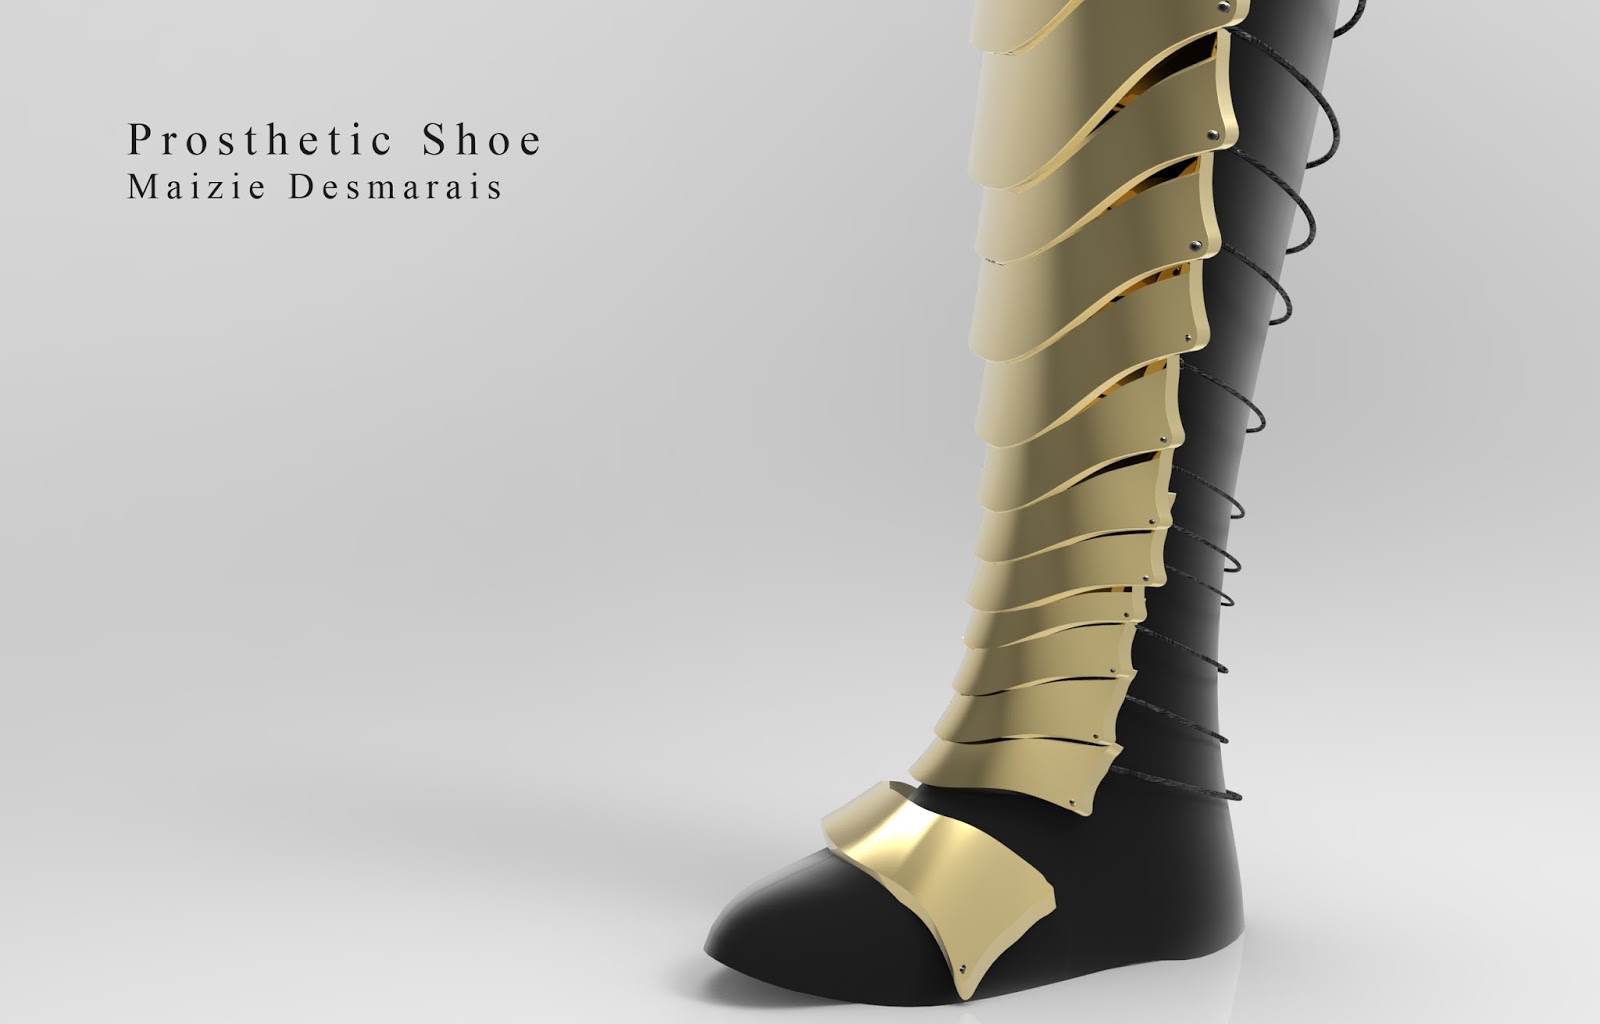
My prosthetic shoe was based off multiple video game character shoes, especially the Paladin. I wanted to have something more armor based and different from shoes we wear today. I also wanted the armor to be optional to wear, so there are strings in the back to hold it up against the boot for a unique design. 

To create the basic shape of the boot, I used multiple curves to get what I wanted in the front and on the side proportional. I then lofted with those curves and had to rebuild the geometry to get a simpler and smoother looking model. For the armor I also used curves of the shape I desired then mirror over to keep it as even as possible. After I had the final curve I duplicated it behind and used sweep rail 2 to connect and patch for each side. To keep the strings attached to the armor I created rings with a torus and used boolean difference to connect it inside the armor so the laces could loop around.

Armor is primarily metal-based so I used a gold material to render out as if it were metal. The boot is suppose to be comfortable with a softer look to it, so for that I used a cloth material. The laces were also cloth and the rings were a black metal that will stand out from the gold.

Rebecca Genung: Week 08 Prosthetic


For my concept I wanted to create a prosthetic leg that resembled that of a Theropod, specifically one that resembled a Dinosaur. I have always admired dinosaurs, specifically Theropods as they developed a larger, quicker, and less complex form of bipedal movement millions of years before man. The evolutionary significance of Theropoda is quite impressive, and that is without going into the detail of the individual species. I take great joy in the near constant discoveries we have made in recent years in regard to figuring out these amazing creatures who once ruled the world. The best part is that dinosaurs didn't die out entirely and their legacy goes on in the form of birds: the best fliers, in both maneuverability and energy use, to ever live on Earth. The overall form of athletic prosthetic tend to resemble Theropod anatomy to begin with. Hypothetically, this would be a cover for a proper blade prosthetic. 

When the entire thing is broken: fix everything.


For my technique, I redid everything: including the design. In my origanal, I tried to push my boundaries by attempting an organic form and I grossly overestimate my abilities. I apologize. This model is all done with previous techniques. I filleted what I could. The bases, orbs, and pole are modified shapes. Everything else was created from curves.


For material, I exclusively used metals. I used titanium for the inside base pieces and the center pole. The "padding" and blades are chrome. I originally had the whole piece silver-colored but I found it to be too gray-scale, so I changed the materials of the crests to blue zinc and the orbs to a blue smooth metal I manually made darker.

Randall Villegas Week 8 Prostehtic

Concept: For my concept, I knew I wanted something robotic but, I wasn't sure the exact direction. While looking through a few different ideas, I stumbled upon some Iron Giant pictures and thought it would be the perfect child's prosthetic. 


     In the film, the Iron Giant gets upset when threatened and turns his arm into a weapon, I decided to keep the transformation portion, but instead of it being a weapon it would just be a child's toy that lights up and makes sound on command. This is also an addition I wanted to make as I knew, from a modeling perspective, it would be easier as much of the prosthetic is composed of primitive/simple shapes                                                                                                                                                
                                         

     I had considered other things such as an Iron Man arm, but I really wanted something unique that would stand out in an understated way. I started with a simple sketch to layout the design and took it into Photoshop to get exact measurements for easy to reference orthographic views.


Modeling: I created a hexagon using the line tool, duplicated  twice for each edge of the body. I scaled these appropriately to my drawing, and then created vertical lines to denote the vertical elements. Using these as a foundation. I created a closed surface with the components. I duplicated the solid and scaled it to be slightly smaller and created a cylinder to use with boolean difference to hollow out the center. I created a truncated cone for the bottom of the body that use a similar process to hollow out and used boolean union to combine the pieces. For the center pipes, I simply created cylinders and hollowed them out where necessary. I the filleted the edges to give a smooth finish

     The hand cover and fingers were modeled in Maya. I used the create polygon tool to shape the hand cover, and extruded to fit my specifications. For the fingers, I modeled a full finger by creating a cylinder of about 12 subdivisions and adjusted vertices with soft select to get the desired shape. I selected a ring of faces around each of the joints and deleted them to create the separations. I closed the created holes by extruding each ring that was created and merging the new vertices to the center. I created some edgeloops to support the new caps and used the smooth tool to work out any kinks. I created a pipe for the knuckle covers, cut it in half by deleting out the bottom faces and appended the holes using the append polygon tool, I shaped them using soft select and the scale tool to fit around the finger sections. 
    
     After fitting and positioning the finger how I desired, I duplicated and made slight adjustments for the rest of the fingers. I did a similar process for the thumb, simply with one less joint. For the palm I created a box and added some topology to give me some sculpting room. I adjust the vertices using soft select to give the impression of a cushiony palm. After finishing, I double checked for supporting edgeloops and that all of my models smoothed correctly


Materials:  I used a shiny metal for the majority of the parts, a medium grey for the larger pieces and a white grey for the detail pieces. the palm is a matte light grey to create a synthetic fabric look, I didn't want it to be shiny like the other pieces because I wanted it to be similar to that of a human hand that could really grab and hold on to something.


Changes from original design: I made some adjustment while modeling that created some variance between the 3d model and drawing. For the hand, I made it much more organic looking, I wanted it to be able to grab and hold something like a human hand does. I also wanted to add some humanity to the piece, as it would be a prosthetic for an individual to wear. The fingers are inspired by the Iron Giant and my drawing, but really took their own form as I sculpted them out, really contrasting the rest of the model.


Michelle Ignacz: Week 08 Prosthetic

Arm Prosthetic Layers

Arm Prosthetic No Naked Edges

Arm Prosthetic Shot 01

Arm Prosthetic Shot 02

Arm Prosthetic Shot 03


So upon modeling my prosthetic, I wanted to keep the idea of usability as well as aesthetic appeal attached to the arm. I saw the idea that the prosthetic would be used by someone who had lost their lower half of their arm from the elbow down, allowing for attachment to their upper arm and their remaining stump to fit into the forearm prostheses. My original concept design was reminiscent of an Aztec and Roman design so I modeled off of that and just the overall flow of what would work and what would not as I modeled in Rhino.
Upon modeling in Rhino, I came into many difficulties, one of them modeling the main basis of the arm and the fingers. The fingers, I must honestly say, gave me the most problems throughout the whole designing and modeling process. Whether Trim, BooleanDifference, Loft, BooleanUnion, and etc was not working properly, I was having to take back alley routes to achieve my desired results. A lot of the time, I feel like it was just me finagling it along until Rhino said, "Yep, I'll do that now." So tiresome it was trying to fight it.. I used most of the process of copy the fingers after I achieved the first one to save myself time on trying to model another after the original. Although I will admit, I did do a bit of a molding technique from the original given model of the female arm to get the base of the body and adjusting everything from there. Everything else was created by lines and extruding the curves and using ArrayPolar to spin it around the top of the arm or around the wrist-let. I had to painstakingly create the laces by hand with a poly-line and rearranging it through the loops. Once finished, I was able to use Pipe and give the laces some thickness. After modeling all the shapes, it was only filleting some of the edges to get the final results. Once finished I decided upon going with a Roman aesthetic touch for material choices based off of the finished product.
For the materials I used red oak for the lower half of the arm, adjusting the texture map accordingly to give it a nice carved look. The upper half of the prosthetic I used a red leather and increased the roughness of the material to give it a nice used look. Trying to stick to the Roman look, I used a white ceramic for the nails to give it a nice manicure appearance. I used anodized brushed orange for the "feathers" and used steel ultra scratched for the bands around the arm, bracelet, and the middle rods. It may be a nice fancy prosthetic, but I feel like no matter what that it would get dinged one way or another. I applied gold 18k to the plating on the wood just because it helps bring attention to the lovely wood and distracts away from the fact of it being a "plain" wooden prosthetic. For the laces towards the top, I could not really think of any other material besides perforated leather material. I didn't see any reason to attach any pretty decoration to simple laces. The same with the ball joints in the hand. I applied glass cubes black for aesthetic appeal and to better see the joint balls. After finished I was finally greeted with a beautiful Roman female arm. It glimmers and shines, but still holds a type of dignified response behind it.


Original Sketch

Sunday, February 26, 2017

Jason Doze: Week 8 Prosthetic Cover

 Front


 Side


Back


Naked Edges/Ghosted


Exploded/Layers


 Shot 1


Shot 2


Concept-  My prosthetic leg cover was intended to have some organic curves that follow along the sides with some circular holes punched out.  I haven't seen a clear prosthetic yet, so I wanted to create a cover that had a thick acrylic look with some color accents to make it pop.  Instead of covering up the inner structure of the leg prosthesis, I wanted the last to open up the apparatus for all to see and do it in a interesting and dynamic way. 


Materials-  I used all plastics for the prosthetic to attain the look I was going for.  Clear, shiny and rough plastics of varying colors with one fully opaque hard white plastic to break up the transparency of the last.  I played around with some emissive light but decided to make the last look as real as possible to my vision.


Technique-  Although I started with reference sketches that I quickly deviated from after learning create uv curves, and flow along surface last week.  I tried dozens of different designs with flow along surface and ultimately sketched a set of curves connecting two stars.  I used mirror, trim, filet, boolean difference, cones, circles, stars, extrude, and create uv with flow along surface to obtain the image I rendered. 

Ashley D Goodenough: WIP "Lyretail" Prosthesis


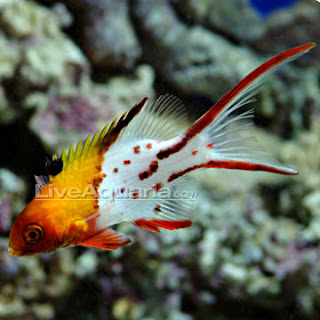
Concept: The Lyretail Prosthesis is a (BK) below-knee design for scuba diving. I’m working with a friend who is a dive master and fairly recent amputee to nail down the functional details of the design, but the concept and modeling have all been done by me. For instance, things I have consulted him on so far include: type of ankle joint and range of motion, height and adjustability of the pylon, the meeting point of the accessory with the socket, easy adjustability of the heel strap, and the openness of the flipper. The name “Lyretail” references a family of fish known for their bright coloring and slightly asymmetrical tails, and it’s also a fun play on words (given that a scuba fin is a fake tail of sorts). The overall shape of the fin mimics the fin of a lyretail hogfish, the materials imitate the coloration of a tang fish, and some of the surface details are inspired by the eagle ray.
Modeling: Keep in mind, this is still in progress and there will be more to come! A simplified modeling breakdown of the work so far:
- Control Point Curves drawn from three perspectives with my concept art as reference (PictureFrame command), then made     sure they intersected for later surfacing
- Interpolate Points Curves to create supporting cross sections in the flipper
- Rebuild all curves to simplify as much as possible without losing basic design concept
- Curvature Graph helped to ensure curve continuity
- Split the curves around the ankle, so I could build the leg and flipper separately. This was important, given that the flipper was going to be much more complex than the leg needed to be. 
- NetworkSrf to get my first surface! Rebuild some more. NEVER STOP REBUILDING.
- Sculpt the surface with RecordHistory on, and use my new set of curve manipulation tools that Professor Scott helped me set up. (MoveUVN, SelU, SelV, etc.)
- Zebra to check on my surface UVs and make sure it was smooth
- ExtractIsocurve to pull some new curves from my surface and get it even smoother
- Drew interpolate point curves from side view onto the leg and then Projected, and Trimmed the surfaces I didn’t want (trick: if you keep your old surfaces exactly where they are and hide them on another layer, you can use Untrim if you ever want your original surface back)
- OffsetSrf to make my shell a solid with a consistent, defined width
- A combo of BlendSrf and FilletEdge to make the edges of my solid fluid
- ShowEdges constantly to check on surface nudity (no naked edges!)
- DupEdge to get the ends of my leg connections to the ankle joint, then Boolean2Objects/BooleanUnion combination and some Sweep2 to get the irregular cylinders
- Patch to close the bottom of the flipper, JoinEdge to close gaps with very small tolerances
- Side curves Projected onto flipper, then Split to keep certain sections
- Sweep1 with several cross sections to build the strap
- Curves then ExtrudeCrv and FilletEdge to build the button, plus BooleanDifference and OffsetCrvonSrf to finish the ratcheting buckle
- Curves Projected on top of flipper. Trim, then Loft and FilletEdge with handles
- InterpolateCurveonSurface and Pull to draw the gills (only for a change in material)
- CreateUVCurves, ArrayCrv, and FlowAlongSrf to make the eagle ray design on the front of the leg
- Explode and Join multiple times to make sure my dots were all correct so I could apply a different material to them in Keyshot
ghosted
no nudity
FlowAlongSrf
material assignments by layer


Materials: I’m testing out a few different styles, but for now, some fun preliminary renders!
- The leg portion is metallic paint (used so I could control metallic coverage, color contrast, and metal roughness)
- The flipper and the eagle ray detail is tire rubber with the roughness turned down, to look more like a realistic scuba flipper material
- The socket is a carbon fiber gloss material with the scale turned way down, the edge width and weave noise turned up to look more organic, and contrast turned down. I got it pretty close to the material actually used to create sockets for stumps.
- The pylon is a steel ultra scratched material
- The SACH (solid ankle-cushion heel) foot is a soft rough orange material with some translucency that sort of mimics skin, much like a real SACH foot

    
keyshot materials #1 (diffuse layered with occlusion pass)
keyshot materials #2 (diffuse layered with occlusion pass)

Next Steps: Modifying the ankle joint to be lock-able at multiple angles for swimming or walking, and modifying the pylon to have adjustable height. Potential modification to flipper to make the top flatter, courtesy of a suggestion from a classmate who is a competitive swimmer - I'll discuss with my dive master about whether he thinks it would greatly affect performance.