Showing posts with label Flashlight sleeve. Show all posts

Sunday, October 8, 2023

Rhett Carlin ATCM 3355: Week 8 Flashlight Sleeve


The P.E.N.-15000

An Analysis of Sciences Fiction's Infatuation with Masculinity

CONTENT WARNING: THIS PROJECT WILL CONTAIN ADULT THEMES AND WILL ACKNOWLEDGE THE EXISTENCE OF GENITALIA  AND SEX
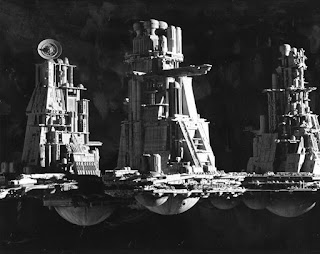
The Nostromo from Alien, Reference
The Nostromo from Alien (1979), Reference

Spaceballs (1987), Scene, Reference

Concept: Spaceballs is one of the most ridiculous movies I have ever seen. Released in 1987, Spaceballs became a near instant cult classic, it sold itself as a parody of star wars, and took no shame in reveling in the sheer stupidity that was its premise. While Spaceballs may not be hailed as a cornerstone of film, one thing Spaceballs excels at, is pointing out how weirdly phallic and homoerotic common science fiction tropes and design can be.

    Spaceballs was not the first to point this out or even to use it as a defining design motif within their film. Critical analysis of the 1979 movie Alien points out the brilliant use of this idea to enhance its horror and play on cultural fears of the time. Instead of ignoring the Freudian implications space exploration has often toed the line with, Alien is able to use it as an element of storytelling, subvert the viewers expectations, and craft a narrative that reaches beyond the screen. A comprehensive and extremely well crafted analysis of this idea can be found here.

    The science fiction genre can often be obsessive about idealizing traits in masculinity which emphasizes the importance of a stoic, emotionless, hero, who rejects the perceived 'softening' of men in  a modern, kinder, society. For my project, I wanted to create a piece exemplifying the celebration of men science fiction exudes, how it blatantly ignores its own homoerotic undertones, and how it perpetuates an ideal that is toxic and unreachable.
Ghosted & Painted Black


Ghosted w/ Colored layers (no naked edges)

Processes: I began my production process by creating a model of a 410 lumen flashlight I bought and of the saber portion of the lightsaber. Both models were created by adjusting and sculpting cylinders until reaching desired proportions.
    The saber was the first thing to be made. I began by cutting a seam down a silicone tube and taping it back together for easier removal later on in the process. I covered the hole at the bottom of the tube with tape, and poured a 2-part silicone rubber mixed with a millennial pink mica powder into the tube and allowed the saber to set. Once set, I removed the saber and coated the outside in cornstarch to give the saber a distinctly flesh like appearance in an attempt to evoke the idea of a sex toy.
    Once I had the finished saber I updated its model in Rhino to match its dimensions more accurately and began creating the hilt from drawn concentric circles which coincided with known paramotors of the saber and flashlight. Using a mix of booleans and polar arrays I created a first draft. A complication that arose within the design process was the saber's translucency, or rather, a lack thereof. Noting this and wanting the flashlight to still be somewhat functional in my design I created a chamber between the layer of plastic that holds the saber in place and the outside layer so light could travel around the saber instead of through it.

Render & Ortho Measurements


Render & Orthographs

Materials: The materials I used within my renderings and in my physical object were, plastic, silicone rubber and a light. The pink plastic material I employ in my design is intended as a direct contrast to the often metallic materials seen used within lightsaber designs. The use of plastic implies a physical cheapness, lack of durability, and helps draw a connection to sex toys which are often made of plastic. The silicone rubber was mixed with pink mica powder, cast, and covered in cornstarch to make a saber which imitates a flesh like appearance by reducing shine and further pushing the concept of a sex toy. The light within my model is a 410 lumen light which creates a glowing effect on the hilt and the saber, cementing its association with a lightsaber and sex toy simultaneously.

*DISCLAIMER* IN THE STATE OF TEXAS IT IS ILLEGAL TO BRANDISH A "DILDO" ON PUBLIC COLLEGE GROUNDS, THIS IS NOT A "DILDO" AND ANY ASSOCIATION WITH SUCH ARE PURELY COINCIDENTAL, THE SILICONE RUBBER UTILIZED IN THIS PROJECT IS NOT BODY SAFE, MICA POWDER IS A WELL DOCUMENTED CARCINIGEN, AND THUS THIS IS NOT A DILDO IT IS A FLASHLIGHT SLEEVE THAT MAY UNINTENTIONALLY HAVE A PASSING RESEMBLANCE TO A DILDO. thx <3.

Monday, January 30, 2017

Lauren Barbieri:Week3 LED Flashlight Sleeve


Concept
My concept was based primarily off of ornate mythological looking metalwork. That and I was looking for an excuse to practice making curves. One of my major focuses was getting those curves just right.
Modeling Techniques
I drew the shape of the base with the curve tool and then used revolve to create the main case. From there I created the curves for the metal work projected them onto the model split the curve into a surface, then scaled and extruded the surface multiple times. I then split the details using the casing as a cut object (and vice versa) then joined the segments. The rivets were duplicated using polar array as were the top and bottom spirals. 
Material and Lighting
The flashlight has a leather sleeve for a firm grip, an intricate and impractical bronze inlay metalwork hiding a factory made steel casing. Someone went to the trouble of buffing and scratching the bronze but the steel casing is practically factory new. Still there is a nice contrast between the bright bronze and the dark leather, and a flash of silvery steel as an accent color. 

Saturday, January 28, 2017

Brandon Wehenkel: Flashlight Sleeve


Black Ghosted


Ghosted Colored


Concept:
Word was said that we were making a lightsaber for 3D printing and even if it was a joke I still did it anyways.  I love Star Wars, and if I get a chance to do something related to Star Wars, I will do it.
It may not be 100% original, but I liked Senator Palpatine Aka Darth Sidious's Lightsaber.  So I used it as a reference.  I also used a technique I learned from my Roman column's in the Castle and wanted to add it to the process.


 Keyshot 1


Modeling Techniques:
I used the tutorial shown in class to manipulate a curve and revolve it.  I did this process about 70x because I was looking for a particular amount of curvature to make what I needed. I used the Verticle Helix tool to create the right size and length of the curve, and if I ran into a slight issue with that particular curve, I just projected it onto a flat plane and copied the curve over to the preset curve.  I used insertEditPoint a few times to get the curve just right.  Once I found all the right curves I created the sleeve.  I ran into a slight issue with the wide cutout in the reference image.  What it looked like to me was an inner shell inside the sleeve, so I had to do 2 revolves.  One for the exterior sleeve and one for the minimum sleeve size that way when I make the large cut out of the outside sleeve it won't break the integrity of the sleeve exposing the flashlight within.  By doing that all I did was use a polyline and measured the end distance to .0625 and revolved a new curve around that size.  I used What a few times to see if all my surfaces were closed.  I filletEdge all the major edges.  I created a few ellipses to make a extruded shape that would cut the outside sleeve.  I had to make points and more polylines to make sure the measurement was exact, and I wasn't cutting into the wrong sleeve.  I used BooleanDifference to do the cuts.  To make the divots, I created a pipe from one of my exterior curves that were made for the large concave bulge in the sleeve.  I then ArrayPolar around a center point and duplicated the pipe 50x. I hide half of them to get a proper spacing.  I tried using bend, but it didn't work like I wanted, so I gave up on that.


Keyshot 2


Materials:
I used polished bronze for the interior curve and the bulb at the end. Then changed it to yellow/gold. I increased the roughness to .02
I used polished nickel for the rest of the sleeve.


Keyshot 3

I ran into several problems with the printing process.  The lab technicians had to print my sculpture four times.  Twice, where the whole for the light was filled.  The reason that was discovered was that I had not booleanDifferenced the intersecting parts and instead grouped the objects together.  Even though the model itself had a hole in it and you could clearly see through it, the printer was tricked and assumed it was a closed object.  The 3rd print was a lab technician oversite where one of the parts was hidden unintentionally before print and the 4th attempt was the final product.


Print fail example 1


 3D print colored


For the 3D print I used gold and silver spraypaint.  Rust-Oleum brand.  I had to sand the internal hole to fit the flashlight.  I had got a pvc pipe that was perfect size for the hole and taped a pad of sand paper.  Once the flashlight fit I stuffed cotton balls around the light and taped over the cotton with electrical tape (only thing available).  I cmpletely forgot to photograph this process.  But I also taped the internal cut as well to do the multi-layered color.  I sprayed everything with gold spray paint.  I let it set overnight and came back the next day to fix any areas that bleed through the tape.  I sprayed inside the lid of the silver spray paint and painted the silver on with a paint brush.  I let the paint sit for about 20 minutes and did the same for the gold to do final touch ups and clean up the area inside around the edge of the flashlight. 


Different angles


Functionality


Sunday, March 1, 2015

Charles Person Midterm Flashlight

For this sleeve I went for a big clunky feel, something that could take a beating. In particular you can see this on the rim of the shade, which is up to a centimeter thick on the finished model. The grips along the side were also intended to help bulk it out visually.

The primary modelling techniques used for it were a combination of curve boolean and revolve for the base shape and grip. Next array polar and boolean difference were used to create the ring of indents along the bottom. And finally the cylinders used to create the indents were moved to the top of the flashlight to repeat the process on the top.

For the materials on the render I wanted to carry on the bulky and durable effect so I went with a hard plastic for the main body and a hard clear plastic for the grip.


Saturday, September 27, 2014

Sean Lenox - Project 2: Flashlight Sleeve

Week 5:

A friend of mine introduced me to the polar array, which led to me sticking shapes all over the flashlight and polar arraying them around it. As I added shapes to my flashlight it started looking pretty silly, so I started modeling it to look like a kids' toy. Showing it to Blake in class I remarked that it looked like "a rocket ship," and he suggested I add some jet engines to the sides. One Keyshot render later, we have a pastel rocket ship-esque toy flashlight.


I used bright, plasticy materials to give it a toy-ish look. I stuck with the default Keyshot background, as I felt it offered the best lighting and made the model easy to see.

I am unsure if the engines are secured enough for printing or if they'll just break right off. I used the gray cylinders to secure them to the body more, so hopefully they'll be safe for printing. Apparently, there are also some naked edges inside the sleeve. I might have to find a way to fix these.

Week 6: Shapeways confirmation

Neither the weird shapes nor the naked edges were a problem! My sleeve has been confirmed and will be printed and shipped shortly.


Week 7: I'm a big idiot

Upon looking at my fellow classmates' sleeves and receiving my own, I have come to the awful conclusion that my sleeve is twice the size it should be. Apparently there was more to this model than just following that flashlight tutorial. Upon revisiting the week 4 folder, I discovered a file containing guidelines for the dimensions the flashlight sleeve should actually have. I slapped my model in there and resized it, fixing the naked edges and giving it the proper dimensions.


Uploading this new model to Shapeways reveals that it costs a much more modest 40 dollars. It's a shame I already ordered the other one.


I'm trying to see if I can get this printed at the school tech store in time for the midterm. If I can't, I might just bring it later to show that I did in fact realize my mistake and print a new one. In the meantime I'll bring the giant one to class tomorrow and we can all laugh at it. I might pack some tissue paper in there to bring the flashlight up, or something. Goodness gracious.

Week 8: The 2nd print

The re-print of the correctly-scaled flashlight is finished! Here are some photos (I had this one printed at the Tech Store on campus).