Monday, October 9, 2017

Clara Crossland: 3D Print Flower - Fall 2017

Concept
I wanted to build something other than this flower at first but when I was starting to reach the end of the building process I saw that it wasn't what I was hoping it would be. But instead of scraping the whole thing I decided to keep going with this pretty design that was coming out. I really liked the shape the bulb at the top was taking. It started looking so much like a tulip that i decided to make it even fuller. So the very last version of this project ended up being a hollow flower.


Techniques
The technique I used on both parts was the rotation tool. For the stem I used a small rectangle and carved out the notches where I wanted the engravings to be. For the bulb I hand drew the shape I wanted one side to be then rotated it 360 degrees in order for the shape to take place. Both the stem and the bulb had a lot of extra pieces inside them so i easily took them out to clean up the figure. I also used the Boolean tool to combine the bulb and the stem to be one in order to make it water-tight.


Materials
The materials I wanted for this figure was a really simple plastic. I the very basic plastic material in Keyshot so it would be easy to decorate once it was made. The materials that the physical project is made out of are the basic 3D printing materials. It is a little rugged and not as shiny as I would have hoped but the project came out very smooth with no errors.


Elizabeth Garvey - 3D print fox

Concept
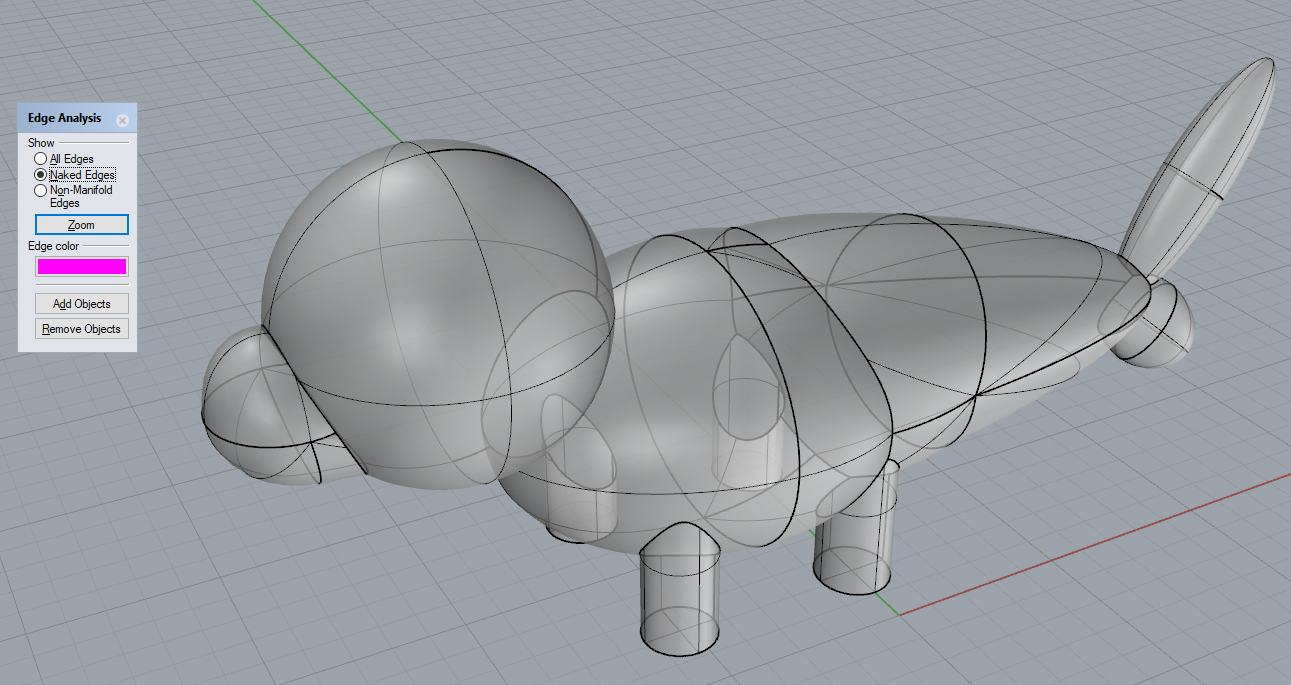
I wanted to make a figurine loosely based on designs based on a 3d game I used to play as a kid,  Space Station Silicon Valley. The creature specifically I chose to model was a Fox.  I liked the idea of using simple shapes to create animal figures.
Techniques:
For this project I modeled the project in Rhino, and then used basic shapes to create the model. I noticed the original N64 version also is made of many different simple shapes. I checked the model for naked edges to make sure that it was water tight. I had to convert the file to an .stl file so it would print. I also had to reduce the number of polygons in Rhino , because at first it was causing the computer at the 3d printing lab to crash. The model did not come out perfect, because the support beams on the moutn and nose would not come off!


Materials:
The materials were hobby grade 3d printing plastic filaments, and I printed this at the tech store at UTDallas. I will probably do a reprint, because it didnot come out as smoothe as I originally wanted.

Taylor Volquardsen - Week 8 - 3D Printing


Concept:
I don't have much room in my house anymore. I've taken so many art classes and have so many projects laying around that I wanted to be sure anything I made was something that I could use. I have a small indoor garden going on downstairs, so I decided to make a little planter pot. It was something small enough to fit in my house and also something I would use, so the plan was perfect.


Technique:
The shape of a basic planter pot is pretty simple, so I kept the modeling simple as well. It's one shape, made from a single sphere that I divided up and extruded to get the shape I wanted. The interior is a basic cylinder shape-instead of following the shape of the outside-to make planting and printing easy.


Material:
It took a while to find out what kind of material I wanted, having to take into consideration both cost and look. I originally wanted to do it in some form of wood or wood-looking material, but that was pretty expensive. I got lucky and found out the cheapest material for me to use on Shapeways was also one that I wanted to use. I decided on a Gloss Celadon Green Porcelain, a ceramic type in a nice seafoam green color.

My model is currently being printed at Shapeways. It should be ready for shipping by October 27.


Anyssa Akridge Week #8 3d Printing Project


Concept


My concept was inspired by these centaur garage kits that were sold at Wonder Festival 2015-16 In Japan. I adore collectable figurines and what's known as "Monster girls" in Japan. I decided to do my own twist on the centaur and did a half slug half gal hybrid. My collectable is supposed to be customizable using different painting applications just like garage kits. Each slug girl is supposed to come in a neutral color just like these tohoku centaur figurines. The owner then gets to paint their slug however they want!

Techniques
Bounding box dimensions depicted in the command line


 I used the software called Sculptris to model my figurine. In the program I primarily used the grab tool and mirror tool to form a symmetrical figure. Then I used the draw tool and crease tool to add the details to my character. I then used the smooth tool to pat down all the bumps on my figure to create a finished surface. Afterwards I transferred my figure over to Mudbox to check for any mesh mistakes. When that was over and done with I transferred my figure over to Rhino to resize my figure and convert my .OBJ file to an .STL file for printing. I sent over my figure to Shapeways and got my figure printed out in sandstone. I feel like using sandstone and Sculptris for my figure suited the more organic form of my design 

Materials


For printing My figure I used sandstone. This material is smooth and holds details well, which was perfect for my figure. I also finished my figure with sandpaper and Krylon gray primer, to give it the  feeling of a garage kit. In Keyshot I used a simple maroon paint render. This is because most garage kit figures come in a neutral color like gray to make it easier to hand paint on collectors, but since our keyshot backgrounds are at 50% gray, the neutral gray color would blend in too much, so I choose a maroon color to make it pop out from the background. I also feel like the shiny paint material shows details and mistakes well when creating figures.

Matthew Durham - 3D Printing 2017

Concept:

For my idea i wanted to make an eastern dragon skull. I based the bone structure and cavities of the skull on McGibbs Dragon skull.

Techniques: 

For this project I took the dinosaur head from Mudbox imported that into maya and altered it to get a 3-d model for Mudbox. i then sculpted that in Mudbox to get my 3D-model and imported into rhino to check for naked edges. 


Materials: 

As far as materialize go i kept everything the same because of it being bone. 

Sunday, October 8, 2017

Klarissa Austin - 3D Printing

Concept:

The character used for this project is one owned by myself. I intended to use him for this project as he is a character made of relatively simple shapes, and therefore would not be overtly complicated to model. He is also mostly comprised of round shapes, which made him easier to model with NURBs methods, which I have grown fond of. The 3D print was intended to serve as a reference when I later make him out of clay for a personal project.
A2- 040 Long Board by TheAnubianEmpire
Technique:

I used mostly sphere shapes to create the base for this project. I then went in and edited the control points to make him more the shape I needed. I did not bother with details such as the thin fins on the back and ears, as those would likely have not survived printing due to thickness. I attempted to make the ruff around his neck, but was unfortunately unable to get it to work in a manner that would mesh with the rest of the model. My biggest issue was time. Due to a hectic life, I was unable to finish the model in an amount of time that would allow me to print him before the deadline.


Material:

As this is a model intended to be a character, I had no intention of having multiple materials on him, as he is all just covered with the same type of skin. Had I been able to print the model, I would have painted him in a fashion like the image above, with the exception of the gradients, which would have been changed to either a solid while or a solid yellow.

Michael Zink - 3D Printing

     For my project, I decided to continue on my castle project so that I would have the most time possible to paint the model, which I believed at the start of the project to be the most time consuming part of it.
     I had to make some changes to the model in order to get it ready to be printed, mainly adding a base to the model and scaling it down. I also decided to add some more detail to the model by adding a second tier to the model and placing many small structures onto it to give a better sense of scale to the whole model. I then connected the two portions with three cylinders in order to more evenly distribute the weight the second tier would add.

     I decided to continue the general theme of the model and extended many of the materials I already used onto the new section I added. However, I did add darker materials to the small building on the second tier in order to create more contrast between the two tiers, specifically in the difference between the dark roofs of the second tier, and the gold roofs of the first.

     When I was painting the model I tried my best to stay true to the colors and textures I used on the model. I decided to paint the connecting cylinders and base of the model black to try and show that they were only designed to hold the model together and were not a part of the model themselves.