Showing posts with label #3dprinting. Show all posts

Sunday, February 23, 2020

Rochelle Offret: Project 3 - Hammer

Concept: For the hammer I wanted to explore making a hammer that was more of a functional weapon and tool.  I gained the majority of my inspiration for this project from a meat cleaver, and Elder Scrolls: Skyrim. The Champions Cudgel is much larger in the game making it a two handed weapon.  I wanted to create something that realistically be more like a hammer and weapon combo. I used this image for my reference.


Process: I started off using curves to create the majority of the shapes for the hammer.  Then using extrusions, revolves, and rails, I created the main components of the hammer. For the peaks on the head of the hammer I created one cone, and then used an array to fill the rest of the face across the x and y axis. I also created some basic embellishments with ellipses and circles, while using Boolean difference to get the effect I wanted from them. I then went around the entire hammer and either filleted or chamfered every edge.  I found that I enjoyed the chamfered edges on the base of the hammer more than a filleted edge, and felt that it gave the hammer a bit more of an authoritative look.


Materials: For materials I wanted mostly some form of metal, except in the handle I wanted a leather type wrap for grip. For the head, claw and the majority of the base, I went with a brushed steel, and darkened the color a bit.  For the embellishments on the base is used a brushed copper and a rough niobium.  On the handle I use an earthy dark brown leather and polished niobium on the embellishments.


Tuesday, January 28, 2020

Nikki Chauhan: Project 1 Castle


Concept: My castle model is based on a natural ice "sculptures" and structures formed by ice in cold caverns as well as a bit of a futuristic look with the round about halls and translucent statement piece at the top of the building. 


Materials: I chose a gem like material for the decorative balls on the outside of the window rooms and the display piece on top, a hard cloudy plastic look for the red hallways, a metallic paint for the towers and a metallic paint for the second floor. I wanted the red hallways to look shiny and reflective from the outside but if you were inside it would be like a one way window.

Process: I wanted this to have a mountain like look so I started with 4 equally spaced octagons and extruded them to a point. After I did that, I used the movement mechanics and spread the pairs of the "icicles" on the x axis. I then created another set of octagons on each icicle and raised them about halfway up and extruded them straight. I then created the central torus and duplicated that higher up and scaled it down to be proportionate to the tip. I then created the bottom two floors of the building with a small rectangular prism for the door and then another octagon for the top decoration. I then used the sphere and the polar array to create the decoration on one of the windows and copied and pasted and mirrored them for the remaining windows. 

Sunday, March 3, 2019

Twinkle Shah Week 8 Assignment 2 Pendant

Keyshot Main View of Pendant

3D Printed Pendant with Attached Chain


Concept:
At first, I tried playing  around in Rhino to see what I could come up with because I didn't have anything in mind. I didn't make anything that was worth printing in my opinion, so I tried to step away from Rhino for a bit and think about what I like. I own a lot of jewelry and really like wearing it, so I thought it would be a good idea to make something I could actually wear--perhaps a pendant that I could put on a necklace. I'm fond of astronomy, and an emblem that I feel attracted to is of the sun with the moon wrapped around it. I decided then that I'd make a pendant of this emblem.

Ghosted Image Painted Black Rhino

Process:
I started with a small sketch on paper, then I created a single curved line within a circle, to make the moon inside a circle. I turned both into pipes and I trimmed the excess part of the curve with the circle. I then joined the two. To create the sun's rays, I created a small, slender cone, oriented it onto the torus, and used ArrayPolar to duplicate it 3 times for some rays coming out of half the circle--making that part look like the sun. To add more interest to the moon's side, I created some small stars with the star tool, extruding them, and ArrayPolar. Then I used Boolean Difference to cut star shapes into the torus. 

All Views of Pendant in Rhino

Materials:

In Keyshot, the materials I used were Anodized Titanium Champagne Brushed 90%. I liked the delicate look it gave and I think it suited the celestial objects. The pendant was 3D printed in PLA Black at a bit under 2 in x 2 in x .13 in. I liked the black color for it as well, although I think it gave a very different vibe to the piece. Unfortunately, the engraved stars I had made with the Boolean Difference didn't turn out so well because they were so small. According to the man at MakerTree, this was because it was printed in PLA. He recommended that I choose FDM for more detail-oriented prints in the future. 


Keyshot Material Assignments

Keyshot Perspective View


Wednesday, October 11, 2017

Elias Perez - 3D Printing

Concept:
    The focus I was trying to make with this model was to create a small figure to lighten up my desk at home and I recently found a love for adventure based video games and decided to follow the classic trope of the hero who pulls the sword from the legendary stone. I was inspired by many different swords from franchises that I adore such as the Legend of Zelda's Master Sword, Zabuza's Executioner Blade from Naruto, as well as a traditional British Sword. I used the Master Sword as reference for the hilt using the spiraling shapes that stack on top of each other for the main design, I was focused on creating a dull like blade to give a sense of use and heavy weight alongside the brutal idea of a large slab of metal on a handle coming for you.

Master Sword Hilt (Reference)

Executioner's Blade(Reference)

British Sword(Reference)

Techniques:

    The techniques used for the creation of the model included the use of the Snapping Tools to the grid as well as the center of objects, Rotating, BooleanUnion, Linear Dimensions, Analyzing of Edges, and Scale commands. When building the model I would make sure to snap the beginning shape to the grid so as to make an even circle for the cylinder's base as I knew I would be making multiple and different sized shapes and stacking them on one another and then combining them with the use of BooleanUnion to create the hilt. The use layers were meant not to separate the objects but rather to be used to hide them when I needed to use the center snap tool to create an evenly stacked object and truly choose the center of the object that I needed. Rotating played a big part as I began working with the sword upwards and then rotated it 180 degrees and then angled it to my liking so that I could work on the hilt, and the handle of the sword as well as get the ominous angle of the sword being embedded in stone. The stone was made to serve as my platform and base for the object as well so that it will stand up on its own on my desk. The Dimensions of the object are about an inch off of the requirements but I found that it was a necessary amount considering the sword is just generally long and the base high, I scaled it down from it's original size to meet these requirements. 

Ghosted Image of layers and the Final Grouping

Showing the Analysis of the Edges

Measurements: 
    The required measurements for this object were meant to be 4 in. width, 5 in. length, and 6 in. height however I exceeded these each by 1 in. as I saw it necessary to get the length of the executioner blade as long as it could be as that is part of the menacing factor. The hilt adds length as well as the base so I treated each as separate objects. I edited the dimensions of the world as it began in millimeters and then used the Linear Dimension from the Dimensions drop down box to show the measurements on the grid plane. 
Measurements of Model(Different Color Used for Emphasis of Text)
Materials:
    The materials I hope to use are just a nice wood that can be painted as I wanted to paint the model by hand as well as be able to engrave into it physically with a human touch rather than have the printer do all the work. I plan on carving an insignia into the rock so as to create a sense of a kingdom elsewhere or show importance of the blade. I am going to carve into the handle of the blade so that it is not entirely just a rounded cylinder so that I may later wrap a ribbon into the crevices of the cut to create a more realistic feel of a grip to the blade. 
    

Valeria Cavazos - 3D Printing

Concept:
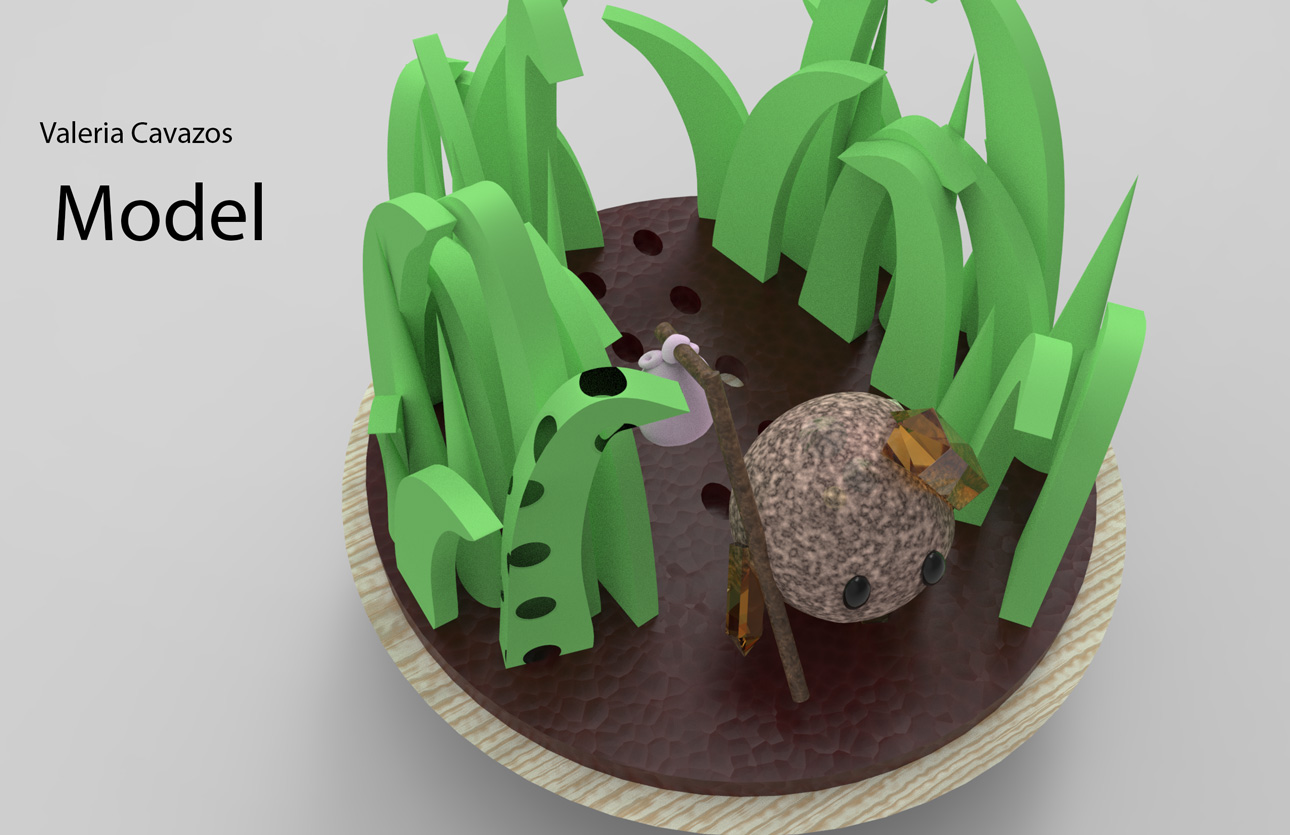
    My concept was based on a character I designed for a children's book as a Graphic Design project. This rock is one out of five and as the leader of the group, I chose to make a scene depicting him walking through the some grass with his mini hobo bag. 

Techniques:
    I first started with the base and the tried different styles before choosing the one in the picture in order to keep it simple yet show that it is a base. It was made with a truncated cone and a extruded circle to simulate dirt. The grass was drawn with the Curve tool to get two different styles, extruded both, and placed around the rock, along with a thin triangle. The actual was was created using a circle and adding small triangular pieces to make the rock look less smooth and more ragged. The gems on the rock were made with a hexagon from the Shape Tool and tracing the shape with a line tool in order to create a triangle for the points of the gems. After making one, I just copied, pasted, and scaled four more for the limbs. 
ghosted image
ghosted image with Keyshot layering assignment

measurements

Material:
    The bases material was made to look like wood and the base that simulates dirt was made with a leather material. The rock was made using a granite rock but I changed the colors in order to get a grainy appearance but not get lost in the material and the gem was a yellow gem. The grass was a result of playing with a miscellaneous material, Matte White, in order to get an organic look but not cartoonish or too fake. Metal was also too shiny to get the organic look of the grass but the front blade of grass with holes is actual metal colored green with properties such as the roughness and the Material Type. 


Final Product:


Pablo Reyes: Week3D Printing

Ghosted Image Painted Black
Ghosted Image With Keyshot Assignment Materials
Rendering 1


Rendering 2


Tuesday, October 10, 2017

Hannah Barnes - 3D Print Fall 2017

Concept:

Image result for metal washer bowl

I chose to recreate the above basket in a 3D print. I loved the use of circles of varying sizes and thickness in order to create a cohesive object. It's both beautiful and functional, and it creates an awesome shadow when held up to the light.


Technique:

I modeled this in Rhino. I blocked out my design by creating a solid bowl shape. I then created the generic washer shape of a cylinder cut out of cylinder. Using this shape, I recreated the bowl shape by copying/pasting and reorienting each cylinder. I varied the thickness and size of each cylinder layer.

Originally, I did not make each layer of the basket out of the same size cylinder. Instead, I created an asymmetrical design with no order to it. However, I forgot to ensure my original cylinder was a solid polysurface, so I had to scrap this design and recreate it. The second time around, I created a more symmetrical design. I ended up liking the symmetry more than the asymmetrical design.


Materials:


The source design that I used as inspiration was made of metal washers. I wanted to imitate that in my print. I used a brownish-orange metal for my material in Keyshot. For the actual 3D print, I finished the print in Gesso and sprayed it with bronze spraypaint to give the print a metal look.


Monday, October 9, 2017

Anyssa Akridge Week #8 3d Printing Project


Concept


My concept was inspired by these centaur garage kits that were sold at Wonder Festival 2015-16 In Japan. I adore collectable figurines and what's known as "Monster girls" in Japan. I decided to do my own twist on the centaur and did a half slug half gal hybrid. My collectable is supposed to be customizable using different painting applications just like garage kits. Each slug girl is supposed to come in a neutral color just like these tohoku centaur figurines. The owner then gets to paint their slug however they want!

Techniques
Bounding box dimensions depicted in the command line


 I used the software called Sculptris to model my figurine. In the program I primarily used the grab tool and mirror tool to form a symmetrical figure. Then I used the draw tool and crease tool to add the details to my character. I then used the smooth tool to pat down all the bumps on my figure to create a finished surface. Afterwards I transferred my figure over to Mudbox to check for any mesh mistakes. When that was over and done with I transferred my figure over to Rhino to resize my figure and convert my .OBJ file to an .STL file for printing. I sent over my figure to Shapeways and got my figure printed out in sandstone. I feel like using sandstone and Sculptris for my figure suited the more organic form of my design 

Materials


For printing My figure I used sandstone. This material is smooth and holds details well, which was perfect for my figure. I also finished my figure with sandpaper and Krylon gray primer, to give it the  feeling of a garage kit. In Keyshot I used a simple maroon paint render. This is because most garage kit figures come in a neutral color like gray to make it easier to hand paint on collectors, but since our keyshot backgrounds are at 50% gray, the neutral gray color would blend in too much, so I choose a maroon color to make it pop out from the background. I also feel like the shiny paint material shows details and mistakes well when creating figures.