Tuesday, October 31, 2017

Elias Perez: Week 10 Cardboard Ball

Concept:

    The concept I had in mind for this project was to create a large jack-o-lantern helmet in the spirit of Halloween. I knew that I wanted it to fit on the persons head and that I didn't want a perfectly spherical pumpkin but rather one with many crooked edges to give off a sense of eeriness or madness almost like a Tim Burton style film. The color palette I used was based off of Vainglory's character Petal's Halloween cosmetic as I felt the purple and green complemented each other and made them pop creating an eerie feeling.
Petal Halloween Skin - Reference

Finished Product of Jack O Lantern
Technique:
    
    The Jack-O-Lantern was modeled in Maya by extruding the faces of basic polygons as well as by moving the vertices inward to create the crooked shape that I was hoping for. To help keep the polygonal shape I would set up sub divisions in Maya so that it would be easier to cut the edge loops once I got into Pepakura. After the modeling process in Maya I changed the .ma file to an OBJ file and imported it into Rhino where I changed the file into NURBS so that I could further lower the amount of polygons. I then imported the file into Pepakura where I cut the edge loops to unroll the mesh. From here I put the vector file into Rhino where I prepped the lay out for laser cutting. The helmet is made from eflute cardboard and was put together using Loctite Super Glue, the candle and the helmet were made as separate objects and glue together after both objects were painted. 
Jack-O-Lantern Pepakura File
Jack-O-Lantern Rhino File Lay Out
Materials:

    The materials used for the Jack-O-Lantern Helmet were eflute cardboard, Loctite super glue, and Apple Barrel Gloss Acrylic paint for a smoother shine and color that pops. The assembly began before the painting but the candle and head were both done at separate parts. To better fit the polygonal flame on top of its candle base I cut multiple slits and glued around both objects to help it stay upright and did then glued the candle to the head after completion. 

Cardboard Ball:

    As requested I attended the cardboard ball and saw quite a few interesting projects that other people had done and was absolutely astounded by what could be done with laser cutting and 3D printing. I took a few photos of the event with others and their costumes. 
Jack-O-Lantern and Ryuko

Jack-O-Lantern and Ryuko  

Jack-O-Lantern and Tribal Wolf Barbarian 

Jack-O-Lantern and Dark Souls 3 Suit

Gathering of others at the Ball

Monday, October 30, 2017

Matthew Durham Week 10: Cardboard Ball

Concept:
      For my costume i want to do a hunter with a skull for a mask. I am basically taking my skull from the 3-d assignment making a low poly model of it and then going to add fur and metal to it to give it a primal feeling.


Techniques:
     I will be importing the maya file into rhino and using the reduce mesh reduce the polygons. I then will import into pepakura to get my files and import into photoshop.

Hannah Barnes: Week 10 Cardboard Ball

Concept:


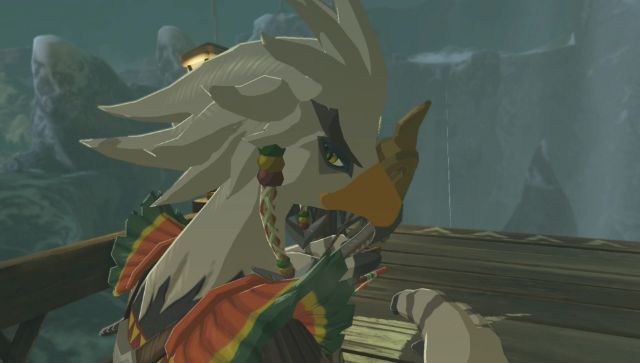
For my costume, I wanted to create a bird mask emulating a species from The Legend of Zelda, known as the Rito. I decided to create the upper half of the birds face with only the top part of the beak, then I added thick feathers protruding from the back of the mask, as seen in the Rito reference picture. Originally, I wanted to leave the cardboard white then add colored cardboard for decoration on the mask. After some complications building the mask however, I decided to paint the mask and turn it into a hat instead.

Technique:


I modeled the mask in Maya. I wanted it to be simple to build, so I tried to limit the amount of polygons I used, which created a blocky look. I translated this to Pepakura to slice the mask into vector shapes. This took several tries to get right, but once I did, I imported the vector file into Rhino where I prepped the laser engraving file.


I got the mask engraved on eflute cardboard. The mask turned out to be too small, so I decided to turn it into a hat. I attempted to assemble the pieces using Locktite super glue, but this turned out poorly. Many of the connecting flaps on the cardboard were too small, and the super glue didn't have much to stick to when I connected the pieces. I also didn't realize that if you mess up on gluing the first time, you can't try and reglue the pieces together. I didn't have any hot glue, so I instead used tape to hold the hat together.

Lastly, I created a simple cardboard band that wraps around my head to secure the hat in place.

Materials:


I used eflute cardboard for this project since the hat was so small and had many pieces that were close together. I painted the hat with red and gold acrylic to add some color and make it feel more cohesive. I'm not pleased with the way the hat turned out, but if I had the chance to do it again, I would use colored cardboard instead of paint. Hopefully, that would give the hat more of a intriguing, stylized feel as opposed to feeling like a kid's mask.


Michael Zink: Week 10 Cardboard Ball

Concept:
    

     I already had a costume for Halloween when this project started, so I decided to add a prop to go along with it. My original costume was a plague doctor so I decided to create a scythe mixed with the medical symbol to represent the plague doctor's themes of death and medicine.

Techniques:

     I created the scythe in Maya by starting with a cylinder and using the extrude tool to make the base shape that I wanted. Then I used the smooth tool in order to give it the rounded form I was looking for. I then used the reduce tool to lower the number of polygons I had from about 80,000 to 300. I created the snake in the exact same manner.


Materials:

     The scythe is made out of cardboard and glued together with foam on the inside to prevent it from collapsing in on itself. The snake is made out of papier-mâché with a plastic tube in the center of it to give it support. Once both parts were finished, I made small holes in the cardboard to connect the snake to it with wires.


Anyssa Akridge Week 10 - Cardboard ball

Concept:
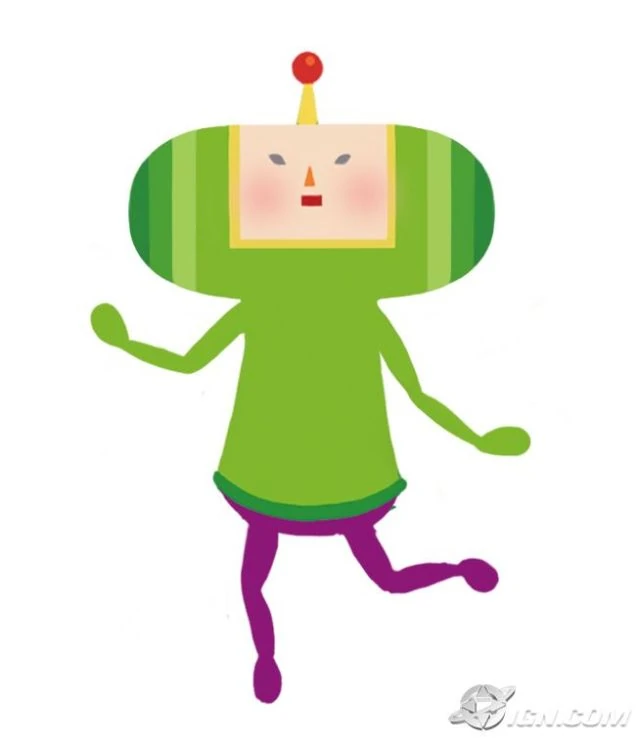
My Idea for the cardboard ball would be a cosplay head piece of the little prince from Katamari. Katamari is a game where you collect objects onto a ball, and try to make that ball as big as you can before the time runs out. Since this is my first time using the pepakura process, I thought it would be apropriate to do a simple low poly model of a game character that's made out of primitive shapes.

Techniques:
Using Rhino , I modeled the head with the Cylinder tool, the Cone tool and the sphere tool/ Half sphere tool. I used the command show bounding box to look at and adjust the measurements. Then I used the Mesh from NURBS object tool to create the low poly model while also making adjustments. After that I separated all the shapes and imported my model into Pepakura Designer. I made sure that everything in the program was set to millimeters. I also used the slice tool to better place my laser cut lines onto the cardboard sheets. I exported the pepakura instructions and imported it back into rhino to color my pepakura lines. After receiving my Cardboard cuts back from the laser cutter I used Loctite glue and masking tape to construct the head for the Katamari character. Then I used a urethane sealant and acrylic paint to paint my head. I cute out a square hole in the bottom to place my head inside the mask. Finally I cut out the eye holes and stretched black stockings on the holes to create eyes I could see through, but still looked dark and black out the outside.
Materials:
I used Flute cardboard, Loctite glue and acrylic paint to create my Katamari head. Katamari is a low poly game so using the low poly model made of primitives while adding a more detailed paint job/ texture made my head more game like. I also used black stretch stockings over the eyes so I can see through the head without the viewer seeing my own eyes, wrecking the illusion. I also used masking tape to attach parts that were hard to attach with the super glue. For keyshot rendering I used gold and gemstones for the hat/crown to represent royalty. And then for the base I used brushed on paint and metallic paint.


Taylor Volquardsen: Week 10 Cardboard Ball

Concept:
My original idea was to create a boar's skull. I had seen things like longhorn skulls and elephant heads, but not a boar. The idea for a boar, in particular, came from the movie Princess Mononoke. I thought it would be fun to work with the tusks.

Technique:
I originally pulled a few different models from the digital databank. I had the idea of taking one of the animal skulls and modifying it to look like a boar's. I decided that I didn't have the time to do the sort of work that would have required, so instead, I took the cat skull model, lowered the polycount, and reworked the wireframe into something that would be easier to cut in Pepakura. As I started putting together the cardboard pieces of the skull, I realized some of the pieces came out smaller than I thought they would, making them hard to manipulate and I had some trouble getting some of the pieces to fit right. In the end, I ended up editing the design some and removed the complicated eye socket structure to aid in construction.

Materials:
Cardboard, and eventually sealant and acrylic paint

Elizabeth Garvey: Week 10 Cardboard Ball

 Concept
The idea of this project initially came from the faun from Pan's Labyrinth. I wanted to make the horns resemble the shapes of a ram, while keeping it rather low res. Initially I planned to make ears, but ran out of time.


Technique
First I modeled out the horns in Maya, and then I reduced the number of polygons so I could transfer the files into pepakura easier. After that I took the files directly into pepakura so it could be deconstructed. After this I sent the files off to be laser cut. The finishing touches were assembling the pieces  with hot glue( they came to me in a big pile) , and later painting it. I later glued it to a hair band for support.


Materials
Hot glue , hair band, acrylic paint ,  gold leaf, cardboard, patience