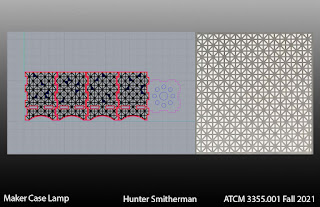
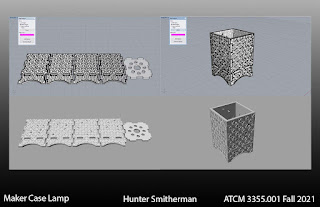
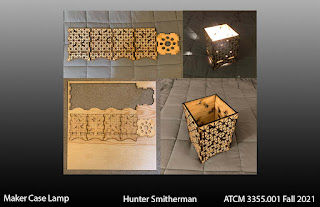
When conceptualizing what design I would want to customize my Maker Case Lamp with, I first thought of my fascination with geometric patterns and their different styles as well as looks. I looked up various geometric patterns to see what kind of style I wanted to go for. After searching Google for some of these patterns, I chose a union jack type pattern for my design and found a reference image. I wanted to have this pattern on all outer sides of the Maker Case Lamp and I started with some Reference Lines. Since Professor Marder wanted us to style the Maker Case Lamp using paint, I thought about using wood stain to darken the rastered portions of the Maker Case Lamp's design to add some depth to the lines. When thinking about the lighting aspect of the Maker Case Lamp, I knew that I wanted to add some kind of openings in the sides of the lamp in order to increase the amount of light resonating from it.
Technique:
When starting off with this design, we were tasked to go to the Maker Case website to create a five-sided box layout to import into Rhino3D. When opening Rhino3D I first changed the units to inches and imported my layout from the Maker Case file that was downloaded. From this point, I was able to begin editing and creating new curves with the PolyLine tool in the left toolbar. I started with editing the bottom of the lamp in order to create openings to hold the lamp fixture about an inch high. To the bottom face, I also added air holes for the light to have ventilation. I also added arches to the bottom of the four main sides of the lamp to create legs for stability. After adding those crucial parts it was time to start creating my pattern using my reference image and reference lines. I started with various directional lines and used the Offset command to create lines on both sides of the reference lines. I also used the Trim tool in order to create the shapes I wanted in my pattern. I decided to also add various inner cuts on random portions of my pattern to create openings for more light to shine through.
After I finished my pattern, I then began to color my vector lines the designated colors so I could begin laser cutting. I assigned my specific lines to my various color layers and hatched out my rastered portion of the pattern. This created my finished vector layout and I was able to begin my laser cutting after taking my materials to the Machine Shop. While my materials were in the shop for cutting, I began to extrude my model into three dimensions and style it how I wanted. This was a pesky task to get my desired look onto the extruded object, I used Boolean Subtract and Extrude Planar Curve to create indents within my three-dimensional model. After extruding my model into 3D, I rotated all the pieces of geometry to create a box so that I could render my model in Keyshot. I imported my 3D model into Keyshot and applied a light-colored wood texture in order to match my selected plywood. I added a plain backdrop to my scene and dragged in a lighting option to properly light my scene. I rendered various angles and saved the rendered images.
I went to pick up my finished laser cut from the North Lab and brought it home to stain and assemble. The staining was very tedious as the lines were very thin, I had to be careful not to over stain onto the other pieces in the pattern. After finishing staining I was ready to assemble my Maker Case Lamp. I used my Loctite Professional Superglue to stick the pieces of my lamp together. After everything dried I then inserted the light fixture and bulb and turned it on to test it out. I am very happy with my result and how the light shines through the various inner cuts of my lamp. I also love the design and I think it turned out super cool.
Materials:
- 5mm Plywood
- Varathane Premium Wood Stain "Dark Walnut"
- Loctite Professional Superglue
- Sylvania 60W B10 Candelabra Bulbs
- Commercial Electric 6ft. Candelabra Base Socket and Cord


No comments:
Post a Comment