Showing posts with label Brittany Han. Show all posts

Monday, December 5, 2022

Brittany Han: Skateboard Extra Credit

 Inspiration:

        I wanted to do something with a cool design for the skateboard. My mind immediately whet to traditional Koi Fish Tattoos. I have always thought they looked awesome and I think having a koi fish shredding down a half pipe would look sick.


Modeling:

        I started modeling by making the initial curve of the skateboard. I then closed this curve and extruded it out into the needed width. I boolean differenced of the corners to make the deck look more like the moderne style board decks. I found a cool koi design online and added some water to the edges to get the effect I wanted.


Render:


    Knowing that the skateboard would be wood I moved my model into Keyshot. I used the fine grain wood texture on the board part if the model. For the engraved part I left it a plastic black so its easily seen on the render model.


Brittany Han: MakerCase Lamp

 Inspiration:

    I honestly didn't have much of an idea for a while on this project. I knew I wanted to make something DnD themed but wasn't sure what so I looked at a few images online and found some dice towers. These are what inspired this lamp as well as shadowboxes of various themes. 


Modeling:

    I started by making the designs using the curve tools within the allotted space of the box given to me. Once that was completed I copied them to another layer and extruded them. I caped these new extruded surfaces and moved the together until they form the desired box shape.


Rendering and Printing:

    I took the finished 3D model and imported it into Keyshot. Knowing I would want this to be wood I used one of the presets to make the render look as though it was made of wood. Though the dragons eye didn't stay, I was very impressed with how this lamp turned out and very proud of the accomplishment this being my first time laser printing anything.
 
Render Front

Render Back

Light Off


Light On


Designs on the Wall


Brittany Han: Architectonic Lamp

 Inspiration:

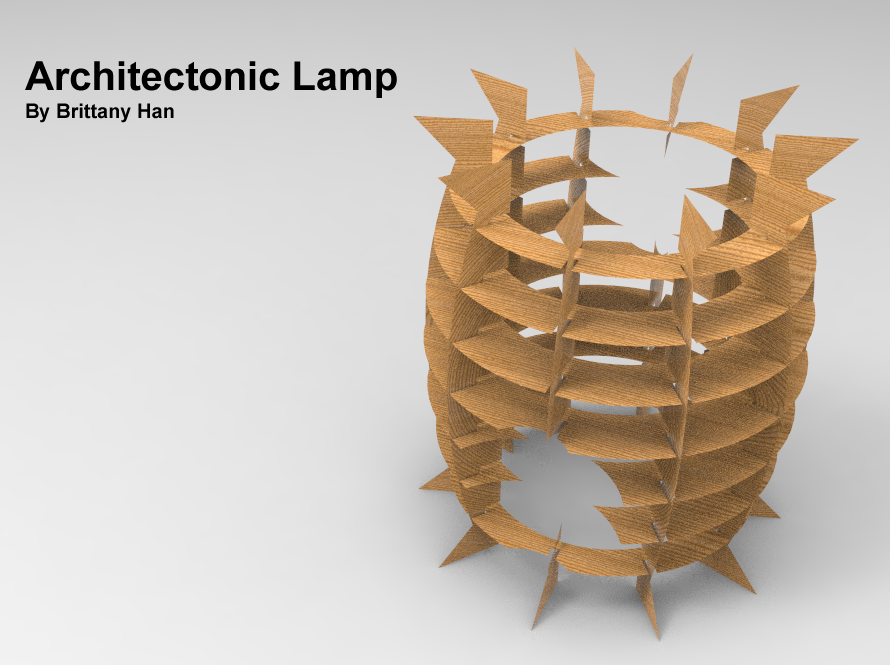
    The inspiration for my architectonic lamps are the old kerosene lamps. I tried my best to stick to the feel of these old lamps, but still keep it simple enough to easily be cut out of my material. Since the eye catching part of the kerosene lamps is the middle where the flame is held this is the section I decided to emphasize. 


Modeling:

    The first step I took while modeling was getting the overall shape I wanted. I accomplished this my using the curve tools and then revolving the shape 360 degrees. I then put the finish polyshape into grasshopper with the grillage coding provided and set the setting to what I thought looked good. Having finished the model to what I wanted, I told the program to slice the sections and laid them out onto a 2 x 4 sheet.

3D Model
Model Layout

Render and Print:

    I took the finished 3D model and imported it into Keyshot. Since I am going to be using wood to make this lamp, I choose one of the wood materials available inside Keyshot's favorites. 


 Lamp Off


Lamp On


Brittany Han: Prosthetic Accessory

 Concept Inspiration:

    My inspiration came from the cute Ranchu Goldfish. I wanted to capture the known silhouette of a goldfish with this mask. I combined the smooth scales of the fish with a functional mask to make a soft on the skin mask. I thought it would be cute to walk around with little fins.


Process:

    I used the provided female face to model my mask onto. I used a combination of curve extrusions as well as premade shapes to get the desired look onto one half of the face. I boolean differenced any unwanted geometry, then I mirror these shapes to the other half of the face. I then used boolean union to join the two halves together.
Model 3/4
Model Side
Model Front
Model Top

Rendering and Materials:

    For my materials I choose to go with items that would feel soft and cool against the skin, like fish scales should. For the main mask section and the straps, I went with a leather material. The lips and fins are made of a durable plastic. and the vents are made out of a hi-dense foam to help with air circulation.
Render 3/4 View

Render Side View


Monday, October 10, 2022

Brittany Han: Week 4 Flashlight


 Inspiration

    For my flashlight project, I was really inspired by rings bands and stems without the stones. I thought this would make for a cool affect when the light was turned on, the top is the main point where this shows. However, for the main body I wanted to make sure there were enough divots and groves do the user wouldn't loss their grip.


Modeling

    For the body of my sleeves I use curves to get the main shape. I filleted most of my edges to stay with the theme of the rings as they don't have sharp edges normally. I used solids ArrayPolaring them around the main body surface, and to add the holes and divots I used bolleanDifference to subtract them
Flashlight Layers


Flashlight Specs
Rendering

    For rendering I used Keyshot to get the front and back profile of the flashlight. I decided to leave my render black for a clean look. I will revisit this in the future to change the colors to their respective looks.
Flashlight Front Render
Flashlight Back Render
3D Print

Sleeve Upright

Sleeve Front

Sleeve Back
Final Look with Flashlight

Flashlight On Pattern

Flashlight On Upright

Flashlight On Front

Flashlight On Back


Monday, September 12, 2022

Brittany Han: Week 1 Castle


     Inspiration:

I wanted to make a castle that was a little off the books but could still be recognized as

a castle if anyone were to look at it. This is where I had the idea to make a giant bouncy castle.

I searched around the internet for possible ways to make this happen and found this big event

bounce house. I knew I wanted to do something similar, but have the insides be connected to 

the main bounce house unlike this one where the smaller bounce houses sit atop it. 


Modeling:

The main primitives that I used while modeling my castle were cylinders. Its a very 

common shape seen on all bouncy castles. I wanted my design to be more cohesive then my 

inspiration so I kept it simple with the small tower tops that are seen. While not visible here I 

wanted the castle to be completely accessible without having to leave the structure, so there are 

slide and climbing walls that connect the large main base to the smaller satellite castles.

Materials

For my materials I went with the materials one would usually find on a bounce house. The 

main framework and bounce pads are made of plastic for easy inflation. The side walls are made 

of mesh. The ground is simply solid green material, since I couldn't find a grass material in the 

version of Keyshot. 

               Birdseye View 


                    Pedestrian View 


                    Main Overview