Showing posts with label architectonic lamp. Show all posts

Monday, December 5, 2022

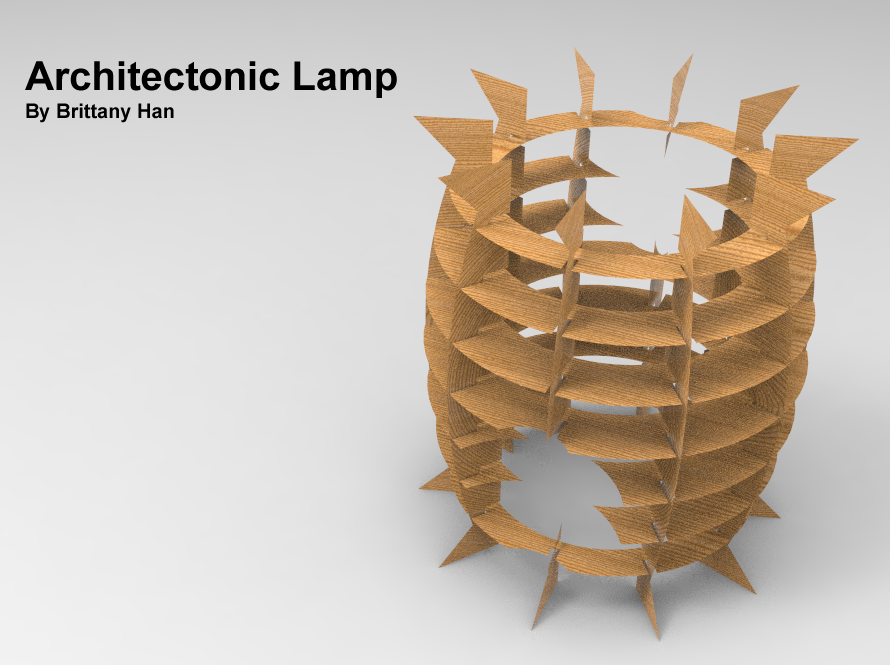
Brittany Han: Architectonic Lamp

 Inspiration:

    The inspiration for my architectonic lamps are the old kerosene lamps. I tried my best to stick to the feel of these old lamps, but still keep it simple enough to easily be cut out of my material. Since the eye catching part of the kerosene lamps is the middle where the flame is held this is the section I decided to emphasize. 


Modeling:

    The first step I took while modeling was getting the overall shape I wanted. I accomplished this my using the curve tools and then revolving the shape 360 degrees. I then put the finish polyshape into grasshopper with the grillage coding provided and set the setting to what I thought looked good. Having finished the model to what I wanted, I told the program to slice the sections and laid them out onto a 2 x 4 sheet.

3D Model
Model Layout

Render and Print:

    I took the finished 3D model and imported it into Keyshot. Since I am going to be using wood to make this lamp, I choose one of the wood materials available inside Keyshot's favorites. 


 Lamp Off


Lamp On


Alexandra Escobedo: Weeks 12-15 Architectonic Lamp

Lamp Model (Flower)

Inspiration

The inspiration behind this model was a peace lily plant and the shape of their petals. The tear drop shape was something I wanted to mimic in my model and was able to do so successfully. I wanted to make a lamp that I would personally use, and that was able to match the aesthetic I had in mind. 


Process

The process involved making petal shapes using curves. After making one petal, I used the loft technique to make it look like a solid flower petal shape. Once completing the first petal, I then utilized the polar array technique to make exact copies of the flower petals. I then created the base for the lamp utilizing the torus shape.


Materials and Techniques

The material I used was plywood to demonstrate what it would look like in real life. Some of the techniques I used involved the curve tool to make the petals; polar array technique to make perfect copies of the petals; and utilized the loft technique to make the petals look more solid in structure. 


Monday, November 14, 2022

Faith Romero: Week 13 Architectonic Lamp

Design Intent 


    It actually took me a while to find a shape that I liked, I continued to sketch and sketch and apply grasshopper to my models. Until I found the shape I liked, and I thought it was too basic until I duplicated it and layered the time, making a hour glass shape. 

Modeling Techniques 


    I began with creating different versions of models, I hated how they had flat bases. My final model I made with a torus shape, I added my cylinder in the center and applied the grasshopper script. I loved how the base had rounded edges, but the model looked really small so I duplicated it and flipped the model. I adjusted the horizontal and the radial slice counts both to 8. I did this so that a horizontal slice would not go through the the middle making the structure weak. 

Rendering and Materials

    For the material I choose to go with non-glossy looks. I choose paint for both with different colors, the blue on the horizontal to make the structure look taller. The grey for the horizontal to be a neutral color. 

Final Version 


Monday, May 11, 2015

Charles Person Lamp

For my lamp project I went through several design ideas, eventually settling on one derived from my flashlight model from the first project.  The model was scaled in two dimensions and tapered slightly to give it a new shape with a wider interior that would lend itself better to fitting a hand to change a bulb. when adding the contours to modify the model I wanted to emphasize the ridged pattern on the bottom, so I applied more vertical contours on the lower half. I also wanted to have an open front, which led to some problems on the printed prototype in conjuncture with slightly too small slots that made it difficult to assemble the model correctly. I also missed the flat base when unrolling the planes, necessitating some modification on the prototype to allow it to stand. Future iterations of the project would have the radial planes moved forward to better balance the structure.


For the lamp project I wanted to refer back to the lamps of old which used actual flames for light. I felt like the tear-drop shape used in most of the lamp examples worked well as a flame as well. As opposed to making a more realistic "swooshing" flame, I decided to create a more stylized version to better demonstrate what the shape is supposed to be.

For modeling, I create the 4 circular shapes, then made a single curve that had the sillouette I wanted. From there I modified it to have wisps coming off of the sides. I used 3 unique curves, 2 across from each other, then the last was duplicated 3 times and used between the others. I used the pipe method to create the slots in each section.

Unfortunately, I thought I had already made this blog post with the required photos, but without the finished product, as I had done for the serial slice project and the waffle posts, but it seems like I did not. As such, and since I do not own Rhino, I only have the pictures of the finished product.


Sunday, May 10, 2015

Renae Patoskie Week 11: Lamp

In most of the examples for the Architectonic Lamp project, a shape was used to create the lattice structure. I wanted to use multiple forms to create something more active and engaging. 

To create the model I drew separate outline curves for the two different layers. I then revolved them, and took a single section slice which I then used the polar array to equidistance my slates around the form. I repeated this concept with the other shape. I then found the innermost points of each object and inserted circular planes to hold the outer shapes together, careful to leave ample room for a spherical lightbulb.

After using the CutMyRibs script to create my slots, there were a lot of overhangs, to simplify the clean-up process, I simply corrected a single outline of each form and then duplicated each 7 times to get my outer shapes.

Rhino rendering of final model.


I tried to save material and time by printing both my box and lamp on the same sheet.


Lamp rendered in red and yellow plexiglass


Lamp from above with simulated emissive light, for the interior places I used clear plexiglass.


Constructed Lamp.

Monday, December 15, 2014

Brian Chancellor Week 11: Architectonic Lamp


This is my architectonic lamp.  For this project I decided to try for something very unique and more difficult to make than my previous project.  I drew inspiration from the marker's shape that is in the Dead Space franchise.  You can see that image below.


I created two separate spiral shapes in rhino.  I twisted each around a central axis and inverted one.  After that I made sure to hollow out the center with an inverted cone.  this would allow for the cord and bulb to fit snugly.  I made sure that the bottom hole was one inch in diameter so that the base of the lamp would fit well.  You can see my base model below.


The next few steps took me the longest.  I had to repeat the slicing part of this project four or five times to get a shape I was pleased with.  The first time I also made the pipes to large and had to come back and edit the slots.


And here below is my lamp cut and assembled.  It turned out much better than I had expected with its unusual shape.  It was difficult to piece together much like a puzzle.


In keyshot I choose to use a glossy black plastic material.  I wanted the lamp to look ominous and the black color goes back to the inspiration I took from Dead Space.  With the sharp corners and spiral shapes black makes the lamp look ominous.