Showing posts with label serial slice. Show all posts

Sunday, October 3, 2021

Paige Brown: Week 4 Serial Sliced Sculpture of Original Design

Concept:
I went through two different concepts, the first being a spork, but eventally settled on a fantasy penguin design. It is partially a penguin inspired design along with the neck of a goose and the tail and beak of a toy rubber duck.
I designed it to be on the somewhat smaller side to reduce cutting costs and material needed. I designed it to be simple because it would lose a lot of detail serial sliced because it is small.


Creation:
I was running short on time so I attempted to create the bulk of model in Maya. Admittedly I'm not very skilled in that program either so I did what I could in hopes I could make the finished product look better than the model itself. I largely created a sphere and extruded from the geometry created. However I did create the legs in Rhino with a control point curve and used the revolve command to create geometry around an axis.

Some assembly images:

Materials:
.25 cardboard sheet, Loctite, newspaper, Mod Podge, and spraypaint

I wanted the surface smooth since I didn't think the paint would show up well on corrugated cardboard. So I covered the surface with paper mache much like a pinata. The legs were fairly flimsy so dowel rods were inserted roughly halfway through the body from the feet giving it weight and stability.

I chose matte black spraypaint and semi gloss white spraypaint for the body and painted the eyes with enamel craft paints.


Monday, March 20, 2017

Lauren Barbieri:Week 10 Serial Slice


concept
The best among dogs, our dear friend Tucker, graciously posed for this model (when  bribed with enough treats). I wanted to keep it a little simple and cartoonish so it would look good when sliced. the eyes are hollow. I'm thinking I'll add glass or marble eyes to the inside. 
modeling
I Worked from primitives to form the basis of the face and muzzle using control points and Boolean operations. the ears and neck were made using sweep2.
The serial slice was created right along with the way the videos said. I created cores (3 in this case) and contouring them and the model, extruding the curves created by those contours to create a digital representation of what the final model will look like. Then I laid out the curves to fit on a reference panel. 


Tucker himself is a very big dog, the rest of his litter ended up around the size of a Labrador, but somehow tucker draws more comparisons to a Great Dane in size. so I really couldn't help having three sheets. 


materials
Tucker's coat is brindled. Inter-striped with blacks and whites and light brown, replicating it proved to be a challenge. So my attempt failed in some respects when transferred into Keyshot I couldn't get my texture map's tones to show quite as I'd like. Although it still came out a nice mottled brown. I applied a bump map of wood to make it look a little more rugged. In the real slice I haven't decided definitively towards what material to use but I am leaning towards cardboard, if only to keep it from getting too heavy. 
Update: May 1
It was cut out of a Home Depot box, And came out a little fatter than anticipated but still recognizable and not too warped. Then it was glued and spray painted black. I left a bit of the brown intentionally to mimic tucker's coloring.


Maizie Desmarais: Week 10 Serial Slice

Concept:
My serial slice model was based off a children's cartoon called "My Neighbor Totoro." I really loved the unique silhouette that can easily be recognized and the overall design of the spirit. Totoro is a forest spirit that is friendly towards the children that appear in the movie and really brings out the inner personality of a furry giant. 


Techniques:
My model was completely made in Maya software and started off with 2 spheres: one for the body and one for the head. I then sculpted those to the shapes I needed and combined them together. For the arms, ears, and tail, I extruded a few faces outwards until I got the desired shape I needed. I then used contour command in Rhino to create my slices and extruded for the model.


Materials:
Because Totoro is a forest spirit, I thought wood would be a great material to use to really match the character's home. For wood I used oak purely because of the color and texture it gives off to make my slices for visible. The second material I used was a glass texture just to see the highlights off each individual slice and really liked how it looked.

Sunday, March 19, 2017

Rebecca Genung: Week 10 Serial Slice


NOTE: The scars are only on the one side

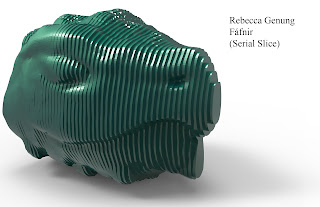
For this project I wanted to do something culturally significant to my heritage (I'm mainly Scoto-Norse) so I went with the most impressive beast of both the Celtics and Norse: Dragons. In pre-christian Celtic mythology dragons are natural beings who are either sea serpents (such as the Mester Stoor Worm) or impossibly large beasts who make up mountain ranges. As I started working on a earthly dragon ( a sea dragon would have fins and other protrusions that would violate the "closed fist"-like rule) I wanted to focus the design. I took inspiration from the Norse side and decided to make my interpretation of Fáfnir. Fáfnir was a Dwarf who murdered his brother for treasure from the Æsir (long story) and slowly turned into a dragon from his greed. He was eventually slain by the hero Sigurðr (another long story). My design originally was much more menacing; with protruding teeth and jaw horns. Unfortunately, these didn't read well in the sliced version and I removed them.


For technique, I modeled the head in ZBrush (about 40 minutes to make) with vertical cutting specifically in mind. Still, I had to snip the last ring from his bottom chin to meet the no double rings requirement. I'm a little worried about how many cut sheets I used, but making the model small enough to fit on less sheets cut away too much detail for me to be comfortable with. The main problem is that there are many layers of large size in the mid-section of the bust.


I wanted to take advantage of my model's asymmetry. The first concept is a marble statue that somehow survived through the ages. The KeyShot material is called Granite Gray (I added some aluminum coloring).
The second concept was that this was a lost treasure of some sort: maybe Jade or Malachite. The KeyShot material is called Tempting Turquoise.


Ideally, I could mount this on my wall as a conversation starter (I already have several odd things of similar nature for my future parlor). I've considered adding a papier-mâché skin so I can paint scales, glowing eyes, etc.

Wednesday, March 15, 2017

Jason Doze: Week 10 Serial Slice

Model / Vertical Slice

Vertical / Horizontal Slice
 Horizontal Slice
 
Horizontal Serial Slices

 
Shot 1

Shot 2
Shot 1

 
Shot 2
Assembled Model


Concept:  I didn't have much of a conceptual idea in the beginning so I just began to play around with shapes with the intention to end up with a sculpture that I like.  After trying several iterations, I decided to go with a clean and simple design of three counter balanced spheres.  I wanted them to overlap and have the largest sphere on the top and the smallest on the bottom. 


Materials:  I played around with material for a few days before deciding what I liked best.  I chose wood for my materials because it seemed the most realistic representation of wood being sliced and pressed one atop the other with a series of spheres cut out and veneered with a contrasting color of wood.  I would not typically choose wood for my material but for this particular project it seemed to be the most plausible.   For fun I made another few versions one with glass cubes another with wavy glass I added soft and sharp radial emissive lights to give the model an other worldly look.  The background for the black model is the Los Angeles noon summer solstice background.


Technique:  I made the spheres with solids and created an array of spheres with opposing angles so I could boolean them out of the model.  Then I used boolean union to combine the individual shapes into one model.  I made the cylinders to cut the .25" dow rod holes.  Using contour, and extrude crv I sliced the model horizontally and vertically, then made the reference rectangle, and moved each slice and numbered them with text.

Wednesday, May 4, 2016

Christopher Rickett - Serial Slice


Concept: For this serial slice project, I wanted to create a structure that, while structurally sound because of the rods and glue holding it together, appeared to be doing a balancing act. What I ended up with was a structure that resembled a rock stack.


Technique: The technique that I used to create this rock was creating 8 different curves and making 2 smaller duplicates of each one. I spread them out from top to bottom at different distances and then lofted them together. The total height came out to just over 10.5". I contoured the model at 1/4" intervals to get the slicing that I wanted.


Material: I chose to go with 1/4" cardboard for this project.  I Liked the dark brown color that it had, and it contrasts nicely with the light wooden base that I had put it on. Overall, I liked the way That it came out and I would like to see how it would would look if I had more slices and made it out of a dark wood and maybe the thickness of 1ply cardboard.

Monday, April 25, 2016

Tara Intyrath: Serial Slice

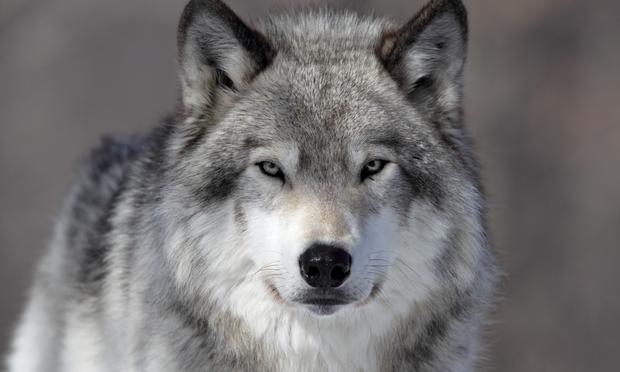
Concept: For this projects concept I wanted to focus on my favorite animal, wolves. I have been in love with wolves since I was a child after reading a book about them for a school project. They fascinate me and I have yet to design anything using a wolf so I thought to take this chance. A full wolf would have taken me far too long to model so I decided to go with the neck up of the animal.
Technique: I had a lot of difficulty working with this model as I haven't modeled something so organic before. I first took the approach of trying to edit a sphere or a box and shape it into that of a wolf head but all the vertices were very confusing. My second approach was to create curves of the wolf using google images as references and to create surfaces off those curves. I found that much easier to do and divided the head into four parts; the nose, main face area, the neck, and then the ears. I had lots trouble getting sweep or surface network to work properly or have an outcome I was satisfied with. It turned out a lot of my curves were not intersecting properly so I learned to make the curves into segments to get a better fit and then joining those segments together to make things work properly. I ended up using sweep2 for the whole process to create the surfaces. To make the swirls and detail of the eyes I made a flat curve and used project to get the curves to wrap around the model, offset them, made them into surfaces then solids, and boolean differenced them. I used various other commands such as join, to join my curves and surfaces once I created them, cap planar holes, and boolean join. Creating the contour lines, unrolling them, and making a spread sheet was the easy part of this project.
Materials: For the laser cut material I decided to stick with the .25 cardboard available at the Fab Lab as it was a cheaper solution and I also wanted to see how the ridges or the insides of the cardboard would look once cut out, hoping it would give an interesting outcome. Gratefully, it came out very well done. My model due to its shape and size has a lot of shapes and parts that aren't in one piece though in the same layer slice which is why I had to go with four rods. I decided to use threaded rods so I could tighten the slices together and ended up liking the "Frankenstein" look of it so left them in. I am very happy with the results of the real model. For my keyshots, I decided to choose a clear acrylic/plastic material and a metal material. I chose these two materials because I wanted to see what it would look like in various materials and hope to maybe make a serious out of these wolf heads.