Monday, October 30, 2017

Anyssa Akridge Week 10 - Cardboard ball

Concept:
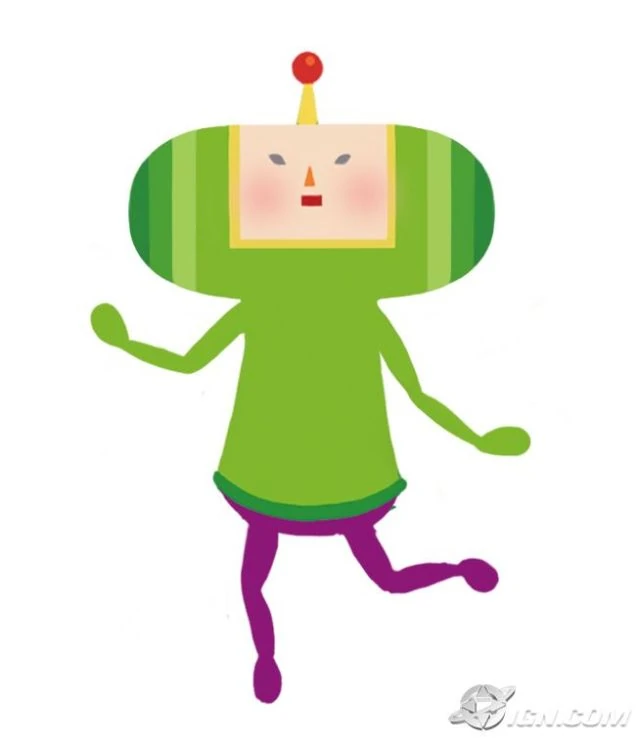
My Idea for the cardboard ball would be a cosplay head piece of the little prince from Katamari. Katamari is a game where you collect objects onto a ball, and try to make that ball as big as you can before the time runs out. Since this is my first time using the pepakura process, I thought it would be apropriate to do a simple low poly model of a game character that's made out of primitive shapes.

Techniques:
Using Rhino , I modeled the head with the Cylinder tool, the Cone tool and the sphere tool/ Half sphere tool. I used the command show bounding box to look at and adjust the measurements. Then I used the Mesh from NURBS object tool to create the low poly model while also making adjustments. After that I separated all the shapes and imported my model into Pepakura Designer. I made sure that everything in the program was set to millimeters. I also used the slice tool to better place my laser cut lines onto the cardboard sheets. I exported the pepakura instructions and imported it back into rhino to color my pepakura lines. After receiving my Cardboard cuts back from the laser cutter I used Loctite glue and masking tape to construct the head for the Katamari character. Then I used a urethane sealant and acrylic paint to paint my head. I cute out a square hole in the bottom to place my head inside the mask. Finally I cut out the eye holes and stretched black stockings on the holes to create eyes I could see through, but still looked dark and black out the outside.
Materials:
I used Flute cardboard, Loctite glue and acrylic paint to create my Katamari head. Katamari is a low poly game so using the low poly model made of primitives while adding a more detailed paint job/ texture made my head more game like. I also used black stretch stockings over the eyes so I can see through the head without the viewer seeing my own eyes, wrecking the illusion. I also used masking tape to attach parts that were hard to attach with the super glue. For keyshot rendering I used gold and gemstones for the hat/crown to represent royalty. And then for the base I used brushed on paint and metallic paint.


Taylor Volquardsen: Week 10 Cardboard Ball

Concept:
My original idea was to create a boar's skull. I had seen things like longhorn skulls and elephant heads, but not a boar. The idea for a boar, in particular, came from the movie Princess Mononoke. I thought it would be fun to work with the tusks.

Technique:
I originally pulled a few different models from the digital databank. I had the idea of taking one of the animal skulls and modifying it to look like a boar's. I decided that I didn't have the time to do the sort of work that would have required, so instead, I took the cat skull model, lowered the polycount, and reworked the wireframe into something that would be easier to cut in Pepakura. As I started putting together the cardboard pieces of the skull, I realized some of the pieces came out smaller than I thought they would, making them hard to manipulate and I had some trouble getting some of the pieces to fit right. In the end, I ended up editing the design some and removed the complicated eye socket structure to aid in construction.

Materials:
Cardboard, and eventually sealant and acrylic paint

Elizabeth Garvey: Week 10 Cardboard Ball

 Concept
The idea of this project initially came from the faun from Pan's Labyrinth. I wanted to make the horns resemble the shapes of a ram, while keeping it rather low res. Initially I planned to make ears, but ran out of time.


Technique
First I modeled out the horns in Maya, and then I reduced the number of polygons so I could transfer the files into pepakura easier. After that I took the files directly into pepakura so it could be deconstructed. After this I sent the files off to be laser cut. The finishing touches were assembling the pieces  with hot glue( they came to me in a big pile) , and later painting it. I later glued it to a hair band for support.


Materials
Hot glue , hair band, acrylic paint ,  gold leaf, cardboard, patience

Sunday, October 29, 2017

Pablo Reyes: Week 10 Cardboard Ball

Concept

Dia de los muertos derives from an Aztec ritual to the goddess Mictlantecuhtli, queen of the after life, and that transformed to a celebration in which people commemorate their deceased loved ones by offering various foods and objects that the lost member used during his or her lifetime, ex. (favorite food, favorite drink, favorite toy). My inspiration comes from the first dia de los muertos parade that took place in Mexico city in 2016, such was due to the fans of the movie Spectre and it's Hollywood made parade and it inspired people across the city to create on of their on. my design is mostly based by the pattern and dimensions of the costumes below.

https://www.cntraveler.com/gallery/mexico-city-holds-first-ever-day-of-the-dead-parade-thanks-james-bond


Technique

Using a skull model from the database at the 3D Studio in the ATEC building, I created a  (#) polygon model that would work well with the Pepakura software and of a real life size that match my concept.


Materials

The materials I used were flute cardboard and acrylic paint.


Wednesday, October 11, 2017

Elias Perez - 3D Printing

Concept:
    The focus I was trying to make with this model was to create a small figure to lighten up my desk at home and I recently found a love for adventure based video games and decided to follow the classic trope of the hero who pulls the sword from the legendary stone. I was inspired by many different swords from franchises that I adore such as the Legend of Zelda's Master Sword, Zabuza's Executioner Blade from Naruto, as well as a traditional British Sword. I used the Master Sword as reference for the hilt using the spiraling shapes that stack on top of each other for the main design, I was focused on creating a dull like blade to give a sense of use and heavy weight alongside the brutal idea of a large slab of metal on a handle coming for you.

Master Sword Hilt (Reference)

Executioner's Blade(Reference)

British Sword(Reference)

Techniques:

    The techniques used for the creation of the model included the use of the Snapping Tools to the grid as well as the center of objects, Rotating, BooleanUnion, Linear Dimensions, Analyzing of Edges, and Scale commands. When building the model I would make sure to snap the beginning shape to the grid so as to make an even circle for the cylinder's base as I knew I would be making multiple and different sized shapes and stacking them on one another and then combining them with the use of BooleanUnion to create the hilt. The use layers were meant not to separate the objects but rather to be used to hide them when I needed to use the center snap tool to create an evenly stacked object and truly choose the center of the object that I needed. Rotating played a big part as I began working with the sword upwards and then rotated it 180 degrees and then angled it to my liking so that I could work on the hilt, and the handle of the sword as well as get the ominous angle of the sword being embedded in stone. The stone was made to serve as my platform and base for the object as well so that it will stand up on its own on my desk. The Dimensions of the object are about an inch off of the requirements but I found that it was a necessary amount considering the sword is just generally long and the base high, I scaled it down from it's original size to meet these requirements. 

Ghosted Image of layers and the Final Grouping

Showing the Analysis of the Edges

Measurements: 
    The required measurements for this object were meant to be 4 in. width, 5 in. length, and 6 in. height however I exceeded these each by 1 in. as I saw it necessary to get the length of the executioner blade as long as it could be as that is part of the menacing factor. The hilt adds length as well as the base so I treated each as separate objects. I edited the dimensions of the world as it began in millimeters and then used the Linear Dimension from the Dimensions drop down box to show the measurements on the grid plane. 
Measurements of Model(Different Color Used for Emphasis of Text)
Materials:
    The materials I hope to use are just a nice wood that can be painted as I wanted to paint the model by hand as well as be able to engrave into it physically with a human touch rather than have the printer do all the work. I plan on carving an insignia into the rock so as to create a sense of a kingdom elsewhere or show importance of the blade. I am going to carve into the handle of the blade so that it is not entirely just a rounded cylinder so that I may later wrap a ribbon into the crevices of the cut to create a more realistic feel of a grip to the blade. 
    

Valeria Cavazos - 3D Printing

Concept:
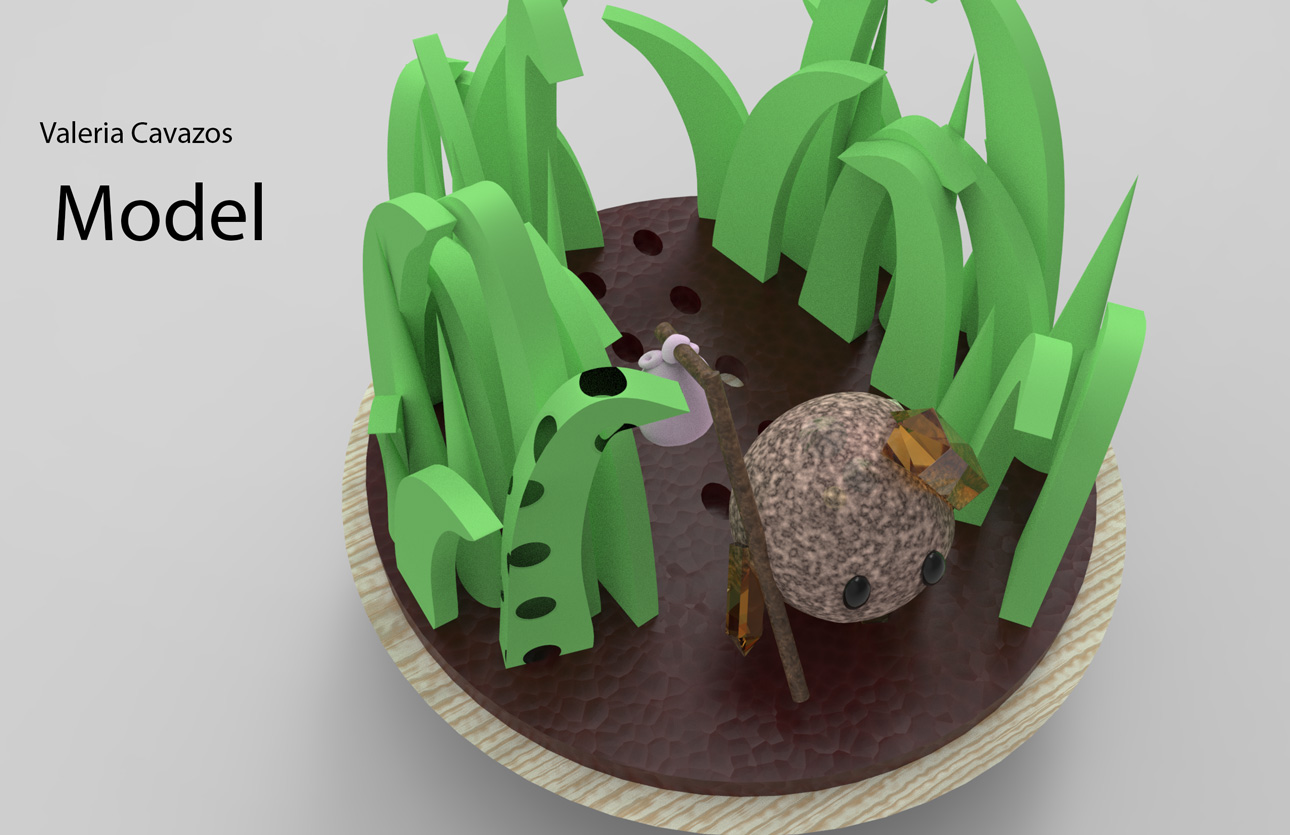
    My concept was based on a character I designed for a children's book as a Graphic Design project. This rock is one out of five and as the leader of the group, I chose to make a scene depicting him walking through the some grass with his mini hobo bag. 

Techniques:
    I first started with the base and the tried different styles before choosing the one in the picture in order to keep it simple yet show that it is a base. It was made with a truncated cone and a extruded circle to simulate dirt. The grass was drawn with the Curve tool to get two different styles, extruded both, and placed around the rock, along with a thin triangle. The actual was was created using a circle and adding small triangular pieces to make the rock look less smooth and more ragged. The gems on the rock were made with a hexagon from the Shape Tool and tracing the shape with a line tool in order to create a triangle for the points of the gems. After making one, I just copied, pasted, and scaled four more for the limbs. 
ghosted image
ghosted image with Keyshot layering assignment

measurements

Material:
    The bases material was made to look like wood and the base that simulates dirt was made with a leather material. The rock was made using a granite rock but I changed the colors in order to get a grainy appearance but not get lost in the material and the gem was a yellow gem. The grass was a result of playing with a miscellaneous material, Matte White, in order to get an organic look but not cartoonish or too fake. Metal was also too shiny to get the organic look of the grass but the front blade of grass with holes is actual metal colored green with properties such as the roughness and the Material Type. 


Final Product:


David Rake Puzzle Box Progress

Throughout this semester I am creating Puzzle Boxes. Puzzle Boxes are boxes that can be opened via a mechanical sequence. These boxes either blatantly appear as a lock box or are more inconspicuous.

Attention: If anyone has any intention to solve these blindly ignore the pictures as the give away clues.

Drawers:

Concept: My first box if seen from the front appears as almost a chest of drawers except they're vertical. It has five vertically moving bars and one horizontally moving bar at the bottom. I started drawing and creating it last spring but didn't get far before realizing how confusing it is to reverse engineer a puzzle that doesn't exist.


Method: I did some brief sketches with the intended solution which was later ripped apart and recreated. The original solution was eight steps and was changed to a seven step one because I realized a flaw that made it solvable in three steps originally. After deciding the way the puzzle moves and is solved I created curves in rhino simulating my drawings. Then I started to test build it in 3d space to make sure all the pieces fit together and solve it before it was physically made.


Materials: I originally planned for it to be laser cut, but I tried out the idea of 3d printing it and that was too costly so I have fallen back on laser cutting. I am using MDF for my first build but if it goes well I may look into other materials like more aesthetically pleasing woods.

Cube:

Concept:  My second box idea quickly came to me while working on the first box and I almost finished the second box before the first because of my excitement about it. It is more of an inconspicuous box and is not clear on how to even start tackling the box. For the picture below I did not use Ghosted because it was very confusing looking.


Method:  I did some brief sketches and ran through multiple iterations on how to do the internal locking mechanisms. It wasn't until I had a dream about it that I really figured out the best way for this first version. I started with a square shape and added and subtracted from that shaped to create all the parts. I use space much smarter than in the first box so this one is much more compact. For the picture below I was using red and purple because it was easier on my eyes to work with.


Materials: I'm using MDF for my first cut out and would LOVE to move to a nicer wood if it works as well as I hope. I think this design will be one of the prettiest out of all since it is more inconspicuous.

Engraved Lock Box:

Concept: This box is much in its infancy but I wanted to create a box with a puzzle on the outside in engraved pictures. I may create two of these specific boxes with one having pictures that can be translated to a solution and one for my Dungeons and Dragons Players for them to solve with clues from their adventures.