Showing posts with label Fall2016. Show all posts
Monday, December 5, 2016
Draven Ashorn-Hejl: 3D Scan Project - Isabelle Statue
Labels:
3d,
3D Scan,
ashorn,
ATEC,
atecfabutd,
draven,
dravenashornhejl,
Fall2016,
hejl,
scan,
Scanning
Draven Ashorn-Hejl: Box Project - Starlight
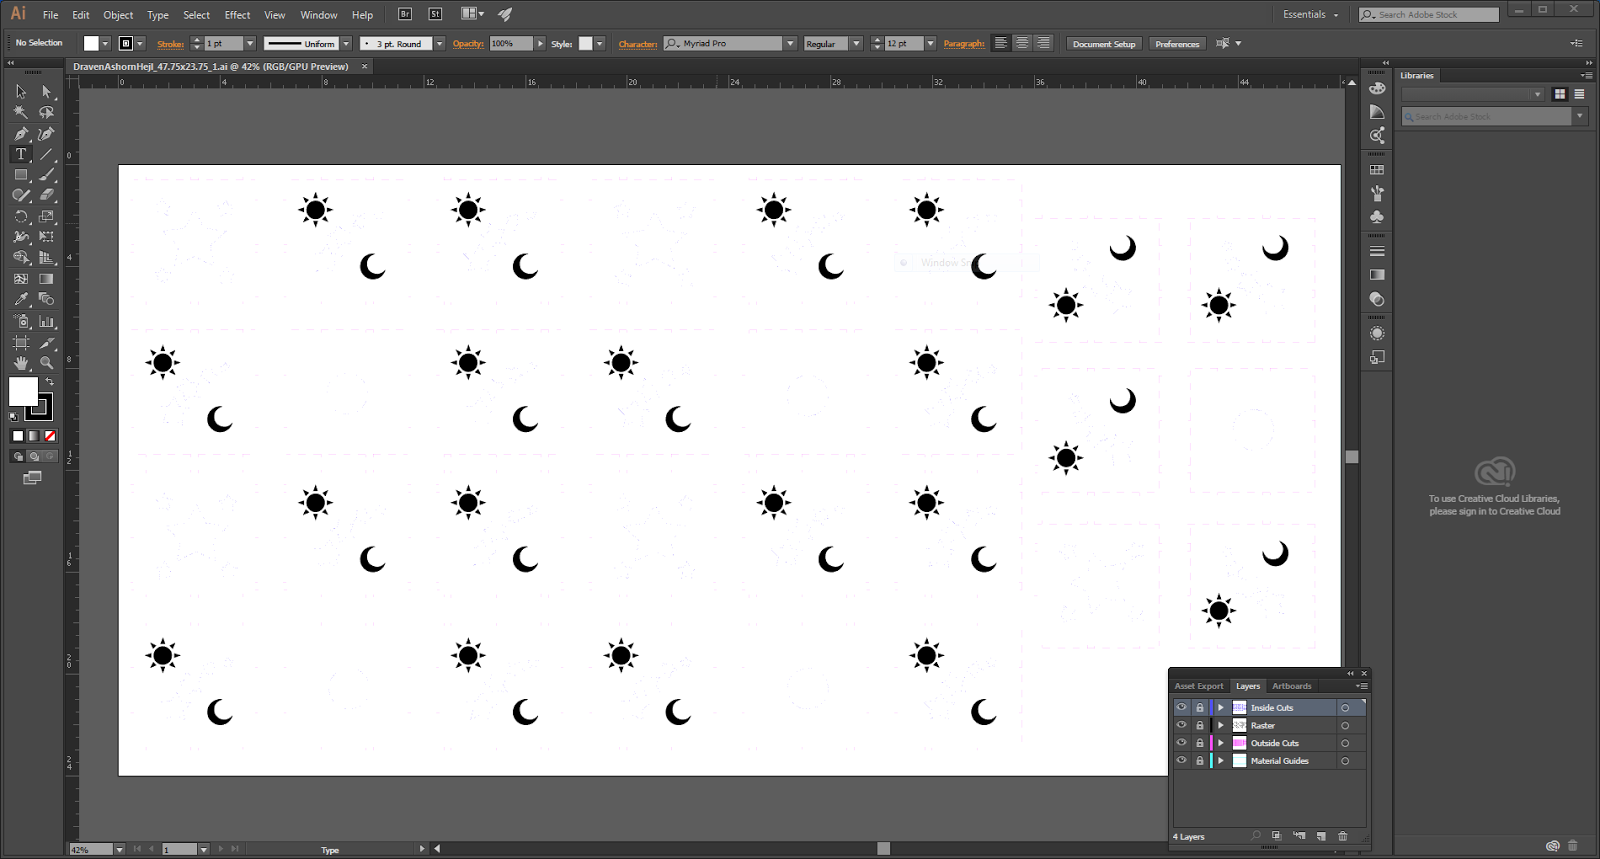
Techniques: I used Box Maker to create the outer shape of the box panels, then imported that into Illustrator, where I added the Star shapes for inner cuts and added vector images of the Sun and Moon for raster engraving, and also cut a hole in the bottom to place an electric tea light to light the box.
Materials: I bought a sheet of plywood from Home Depot that was just barely smaller than the laser cutter window for the material for the box itself (out of which I got 5 boxes), and used the UTD Fab Lab's laser cutter to do the cutting and engraving of the panels. I then used superglue to ensure the boxes held together and added a small electric tea light for the illumination.
Labels:
ashorn,
ATEC,
atecfabutd,
box,
draven,
dravenashornhejl,
engrave,
engraving,
Fall2016,
hejl,
laser
Draven Ashorn-Hejl: Laser Engraving Project - Skateboard
Materials: I bought one of the skateboards Professor Scott recommended because I trust his judgement, and used the laser cutter at the UTD Fab Lab to handle the engraving.
Labels:
ashorn,
ATEC,
atecfabutd,
draven,
dravenashornhejl,
engrave,
engraving,
Fall2016,
hejl,
laser,
skateboard
Sunday, December 4, 2016
Michael Crow: Week 16 - 3D Scan
Concept: For this Project I worked with Melanie Estes. She created a candle overnight with fast drying clay, using small beads and animal sculptures, she created a relief into the wet clay of the candle base and placed a candle int he top.
Modeling Techniques: Once it dried we scanned the sides of the object, in 12 continuous shots at the wide settings with Standard Definition. After the sides we took a single snapshot of the top to mold onto the rest of our models. Moving into alignment mode I cut out all the background scanned material and we merged the families using the tips of the fins on the dolphins, waves, and Fish Fins. this created a model with .01 deference, a very good result. This allowed us to move onto the smoothing using sandpaper and eventually an overall smooth. from there we were able to make sure there were no holes in the model, and create other , lower poly versions. Going form 1.2 million polys to only several hundred in our Polygonal model.
Materials:While the original Candle holder was made from fast drying clay. I imagined it as a mass produced little under the sea kind of room decoration for little kids. So the materials I went with for it were soft plastics and rubber. I made the candle a blue color that would both allow for maximum visibility of the relief texture, while also maintaining the theme of the sea.
Keyshot - In Keyshot I imported the model in multiple times and aligned them all up to the grid, using show grid under the camera settings. Making sure my camera was in the proper 11 x 17 ratio I went through thee different lighting environments till I found one that mimicked the street post lamp and night sky as well as I could. making sure that each one had the right gloss, texture,and was casting proper shadows I did a number of renders so that i could composite it to the best single image in Photoshop possible including a clown render for each object, a color Render and a shadow render.
Modeling Techniques: Once it dried we scanned the sides of the object, in 12 continuous shots at the wide settings with Standard Definition. After the sides we took a single snapshot of the top to mold onto the rest of our models. Moving into alignment mode I cut out all the background scanned material and we merged the families using the tips of the fins on the dolphins, waves, and Fish Fins. this created a model with .01 deference, a very good result. This allowed us to move onto the smoothing using sandpaper and eventually an overall smooth. from there we were able to make sure there were no holes in the model, and create other , lower poly versions. Going form 1.2 million polys to only several hundred in our Polygonal model.
Materials:While the original Candle holder was made from fast drying clay. I imagined it as a mass produced little under the sea kind of room decoration for little kids. So the materials I went with for it were soft plastics and rubber. I made the candle a blue color that would both allow for maximum visibility of the relief texture, while also maintaining the theme of the sea.
Keyshot - In Keyshot I imported the model in multiple times and aligned them all up to the grid, using show grid under the camera settings. Making sure my camera was in the proper 11 x 17 ratio I went through thee different lighting environments till I found one that mimicked the street post lamp and night sky as well as I could. making sure that each one had the right gloss, texture,and was casting proper shadows I did a number of renders so that i could composite it to the best single image in Photoshop possible including a clown render for each object, a color Render and a shadow render.
Labels:
3D model,
3D Scan,
assignment 6,
ATEC,
ATEC FAB,
atecfablab,
clay,
digital fabrication,
digitalfabrication,
Fall2016,
Games,
hand modeled.,
Melanie Estes,
Michael Crow,
Scanning,
Week 16
Brandon Wehenkel: 3D Scanned Object
Final Concept & Design
Work Station
Concept:
I've been wanting to do this project the entire time I've been at this school. My goal is to buy a scanner to manipulate my sculptures in a more detailed digital fashion. My design was to recreate one of my drawings into a sculpture. I made a character when I was in ARTS 1201 (Drawing Fundamentals) at my previous school. I'm quite fascinated with primates and anthropomorphism. So I used my original drawing and the original picture as an inspiration to make my sculpture.
This is Bubbah he is my character, he's based off of the Common Chimpanzee or Pan Troglodyte species. He is currently a newborn shapen into my mind. Bubbah is a kind and intelligent half-breed. He didn't transform into how he is. He was merely born half man half Chimpanzee.
Modeling Techniques:
I started off with, I believe 12 gauge wire, no bigger than a coat hangar, and created a helix with a drill to build strength. I just made a circle for the base and a 4x twisted spine. I forgot to photograph it. But trust me there's metal inside.
I bought about $100 worth of polymer clay of grey, black, and fair skin color. I saw tutorials in the past to mix the black with other colors to make the clay softer. It works but not as much as I wanted it to. I ended up with about 10 lbs of clay into one gigantic marbleized clay block. I ran into quite a bit of trouble mixing the clay together to make the shade I have now. I bought an electric pasta maker to aid in my battle and it broke after 10 minutes of work. I got my money back. Next, I tried a meat grinder. This lasted me 2 weeks. The handle broke from excessive heat build up in the working process. Because that crap was made out of cast aluminum I bought a cast iron one instead which you can see in the Work Station photo. This worked a lot better to an extent. I had to go and buy some clay softener liquid to use the machine more efficiently. But I found out that it was much quicker to do everything by hand after I spent more time screwing around with machines.
Tools
None of the tools I use are meant for clay but I've repurposed them for
my work. I've got 2 crochet needles, 4 dental needles, a jeweler's flat
head screwdriver & hammer, pliers, a spoon, an unsharpened knife,
an eyedropper, and a plastic rolling pin.
Reference Images & WIP
Facial Detailing
I was using a magnifying glass mounted to the table with some dental tools to remove all the burs that were left behind, left picture. Right picture shows less burrs. Burrs are the little pieces of clay that clump up when you slide a piece of metal into it kinda like how cheese curds.
Ditched Design Idea
I originally had him planned as a bust design inspired by Gian L. Bernini,
but I ditched the idea because the object was getting too tall. I would
need to chop the bottom off and that would get in the way of the
armature (also seen a part of my armature already cut, which came from the neck). Bad design on my part. Next time I'll just make a thinner
spine armature and not worry about making a wire base.Materials:
Polymer Clay, Polymer Clay softener, 16 gauge galvanized steel wire, various tools I mentioned above, NextEngine, ScanStuido, Rapidworks, Mudbox, Photoshop
Scan Stuido Align Process
Next Engine 6.3M poly reduction to 900k
I ran into a problem where I couldn't get the paint effect to export to any other program. Never used this program so its probably some very simple solution. But I tried importaing as .obj to Keyshot, Maya, 3DSMax. So here is an unrendered colored version of how my character looks in Mudbox. The lighting is also quite wasky in mudbox. I wasn't completely sure how to change them. Their default presets were pretty awful.
Keyshot
Labels:
3d,
3dmodel,
3Dscanner,
Animal,
Anthropomorphism,
Assignment5,
atecfab,
BrandonWehenkel,
digitalfabrication,
Fall2016,
final project,
laser scanning,
NextEngine,
Rapidworks,
scanner,
ScanStuido,
sculpture,
Traditional
Saturday, December 3, 2016
Brandon Wehenkel: Box Laser Engraving
Rhino
Inspiration (Father's Box)
My mother loves boxes so I decided to make a tiny chest for her to put her belongings. My father has one on his nightstand that my mother had created, so I wanted to make one of similar size for her. My idea was to make a box with a lid that opens with hinges. She said she wanted to paint it.
Box Interior (Final)
Modeling Techniques:
I used box designer to make a box with measurements of 9x5x5 with a thickness of .1875". I uploaded the pdf onto Rhino. I used split to cut a line onto the box shapes to create my opening. I changed that to blue. Then I used rectangles and lines to make my design. I used hatch, raster, high, medium, and low engraving colors as well. My design is quite simplistic because I just wanted to add some texture to the box.
When I assembled the box pieces I got a paintbrush and brushed wood glue on the interior ridges and on the interior crack of the box.
Front/Back and Side Designs
Materials:
2'x4'x1/4" Birch Plywood although the actual thickness of the wood was 3/16"(0.1875), 2x hinges, 8x screws & washers, Wood Glue, Brush
Monday, October 31, 2016
Brandon Wehenkel: Longboard Engraving
Photoshop Original
Rhino example
Concept:
I don't skate. My brother does. Since he does I asked him what he wanted on the bottom of his longboard. When I was younger I got an email while I was away from home that my brother had broken his collar bone while longboarding down a steep hill. He told me he wanted an omage to his collar bone on his longboard. Longboard Inspiration
X-ray
Predator Organism Radiolaria
Vertebrae seen through an electron microscope
Modeling Techniques:
I uploaded the images to photoshop and photomanipulated the images to the longboard example I gave in the concept. I used curves and saturation to create a very blown out image. I used various tools in photoshop: eliptical, rectangular, magic wand, quick selection tool, brush tool, spot healing brush, healing brush, patch tool, eraser, paint bucket, lasso tool, eyedropper.
In Illustrator: Image Tracing, Pen Tool
In Rhino: Scale 1D, Dimension --> Linear Dimension
I ended up ditching the Rhino & Illustrator idea and just manipulating the image in photoshop till I got a very different appearance. The design wasn't very cooperative with the laser engraver so I ended up enhancing the contrast with the exposure setting. I adjusted gamma to .26 (almost all the way to the right) and I adjusted the exposure to multiple different spots: I started on a lower adjustment of +1 and I believe I adjusted it to +14 for the final design. Because of this I lost a significant amount of detail.
I had also used pixelation and greyscale to my advantage to get more detail out of the shadows that I wanted in the X-ray, without the pixelation I would have lost all detail.
Materials:
The longboard is made of pine. I did a test on Oak because I had an excess of that wood at home. Its an expensive test, but I didn't want the wood to go to waste. I ended up not doing a 2nd test and just editing the design five different times to be printed on the pine board.
I used a spray on sealant to clean up the exposed laser engraved areas. But I didn't want to use paint on with a brush because I fear that I might have some slight clumping in the pixelated area.
Final
Sunday, October 9, 2016
Draven Ashorn-Hejl: Week 8 - 3D Print
Concept: My favorite game is Final Fantasy XIV, and in it your character wears a lot of accessories, including a pair of rings. One of the armor sets in the game is the Halone's Champion set, an angelic set of armor with a focus on wing imagery. Unlike many sets of armor in the game however, the Halone's Champion set does not have an accompanying accessory set, so I decided to make my own idea of what the rings of the set would look like.
Process: For the model of the ring, I kept things simple, as in Final Fantasy XIV their ring designs are all simple bands focused on highlighting one feature. In this ring's case, the focus was on the wings at the top, which I made by manipulating a sphere with Gumball until it was flattened, then cut a notch into it using BooleanDifference to add detail and some dimension. I then grouped multiple "feathers" together into a wing, then mirrored the first group to the other side of the ring to make the matching wing. To keep the wings solidly attached to the core band, I used simple cubes the length of the band to fill in the small gaps between the feathers. For some extra detail and flair, I added a 7-sided pyramid to the top as a small decorative gem, and cut small gaps into the core band of the ring so that it wasn't plain and flat all around. After the model was printed, I hand brushed on 2 coats of XTC-3D and then hand painted it with acrylic paint to finish it.
Materials: In Keyshot, I used Brushed Metal in gray and yellow for the core ring band and the wings respectively, but tweaked them to be more silver and gold. For the gemstone I used Blue Gem Stone, tweaked to be less transparent and rougher, with a deeper blue hue. For the physical ring, it was printed with basic 3D printer plastic, and I hand painted the ring with acrylic paints.
Michael Crow: 3D Printing Assignment
Concept:
The Legend Of Zelda is my quintessential connection to all things nerdy. It is what made me want to pursue my career in animation, modeling and video games. In the N64 Game "Ocarina of Time" you are sent to several dungeons to collect "Medallions" to beat the game. To me each of these medallions represent challenges I have overcome in my life. I consider learning the ability to create physically what i perceive visual a milestone in my training and a talent to carry forward with me. So I decided to recreate these medallions and a base fitting them.
Modeling Techniques:
Each medallion started out the smae with a wide cylinder base, using a slightly smaller copy of the base with a Boolean difference to create the raised lip edge. From there it was mainly simple shapes, adjusted using their "Control Points" and duplicated to create the reliefs I needed to Boolean Combine or difference to get the shape I wanted. from there I was able to Fillet the edges to create a nice swooping join along the edges that wast to wide or to pointed.
Materials:
3D Print - The medallions were all 3D printed at the UT Dallas Art Barn Fabrication Lab, using ABS plastic. These were then coated with 3 layers of XTC-3D to give the model a more cohesive look and provide a primer for the different colored Acrylic paints. One different color for each of the Medallions. The base was laser cut from 11x14 sheets of .25" thick Acrylic. A base and a Top layer were cut and the sides facing each other were sanded down and conjoined using Super glue. Once that was hardened the entire base was sanded using 120 grit sand paper and coated in multiple layers of Black Gloss Spray Paint and the Golden triangles were attached with super glue
Labels:
3dmodel,
3dprint,
3dprinting,
Assignment 3,
atecfab,
atecfablab,
digitalfabrication,
Fall2016,
Games,
Legend Of Zelda,
Medallions,
MichaelCrow,
Ocarina of Time,
Project 3,
Week 8,
Zelda
Subscribe to:
Posts (Atom)