Showing posts with label JungChoi. Show all posts

Sunday, May 1, 2016

Jung Choi: Pepakura

Concept: I got the concept from the game I am playing called Stardew Valley. It is a game where you are a farmer and you work on building it up. In the game, you are able to raise farm animals such as cows and sheep, and I decided to make a bust of a cow as it was the first animal I purchased in the game.


Modeling Techniques: I wanted to use Maya for this project, but decided to try it using Rhino instead.  I used the interpolate on curves tool to create the shape of the head which I extruded to create a solid object. Then, I created a pyramid object then used the split/trim tools to cut a hole on the bottom of the head as well as cutting off the top of the pyramid. I used the blend surface tool between the bottom of the pyramid and the head to create the connecting areas similar to the technique we used for the duck. To create the horns, I exploded a cylinder and the cones, then deleted the bottoms to make openings to which I used the blend surface tool again. Lastly, I used the mesh from NURBS object to create a polygonal mesh, then used reducepolygons to adjust the number of polygons. 


Saturday, April 16, 2016

Jung Choi: Laser Engraving

Concept: When I first heard of this project and Professor Scott showed us the tween curves tool, I knew that I wanted to create some kind of a pattern using that tool. I did not have a specific concept in mind but thought that the tool would allow me to create some interesting patterns. I was very happy with the overall results regarding the pattern as it created something like a swirling circle in the middle with the outside looking almost like flower petals. The piece seems a little busy looking at it from up close, but when you look at it from a bit further away, the lines blend together to create some amusing shapes.

Modeling Techniques: As I had stated before, I wanted to use the tween curve tool for this project. I created a rounded square shaped curve towards the bottom left of a square and then used the tween curve tool. Then, I deleted all other curves but the tweened curve that was one bigger than the rounded square that I had originally. Then, I used the tween curve tool on that curve at the outside square again. After repeating this multiple times with different settings for matchmethods, it gave me the star-like shape and I decided to stick with that shape. I mirrored the star shape across and over so that I would have 4 of them that were towards the 4 different corners of the square. After that I used the curve edit tool> adjust closed curve seam to adjust the seams of the outer square so that it would make the correct effect with the mirrored star curves.
Material: I used a 1/4th inch plywood as I thought it would look interesting with the patterns and the grain of the wood. This proved to be of little use as the grains are hardly noticeable given the dark lines of the engraving and how busy the piece is. The piece itself is 1 foot x 1 foot and I decided to go with those dimensions as it is ultimately in a square shape and I did not want it to be too big.


Thursday, April 14, 2016

Jung Choi: Waffle Structure Wave


Concept: The concept I had for the waffle structure project was a wave in the ocean. I got the idea from the Japanese painting, The Great Wave Off Kanagawa, when I saw it somewhere the day I started on the project and thought it would look interesting as a waffle structure with it's curvy and wavy lines.

For modeling techniques, I used the interpolate on curve tool to create the wave-like shape I wanted then extruded it in order to create a sold object. Then I created a cylinder and used the boolean difference tool with the solid to create the concave part at the bottom. Then I used the contour tool to create the curves which I used planar surface tool on to get the surfaces. Then I used the cutribs script and the unroll script to get the slots and lay them out for laser cut. I wanted to create diagonal lines with the contour tool to create a more interesting effect, however, this made the cutmyribs script buggy as it gave an error and not cut the slots when there is a two pronged surface that were connected at one part that branched out to 2 different wings. It would cut slots on the bottom wing but not the top wing, so I had to get contour curves using 90 degree angles.

Material: For the actual structure, I used quarter inch cardboard as it was cheaper. For this project, I wanted the structure to have a slight bulkiness to it as waves are nothing to scoff and dangerous if given proper size which made me choose the thicker cardboard. In my opinion, it turned out fine and still kept the shape of a wave and just made it look like a wave of brown water. If I were to make this without price restraints and had more time to procure materials, I would use a bluish glass with a white/grey glass to create a more ocean water-like color that is see through as I did in keyshot.


Jung Choi: Slots Droplet

Concept: The concept I had in mind for this project was a water droplet hitting the surface of the water. With this concept, I decided to use a lot of round circular shapes in radiate outwards in a symmetrical pattern that gave off a slight feeling of an explosion.

Modeling Techniques: A lot of the slot making was done with the curve boolean tool as well as array polar to get the slots all the way around some of the shapes. For the long shapes, I used two circles then connected them with curves. After which I split the curves in order to trim out the pieces I do not want then joined the open curves together to make a closed curve. The hardest part was planning out the slots so that the top and bottom circles would fit the long slots. After I made the long pieces, I rotated them upwards to see where the slots and what angle they would need to go in order to fit.


Material: For the material I decided to use the eflute cardboard as I did not want it to be too bulky or big since it was supposed to be a water droplet. Thicker material would have made the pattern less noticeable and I believe would have taken away from the theme of the project unless I had made it significantly larger. 

Sunday, March 27, 2016

Since we were doing a serial slicing of an object, I wanted to make something that had movable parts that had an interactive element with the viewers. After that I tried to think of a shape and decided on a fan/propeller shape. I decided on a cylindrical base on which the blades would sit and made individual blades that the viewer can rotate around to create their own design of the object.
I created a cylinder for the base then used edit points to make it get smaller as it went towards the top. For the propellers, I used a square curve tool then used interpolate on curve tool to create the blades around the square. Then, I extruded the curves into a solid object then used to edit points to make it get smaller as it went towards the top again. Then I used the contour tool and used the sliced curves to split the object then patched the spaces in between the blades.

If I were to make this model without cost restraints, I would make the propeller part some kind of glass material that would allow smooth rotations for each of the pieces. I think that the glass material that is see through would create a cool effect when light is shone through and the object would look significantly different depending on how the individual blades are rotated. For the base I went with a simple black metal material to keep the focus on the blades.

Tuesday, March 1, 2016

Jung Choi 3D Print Solus

I got the inspiration for this 3D print from the Keyblade from the Kingdom Hearts game series. I originally had intended to make something similar that acts as a "sword", but I decided that since the print was going to be small, I decided to go with an actual key. After I decided on going with the key, I wanted it to look like something from a fictional story with special purposes.

I used a lot of extrusions and offsetting of curves to create solid objects for the main body and the decorations. The hardest part was creating the indented curvy decoration on the body of the key. I made the curve, then mirrored it across then projected it onto the body. Then, I used the projected curves to trim out parts that I wanted indented then extruded the curves down then patched the bottom to get the solid indention that I wanted. I used a lot of the joinedge tool as a lot of these pieces would not join with the simple join command. I used filletedge command to fillet the edges so that they would have smooth edges.
 The materials were obviously metal. I wanted it to look like something from a fictional story, something like a magical key to open magical objects or doors so I made it fairly colorful. I gave it a golden body and made a lot of the decorations red and named it Solus as the flare decorations around the head of the key resembled the sun. 

Jung Choi Week8 Prosthesis

 The theme for my prosthesis was skeleton as they function similar limbs for people who have lost them. I decided to go with the rib cage look while keeping the design and style simple and sleek. I wanted it to look fashionable while still staying true to the theme.
For modeling techniques, I created a cylinder in the shape of a leg from curves by using networksrf then turned it into a solid by using offset surface tool. I created the holes on the side by using the makehole tool. For the shoe last, I created curves of the top of the last and the bottom then curves around the center and the side then used networksrf tool. Then I used the patch tool to fill the top and the bottom in order to turn it into a solid. For the middle decoration piece, I used curves to make a plane of the shape I want, extruded it then patch the top and bottom to create a solid object. I used control point editing in order to turn the shapes of curves and objects to how I want them to be shaped.

I went with a white metal material for the body as it is supposed to resemble a rib cage. I made it metal as I want it to be sturdy as well. I chose the decoration part and the shoe last to be black as I wanted to keep a simple black and white color scheme to make it look more slick and fashionable.

Monday, February 15, 2016

Jung Choi Week4 Detergent Bottle

I couldn't really think of a theme for the detergent bottle. I just created a fairly generic detergent bottle that I have used in the past. The indented part, I left clear as many detergent bottles have a way of telling how much detergent is left in the bottle.
I used the sweep and trim tools on extruded curves to create the body. It was hard to get the shape I wanted using the curve tool. Then I used the sweep1 tool on a helix around a cylinder to create the screw part on the top of the bottle, then used boolean difference to create the cap. 
 The materials I used were mostly plastic. The clear blue part was made with a blue gemstone as I liked the color the best and it most closely resembled laundry detergent. Again, the color scheme is also fairly generic as the bottle itself.

Jung Choi Week4 USB

I mostly stuck to the tutorial until the end. I could not think of what to make and was playing around with it and got the idea to make ears for the USB. Then it just turned into a Mickey Mouse type of USB for kids as many schools are starting to utilize more technology even for little kids in elementary school. I gave it ears, eyes, nose and a mouth and tried my best to make it look like Mickey, but I could not find the right colors in Keyshot.
Modeling techniques were mostly creating solid objects from curves using loft and using sweep and blend surface tools to create surfaces. I used boolean difference for the eyes, ears and the mouth. I mostly learned how to create holes and indentions on surfaces using projected curves and the blend surface tool. I use fillet edge tool to create rounded edges.
 The materials were all plastic except for the parts that are inserted into the socket which is metal. For the color scheme, I tried to get it close to Mickey with the black round ears and decided on the colors as he wears red pants and yellow shoes. I could not find a good skin color tone for the body so I just decided to go with yellow.

Saturday, February 6, 2016

Jung Choi Week3 Mouse


 It is pretty cliche, but I took the word mouse a bit literally as the buttons reminded me of ears of an animal. I gave the ball mouse a snout, a nose, and a pair of eyes and made it looks like a mouse.

I used curves and the loft tool as well as sweep2 in order to create the body. Then I used the boolean difference tool with the sphere and the body to create the socket for the ball. Then I projected a curve onto the body then used pipe along the curve to use the difference tool again to create the buttons.

I used non-shiny materials for the most part. Most of the mouses(mice?) I've used have not been shiny. I did have a trackball mouse at one point and it had a red ball on it which is why I used a shiny red plastic material for the ball. The eyes and the nose were shiny black plastic. I also like the sleek grey, black, and white color theme with the red ball as the focal point.

Jung Choi Week3 Hammer

I knew from the start that I wanted to create a hammer used in something like medieval warfare. I did not use a specific reference image, but I created something on my own. It is a hammer to be used with both hands and has a spike at the tip of the pole so that damage can be done even with a stabbing motion.

 I used control point editing to create one side of the hammer using a rectangle then I mirrored it across. I used a projection of a curve in order to cut into the rectangle then extruded it down to make the indentions where the bolts are. I used the join tool to create the tip then used a polar array in order to create the spikes on the pole.

I used a metallic material for the head of the hammer and the bolts. I could not find a good wood material for the handle, so I just used a brown paint material. I also used a light aluminum material for the metal that covers a part of the handle so that the user does not get splinters while swinging this hammer.

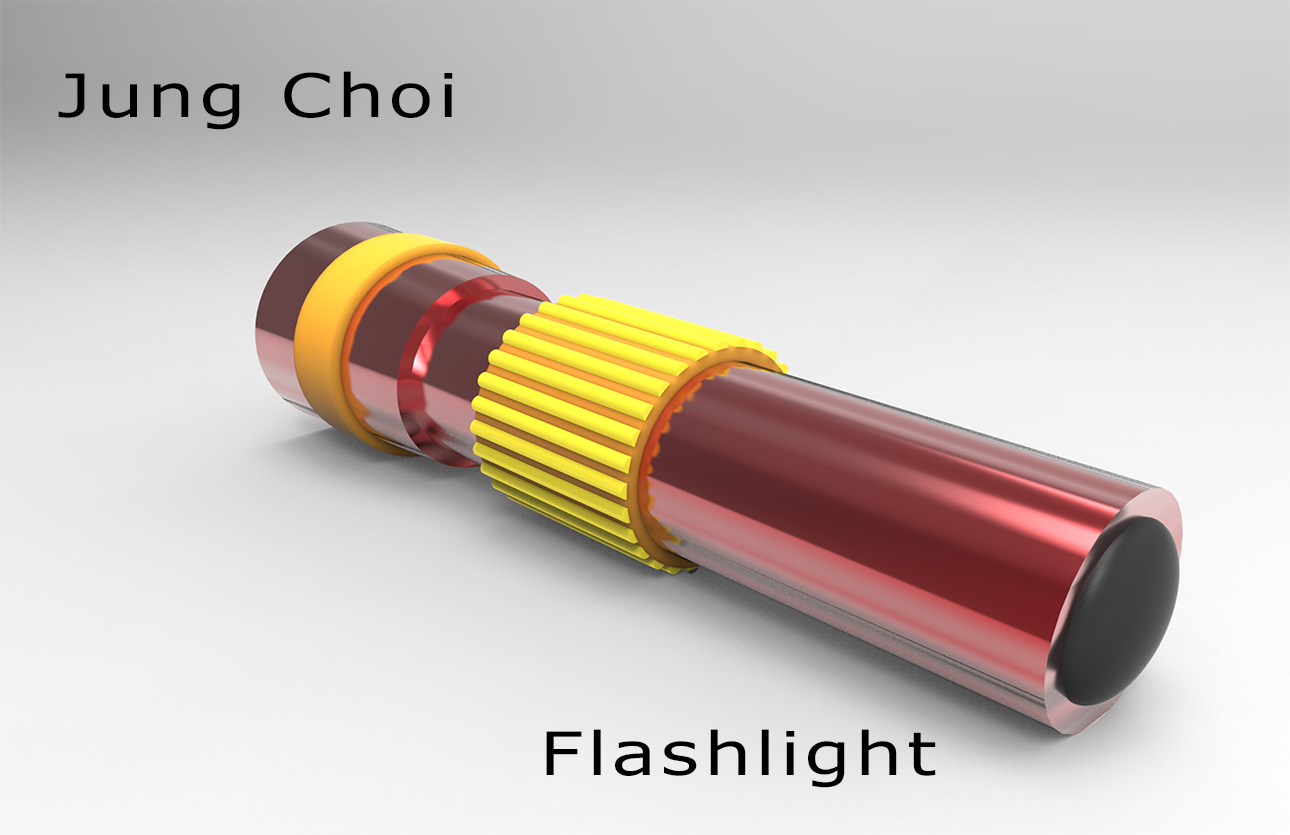
Jung Choi Week2 Flashlight

 I wanted to make an emergency flashlight that was not too complicated. Simplicity is the key to many emergency equipment as they need to be easy for anyone to pick up and use.


I used cylinders and used the boolean difference tool to create the body of the cylinder where it would hold the batteries and other intricacies of the flashlight. I used the polar array tool in order to create the rubber part where the flashlight is easier to hold and has a better grip.
I used a red metal for the body of the flashlight to go along with the emergency theme along with having a sturdy body. I made the button on the bottom. The yellow part is made of rubbery material providing the user with a better grip. The colors make the flashlight be easy to seen as well.