Showing posts with label Waffle. Show all posts

Sunday, October 24, 2021

Clay Purdy: Week 7 Waffle Construction


Concept: I wanted to make something with a practical use. I took inspiration from old, ornate iron structures, specifically an antique school desk I have in my house. My original idea was to make a stand for my laptop, but decided to go with something requiring less specific measurements. So instead, I turned one of my sketches into a wall sconce with a big lightbulb.   


Techniques: I started building my model by revolving a curve to make the part that holds the bulb. I built the different parts of the model separately by drawing their shapes with curves on a plane then extruding them, creating square objects. To give the pieces their narrow shapes, I brought in a box, angled it then mirrored it, then used boolean difference to cut away the corners. To make the separate sections one piece I used boolean union. To create the waffle structure I followed Professor Scott's Waffles With Pipes tutorials on Youtube.  


Materials: I used a rough black plastic material for the model to resemble cast iron. I applied a warm light texture to a cylinder then placed it into a lightbulb I modeled in Rhino. I applied a clear glass texture to the bulb and changed the color to amber. I wanted it to look like it was in an old mansion so, for the environment I made a wall with a molding frame in Rhino then applied a dark wood planks texture. To create an old mansion atmosphere. I brought the environmental lighting down a lot, but not so much that you couldn't see the model anymore. 
For the physical model, I was planning on covering it with a coat of textured spray paint, then applying a coat of black metallic paint on top of that. 


Sunday, April 30, 2017

Griffin Korns: Week 12 Waffle Lamp

Concept:
I wanted to make a simple, easy to put together lamp that sort of mimicked a globe, and could stand on its own.


Technique:
I created a series of circular curves, then lofted them to create the outer shape, then used the Cap command to seal it off. I duplicated the model and manipulated it to get the interior cavity shape that I wanted, then used BooleanDifference to hollow it out. I followed the tutorial video with the pipes to create the sliced model.


Materials:
The model is made out of 2 ply cardboard, along with a regular light bulb and a Bottle Lamp kit from Lowe's.I also created a mounting piece for the light bulb with some scrap cardboard, and cut it so it notches into the top of the lamp.


Thursday, April 13, 2017

Lauren Barbieri: week 12 Waffle lamp

concept
The exterior arms are supposed to be very organic and abstract. The interior form is supposed to be a kind of cage around the light source. The light hitting the upper points from below will hopefully create something like a candle flame effect. I wanted to have two levels of shade between the outside and the light source and really get the light to diffuse. 
technique
The original shape was made by warping control points on a sphere into the pointed shape and polar arraying to form 6 spines. In the center is a hollowed oval shape with a hole in the bottom where the lighting fixture will go. I then all Boolean un

ioned it all together.
Materials


Two different colors of wood on the exterior sections probably achieved through stains. The six spines are a darker tone and the horizontal segments are light to reflect more. the interior section is Plexiglass slightly orange toned. 
UPDATE: May 1, 2017

The pieces were laser cut and then stained before being joined together, I considered adding a gloss finish but ultimately decided that a more rustic look worked better.


Monday, April 10, 2017

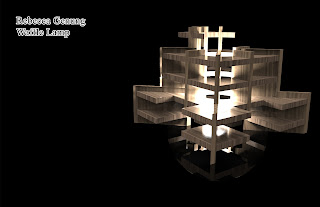
Rebecca Genung: Week 12 Waffle Lamp


I wanted to use only basic shapes this project. Inspired by cube-shaped statues and a oddly shaped building near where I live, I created a simple but modern design.

For technique, I just kept it simple. I placed cubes in the shape of the building I mentioned above and Boolean-difference a cylinder from the center to leave room for the light. The Rhino scripts provided glitched out on me so I did everything by hand.


For materials, I used oak in the KeyShot. In KeyShot, I made the vertical pieces beige to keep the textures from muddying the form. The actual lamp itself is made of .25 cardboard.

Sunday, May 1, 2016

Thomas Perugini: Waffle Structure

For a long time I was uninspired in what to do for this project. Then I came across some images of retro-futuristic ray guns. I believe this type of style is called "Gothic raygun." It is a bit of a 1940s-1950s prediction of what the technology of the future would look like.


 To create the model I drew a curve for the main body silhouette, and then extruded it around an axis. I then made a curve for the handle and trigger guard, and extruded it. The fin was also a curve that was extruded. The tip was a flat cone object with a sphere at the end. I then used the cut my ribs code to make the outlines for the laser cut.


 I used .25' cardboard for my final product, and I removed more extraneous pieces from the trigger guard and the handle to make it easier to hold. The main body was a little tight, but I got it all together in the end.


Monday, April 25, 2016

Tara Intyrath: Waffle

Concept: For this project I wanted to go back to the oriental theme as it is my favorite art genre. I also always wanted to make a bust out of something so I decided to go for a geisha design. Geishas are really elegant and beautiful to me with profound features so I thought it was perfect.
Technique: For this model, I used the same techniques for the wolf bust from the previous project. I started by using references from google images to create the curves for half of the bust, created a surface using those curves, copy and mirror that surface, joined the surfaces together, and patched the bottom and created a solid with the surfaces. This was only for the head and the shoulder part of the model though. I wanted the hair to be a whole separate entity that could be removed so didn't have that joined with the head. For the hair it was a much simpler process. I created curves that moved a long the shape of the head how I think the hair would fit and flow and used pipe to make a solid. I even used the torus tool to make the bun on top and then boolean joined all the hair parts together. To make the hair a separate entity and removable I made a boolean difference from the hair using the head without deleting the solid used (the head) and thats how its able to fit so nicely on top. I made the waffle slices using the contour command and used the rib command that was provided for us on blackboard. I originally was going to make the hair the same angle as the head and shoulders but I decided it would look better if the waffles slices were angled instead of flat to show contrast between the two elements.

Materials: For the actual real life model, I used plywood for the head and shoulders and the hair is MDF. In the keyshot renderings I decided to use simple translucent plastics for the hair and head/shoulders but differing colors to again show contrast and differentiate the two.

Sunday, April 17, 2016

Alec McKay: Waffle Structure


Concept: My design was inspired by other furniture I found online that had been made with waffle structure, such as the above chair. From there I decided to do a sofa, so I did some research into interesting designs for sofas, which was where I got the idea to put a shelf into the back of the couch. I thought the rounded form of both the sofa and the shelf would look good with the layers of waffle structure, and the shelf would add more interest to the back side of the sofa.


Technique: I started with an ellipsoid, and I used another ellipsoid and BooleanDifference to create the seat of the sofa. To create a base, I drew an ellipse curve and used Sweep2 to create a surface connecting it to the ellipsoid above it. Once I had that shape, I created another ellipsoid for the shelving unit. For a flat-bottomed shelf, I used a flat surface to cut the bottom off, and then I used another BooleanDifference to cut that out of the sofa. I also used a large fillet on the edges of the sofa and the shelf so that the arm rests and seat wouldn't be too sharp.


Materials: For my laser cut model, I decided to go with the thin E-Flute cardboard because I thought it would look better for the small scale to have a thinner material, so it would look more similar to what I imagined it would look like at full scale. For my renders, I went with a plastic painted in metallic red for the solid version, and a nice light wood for the waffle structure. A light colored wood was what I thought I could use if I made a full scale version of the waffle structure sofa. I chose a different material for the solid version because the wood didn't look as good in this context, so I went with a bright, shiny metallic plastic.


Thursday, April 14, 2016

Victoria Mayfield: Batman Waffle


Concept: I knew that when I started looking at other waffle ideas that I would need to create something with a very recognizable silhouette. The first thing that came to mind were things like mountains, different animals, or trees. However whenever I would model these things, the waffle structure didn't allow for recognition of what the shape was supposed to be. It wasn't until the weekend when I was going to the movies that I realized: Batman is a recognizable silhouette! I knew I wanted one of the Batman logos to be my waffle design, but it took a few iterations before I decided which one I wanted.


Modeling: The main modeling technique I used was the curve tool. I was able to import reference images using the picture frame tool, and then trace them using the curve tool. Than it was simply a matter of extruding the curve to create the shape that I would create my waffle structure from. I used the Contour tool to create two sets of contours going against each other. I used these contours to make planes that would then become each layer of my waffle. From there, I imported the Cut my Ribs script, and was able to get each layer of the waffle cut properly. Then I imported the Massive unroll script, which allowed me to neatly lay out and number each piece of my waffle.


Materials: I decided to use a 2-ply cardboard to print out this version of my batman waffle just to better see how the waffle would work actually printed. I decided against eflute cardboard because I wanted the piece to have some visual weight to it. In my keyshots, I used a grey, frosted plastic, which is what I would like to use if I was going to print this piece again. I image the piece about 3 times the size of the maquette, with LED lights strung around the back to create a vibrant wall mounted lamp.