This post has all updates for Project 5, Modular Slots.
See all posts below the fold!

Showing posts with label fa2014. Show all posts
Showing posts with label fa2014. Show all posts
Monday, December 15, 2014

Sean Johnson/Blake Philley: Final Knight Chess Piece

We decided to pick the Knight for our piece, but instead of the traditional Horse head we decided to make our piece a bit more literal and make a knight's helm. The original form was made in Maya using planer modeling, then transferred into Rhino for proper scaling. Once we were happy with the size we brought it into Pepakura and unfolded it. We ran into a small snag once it was printed but all it really did was slow us down a bit.

We put a scratched metal texture on our model in Keyshot since we both thought it would be cool to make an even bigger statue made of actual steel. It also made a lot of sense considering it's a piece of armor. putting a metal texture on it wasn't too insane as far as our ideas usually go.

The End result was two separate pieces, the helm itself and a base for it to rest on. We took this picture just to be silly, but we both ended up liking the idea of being able to wear the over-sized helmet so we cut off the tabs that were intended to fuse the pieces and left the helm wearable. We're both pleased with how it turned out and ended up having a good time working on it, even with the crunch time.
Shelandy Ting: Serial Slice
The original idea is to make the serial slice of the whole piece of my 3D print design work "I meant it", to see how far the abstract expression of slicing can deliver different but interesting look of those 3D text sculpture. However, because the huge amount of cut-out of the design, I have to compromise to do only one letter among them. I chose the "a" with the cut-out light channel of letter "e." It would be very boring if I cut in the direction of Z or Y or Z axis. So I decided to make it 45 degree to make a zigzag texture of its facets.

However, I did not realize the trouble I could encounter using this special cut angle, with the physical limitation of no more than and using .25"core and the maximal size of 3D model. The available surface on each curve for placing the referenced core is too small. I can hardly place them, not to mentioning that I have to put at least two cores inside each piece. No matter how I move, there are always a piece that it will have a core for referring other piece crossing over its outline. I spend a month to figure out how to make this work:
I have to find the exact core position first with the extruding height, then redo the slicing again with the appropriate core location and angle. This is hard because I've rotate the plane of bird's eye view for 45 degree in two axis. It is now difficult to move things which have a same setting of displacements and angles. Once I have the curves located in the right angle and location, I make them become surfaces by using "planerCurve." Then I use the intersection of the core and the planerCurve to generate the 'estimated' inner cut curves, by applying "curve from object" -> "intersection".

The reason I said 'estimated' curves is because it is not necessary the case: since the available top surface top for each block is so tiny, some core for registering other slice will be likely intersecting the contour. As mater of fact, since the purpose of the cores is for referencing the orientation of a slice and lot of the edge of slice contour is composed of straight line segments, if we see a round edge cut through a straight line, we know it is the cutting residue of the core shape. I make sure that each piece having at least two cores, yet keeping the number of cores to be minimal. It took a long time to figure it out the best deployment of cores. Once I got those contours, I group them and use the script to make the label, and manually clean it up because the slicing labeling script does not perform well in this case.

I make two keyshot rendering to simulate the martial I like to use. I do think of use foam with sand splatting. So the first one use I use marble texture to render it,

The second one use red reflective glass with a background, to see how it looks alike to be a large scaled installation

However, I did not realize the trouble I could encounter using this special cut angle, with the physical limitation of no more than and using .25"core and the maximal size of 3D model. The available surface on each curve for placing the referenced core is too small. I can hardly place them, not to mentioning that I have to put at least two cores inside each piece. No matter how I move, there are always a piece that it will have a core for referring other piece crossing over its outline. I spend a month to figure out how to make this work:
I have to find the exact core position first with the extruding height, then redo the slicing again with the appropriate core location and angle. This is hard because I've rotate the plane of bird's eye view for 45 degree in two axis. It is now difficult to move things which have a same setting of displacements and angles. Once I have the curves located in the right angle and location, I make them become surfaces by using "planerCurve." Then I use the intersection of the core and the planerCurve to generate the 'estimated' inner cut curves, by applying "curve from object" -> "intersection".
The reason I said 'estimated' curves is because it is not necessary the case: since the available top surface top for each block is so tiny, some core for registering other slice will be likely intersecting the contour. As mater of fact, since the purpose of the cores is for referencing the orientation of a slice and lot of the edge of slice contour is composed of straight line segments, if we see a round edge cut through a straight line, we know it is the cutting residue of the core shape. I make sure that each piece having at least two cores, yet keeping the number of cores to be minimal. It took a long time to figure it out the best deployment of cores. Once I got those contours, I group them and use the script to make the label, and manually clean it up because the slicing labeling script does not perform well in this case.
I make two keyshot rendering to simulate the martial I like to use. I do think of use foam with sand splatting. So the first one use I use marble texture to render it,

The second one use red reflective glass with a background, to see how it looks alike to be a large scaled installation


Sean Johnson: Week 13 Geometric Unfolding
Well, you said all we needed for this post was a picture of the end result sooooo...yeah. Here ya go.

Sean Johnson: Week 12 Lamp

Of the five prototypes I made, I liked this gear shaped one the most. It had a good solid look to it and I liked the radial symmetry it had. Just in case you haven't noticed yet....I really like symmetry.As for what made me come up with the prototype in the first place, I was actually fixing my dad's watch for him and All the gears just looked really nice. I've always liked machinery with visible gears and pistons so I figured why not make a lamp that was a big 'ol gear?
The shape started out in Maya where I extruded some of the faces on a cylinder to make the outter form. Then I took that and brought it into Rhino and booleaned a hole through it. After that I used the pipe method we talked about in class to end up with the image above..

Sean Johnson: Week 10 Waffle

I wanted to make something that just had a nice clean look to it. Something with a good flow to it, and not too complex. I wanted a good amount of space between the ribs so that it didn't look too packed together either. I ended up with a smooth wave-like design that I really like. I plan on hanging it on a wall and using the chambers like little shelves for various stones and crystals.
The building process was pretty straightforward. I extruded a plane and used the contour command along the plane's original axis to get the basic ribs. The scripts for cutting the ribs actually worked perfectly and I didn't even need to clean up any of the edges afterwards.

Sean Johnson: Week 9 Slots

I approach this project with to intention of making a set of slots that I might be able to give my kids, should I have any down the road. That said, I didn't want any particularly sharp edges and I wanted to make sure I had plenty of small connector pieces as well.
I wanted to have a large variety of different pieces, and each of them to have at least some kind of symmetry. Each of the pieces was made using a series of curve booleans. I made sure to fillet all of the sharp edges and used polar arrays to arrage the slots on the ends of pieces.

Saturday, December 13, 2014
Chris Venable and Kristine Dickson: Week 14-15 Pepakura Chess Piece - "Queen"
For our Pepakura, we decided to make the chess Queen. Chris designed and modeled it in 3ds Max first. I handled unfolding and laying it out in Pepakura and Illustrator, before pulling it into Rhino.
Ghosted:

Keyshot:


In Keyshot, I gave the Queen the Granite stone material. I increased the scale of the texture so that it repeated more often and the veins in the stone were finer. I darkened the overall color by blending in a charcoal black with the texture. Overall, I really liked how glossy it turned out. Chris gave the model a nice, sharp silhouette so the reflective material gave it a faceted look.


Kristine Dickson: Week 11 Radial Waffle Lamp
The lamp I had in mind would be something that covered the top of a post, like on railing or a balustrade. I wanted it to be rounded on top and taper in a bit around the lower half.
Reference Photos:

When I was modeling it, I tried using the a lathe tool in 3ds Max to create the entire thing using splines, but I could not get the the shape that I wanted out of it. Instead, I ended up joining half a sphere to a cylinder and squeezing the middle of the cylinder in to give it the curvature I wanted. I then pulled the top part of the cylinder out a little bit so the hemisphere was nested in it.
Ghosted Images:

Keyshot Images:


In Keyshot, I chose to use the Mahogany wood texture, with a couple slices in 24k Gold. I liked how the light inside brightened the wood texture on the inside; it contrasted nicely with the dark wood texture around the outside. I chose the gold material for the middle ring and the top ring to mimic gold trimming if the model were solid and not a waffle structure. It also brought a little variety to the lamp.
Reference Photos:
When I was modeling it, I tried using the a lathe tool in 3ds Max to create the entire thing using splines, but I could not get the the shape that I wanted out of it. Instead, I ended up joining half a sphere to a cylinder and squeezing the middle of the cylinder in to give it the curvature I wanted. I then pulled the top part of the cylinder out a little bit so the hemisphere was nested in it.
Ghosted Images:
Keyshot Images:
In Keyshot, I chose to use the Mahogany wood texture, with a couple slices in 24k Gold. I liked how the light inside brightened the wood texture on the inside; it contrasted nicely with the dark wood texture around the outside. I chose the gold material for the middle ring and the top ring to mimic gold trimming if the model were solid and not a waffle structure. It also brought a little variety to the lamp.
Thursday, December 11, 2014
David Norkiewicz: Project 8: Pepakura Chess Piece w/ Philip Barker
Statement of Purpose: For this assignment,we to expound upon the last object we created from cardboard. This time were told to model and create a chess piece. The piece that Philip and I chosose to do was a king piece. We took the idea from the the Lord of the Ring. We used Barad-dûr, aka The tower of sauron.

Modeling techniques: This model, while simplistic, was difficult to make while staying within the 200 polygon limit we were told to use.


As can be seen, the tower looks remarkably like the picture above. Orgionally the model looked much more exact, but the spires on the sides had to be cut.

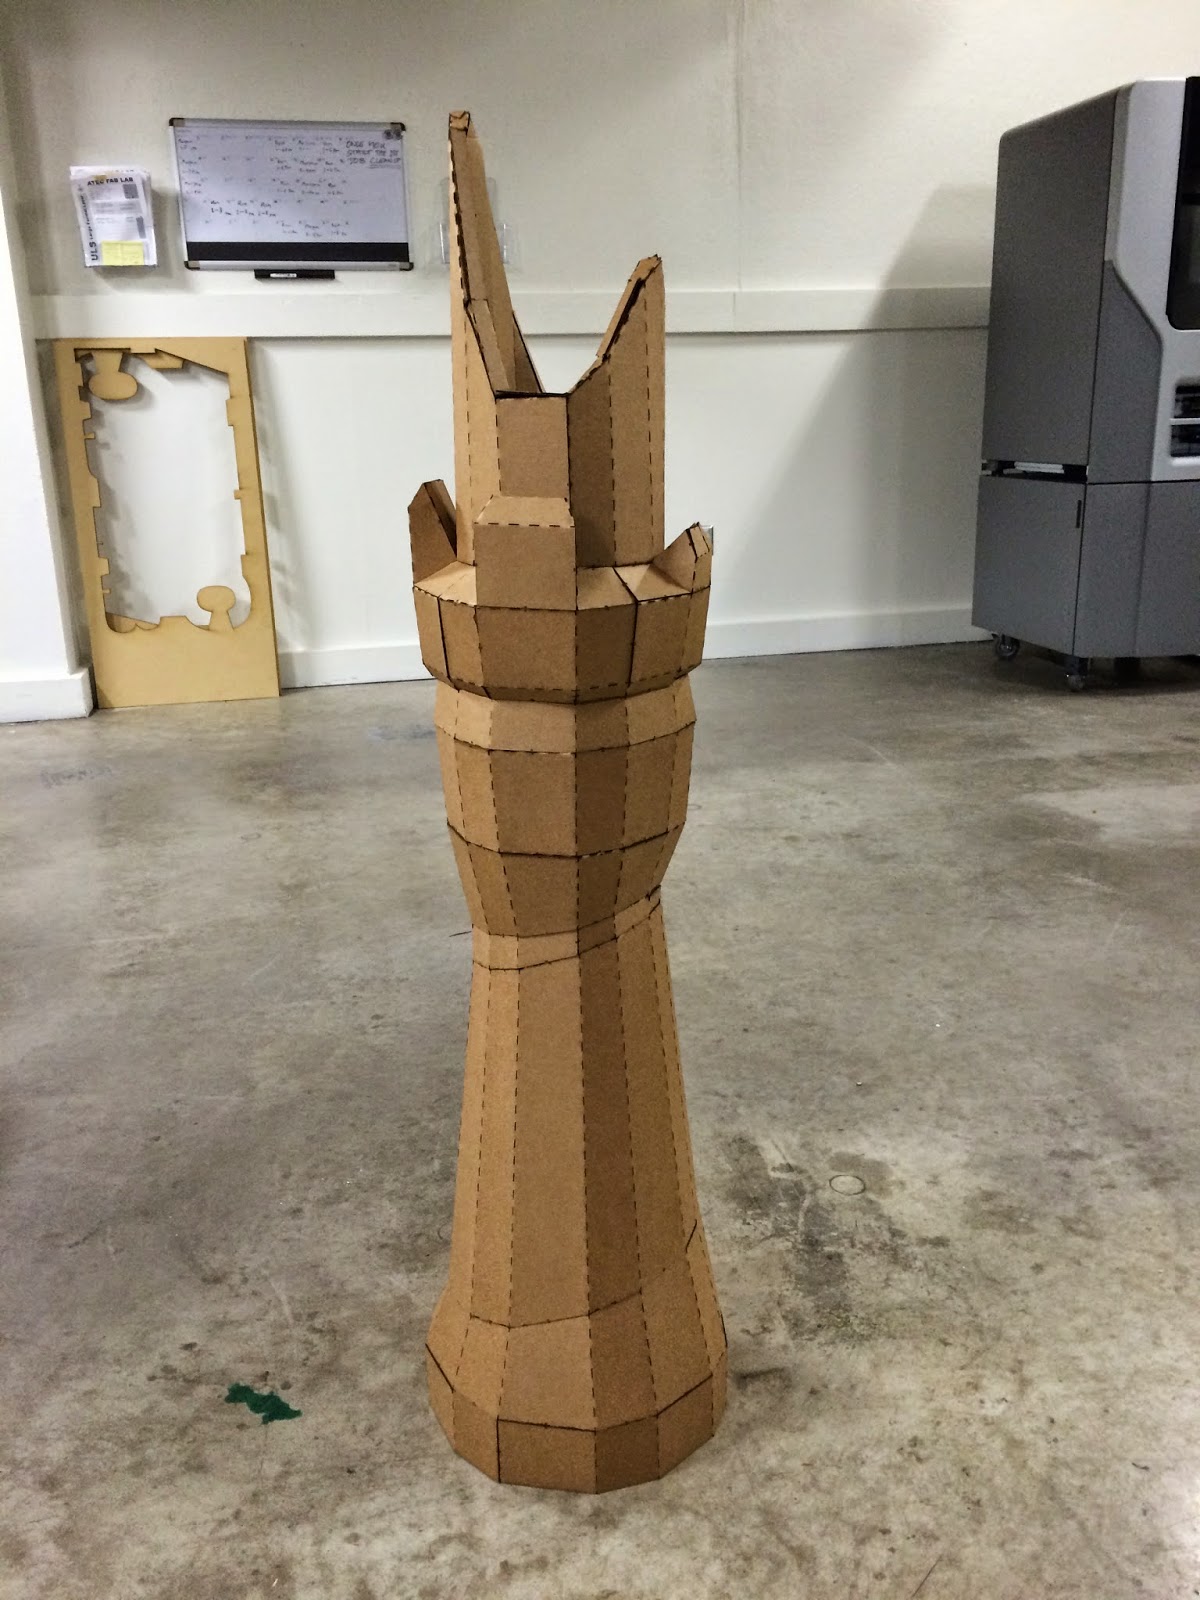 The final image above is our finished king piece. Putting together the tower took around 1.5 hours, but then again it stands about 4ft tall. I have to say that I really like this piece and will be looking into doing something like it in the future!
The piece was originally going to be a castle piece, but the idea of using this specific tower did not feel right to use it as a lesser piece on the board. Instead, this iconic tower would be used as our kingly piece to the set.
Modeling techniques: This model, while simplistic, was difficult to make while staying within the 200 polygon limit we were told to use.
As can be seen, the tower looks remarkably like the picture above. Orgionally the model looked much more exact, but the spires on the sides had to be cut.
David Billings: Week 10 : Waffles
My design intent for this piece was one that could display a unique form and shape while having a minimum number of waffle structuring to display this. Inspiration for this came from utilizing the basic shapes of geometry that would be easily recognizable in form with minimal structuring.
Created in Rhino I used the boolean functions to combine cylinders, spheres and cones into the final shape. After using the provided scripts to waffle the structure I began selectively removing pieces in order to minimize the structure while retaining its form
The material I chose in keyshot was that of wood as it was intended to be cut out of, and not taken into a further material or direction than that.


Created in Rhino I used the boolean functions to combine cylinders, spheres and cones into the final shape. After using the provided scripts to waffle the structure I began selectively removing pieces in order to minimize the structure while retaining its form
The material I chose in keyshot was that of wood as it was intended to be cut out of, and not taken into a further material or direction than that.
Davi Billings: Project 4 Slots
Created in Rhino I used the curve boolean function to create and edit the design, then using the array function to lay out enough pieces that would fit on the board.


David Billings: week 11 : lamp
This was created in Rhino using 3 base shapes, a sphere, a cone, and a pyramid. Once they were booleaned together I elongated it to a desirable size and proportion then used the provided scripted to serial slice the model.
The materials I chose to represent this model in keyshot were a blue resin and a red metal with a specular finish. I chose these because they seemed to allow the lamp to be placed easily within a modern setting or environment.


David Billings week 15 : Chess Piece
I created this model in Maya and did so by first creating the base and extruding upwards, adding variations and extrusions as I saw fit to better express my design.
The material I chose to render in keyshot was a high polished black metal. I chose this because I felt it added to the refined nature and elegant styling I was hoping to achieve.


Monday, December 8, 2014
Shelandy Ting: Lamp
I have been amused by Jim Sanborn's "A,A" for some time, and like to make a similar light installation art to project the lovely Chinese calligraphy font onto the environment I have been living.
 With this goal in mind, when designing my own lamp, I intent to reserve the wall on the top and some space on the side walls to put few Chinese characters. Since the Chinese calligraphy fonts already have quite a complexity, I decide make the external contour of the lamp to be simple, yet with elegance in an asymmetric outlook inside a symmetric structure. So it will show some modern fusion feeling. Since the major impression of the rib of the lamp will be in a
simplistic style, one way to add more fun on top of it without
overkilling it by making the expression too heavy, is to add a light-weighted twist of 'texture' in the 3D structure. The question is: How
can we add a 'texture', which is mostly expressed in 2D pattern, on a 3D structure without occlude the shape of original structure? I spent some time in searching the possible technology of using laser cut on wood crafting, and found a way called "living hinge" to make the hard surface bendable. So I am using this lamp design to further exercise my skill of fusing 2D and 3D feeling in an installation art. None of the living hinge pattern on internet is suitable for my demand of twist, so I create my own.
With this goal in mind, when designing my own lamp, I intent to reserve the wall on the top and some space on the side walls to put few Chinese characters. Since the Chinese calligraphy fonts already have quite a complexity, I decide make the external contour of the lamp to be simple, yet with elegance in an asymmetric outlook inside a symmetric structure. So it will show some modern fusion feeling. Since the major impression of the rib of the lamp will be in a
simplistic style, one way to add more fun on top of it without
overkilling it by making the expression too heavy, is to add a light-weighted twist of 'texture' in the 3D structure. The question is: How
can we add a 'texture', which is mostly expressed in 2D pattern, on a 3D structure without occlude the shape of original structure? I spent some time in searching the possible technology of using laser cut on wood crafting, and found a way called "living hinge" to make the hard surface bendable. So I am using this lamp design to further exercise my skill of fusing 2D and 3D feeling in an installation art. None of the living hinge pattern on internet is suitable for my demand of twist, so I create my own.

The interior shape of the circular disk is further limited to support only two goals:
the hollow shape will let the light coming from the bulb underneath go through the mask as much as possible. A transparent material might be better, but its not viable for now since lots of designers are competing one laser cutter.

This is the layout sheet for my first cut, which I put two designs on it. The one without twist ribs, and another one without complete lamp construction but the major part of the twist ribs

After the first assembling the result of the first cut, the twist of live hinge does add a tasteful fun on top of the basic contour. However, the effect of the light mask is not too obviously. It will take a while to find the right bulb and redesign the focal length from the bulb to the mask. So I temporarily drop the idea of having Chinese character light shadow project, and scale the Chinese character down as the decoration on top disk so I can make more slots to accommodate more living hinge twists to flourish the top of lamp. I also make the slots on the disk rotate to certain degree, hoping the result of connecting the joins is better. Again, this is a somewhat trial and error process because the degree of individual rotation is hard to calculate, the only way is to estimate and make a prototype to test if the estimation works or not.

Since the final spacial structure is way different than the 3D rendering can make. I did not make a Keyshot rendering for it this time because it is will be a total misleading. I will add a photo of the assembled lamp once I get the second cut, which is delayed because the assistant of fab delayed my first submission which has lots of living hinge which taking too much time for them to cut. Before that, this is what the close thing I can get to render the idea:


Because the fab could not give me all 16 living hinges I need, I teared down the living hinge and took the shot of the lamp. I will add another picture once I got enough living hinge to finish the real composition
 --------------------------------------------------------------------------------------------------------------------------
Adding the shot of the construction with only few living hinges

I use Rhino to draw the contour of ridge, and use the "arraypolar"command to place the ribs onto the desired locations. To make the interesting asymmetric outlook, I use boolean difference to cut out the top of a big sphere from the button from a particular angle. A primitive preview of the structure will look like this:
I wish to make the button skirt higher to reveal more sweep above the hemline. However, I also like to make the ribs twisted for 90 degree in the real assembling process. (That is the reason that the slots on the top did not align to the center of circle in this design preview.) In the early design phase I did a test on a hardboard stripe and it can hardly bent that much if shorter than 15cm. I also have to limit the length of ribs length in order to not to have a huge lamp. This physical constraint for using hardboard as the material is something I have to compromised. After getting the first cut, I realized a way to avoid this problem, I will make the change in the next revision.
One thing we can see from this picture above is that the Rhino script of cutting the intersection slots may not work well in some cases. Since I
knew I am going to be bold to try some things in the design beyond
what we can reply on Rhino, so I did not bother to fix all 2D laser cut
layout design all in the 3D view of Rhino. I start with the 3D
model in Rhino as much as possible, then clean up the problem in 2D
view in Rhino which gives me more clear and precise control for laser cut. After that, I alter the 2D layout again for those parts which the 2D shapes needed to be adjusted for constructing the 3D structure which can not simply constructed/ simulated by Rhino. One thing I am going to try is make two different twisting structures in the final result, but no one knows how exactly the material I am going to used will be twisted with a particular setting of material/ spacial configuration. so the lesson learned here is
Make your design as detail as possible, then allowing trial and error to find the best combination.
- support the part of the bulb fixture,
- make the light projection through the mask as much as it can be
the hollow shape will let the light coming from the bulb underneath go through the mask as much as possible. A transparent material might be better, but its not viable for now since lots of designers are competing one laser cutter.
This is the layout sheet for my first cut, which I put two designs on it. The one without twist ribs, and another one without complete lamp construction but the major part of the twist ribs
After the first assembling the result of the first cut, the twist of live hinge does add a tasteful fun on top of the basic contour. However, the effect of the light mask is not too obviously. It will take a while to find the right bulb and redesign the focal length from the bulb to the mask. So I temporarily drop the idea of having Chinese character light shadow project, and scale the Chinese character down as the decoration on top disk so I can make more slots to accommodate more living hinge twists to flourish the top of lamp. I also make the slots on the disk rotate to certain degree, hoping the result of connecting the joins is better. Again, this is a somewhat trial and error process because the degree of individual rotation is hard to calculate, the only way is to estimate and make a prototype to test if the estimation works or not.
Since the final spacial structure is way different than the 3D rendering can make. I did not make a Keyshot rendering for it this time because it is will be a total misleading. I will add a photo of the assembled lamp once I get the second cut, which is delayed because the assistant of fab delayed my first submission which has lots of living hinge which taking too much time for them to cut. Before that, this is what the close thing I can get to render the idea:
Because the fab could not give me all 16 living hinges I need, I teared down the living hinge and took the shot of the lamp. I will add another picture once I got enough living hinge to finish the real composition
Adding the shot of the construction with only few living hinges
Subscribe to:
Posts (Atom)