See http:/brianuretsky.com/atec4374 for more images and commentary.
Flashlight Model
The flashlight was a very fun, small project to get started with. This was the first time modeling in Rhino 5. I was lucky that Rhino is currently in development for the Mac and I managed to grab a fully-functional evaluation copy for free.
There was definitely a learning curve jumping into Rhino. I was not unfamiliar with 3D Design coming from Sketchup and Maya, but Rhino introduced many different modeling concepts and techniques that took me a while to learn. However, after watching some tutorials on Lynda.com, I soon discovered how powerful these tools and commands are.
Before I discuss my design techniques, let me introduce you to my flashlight model.
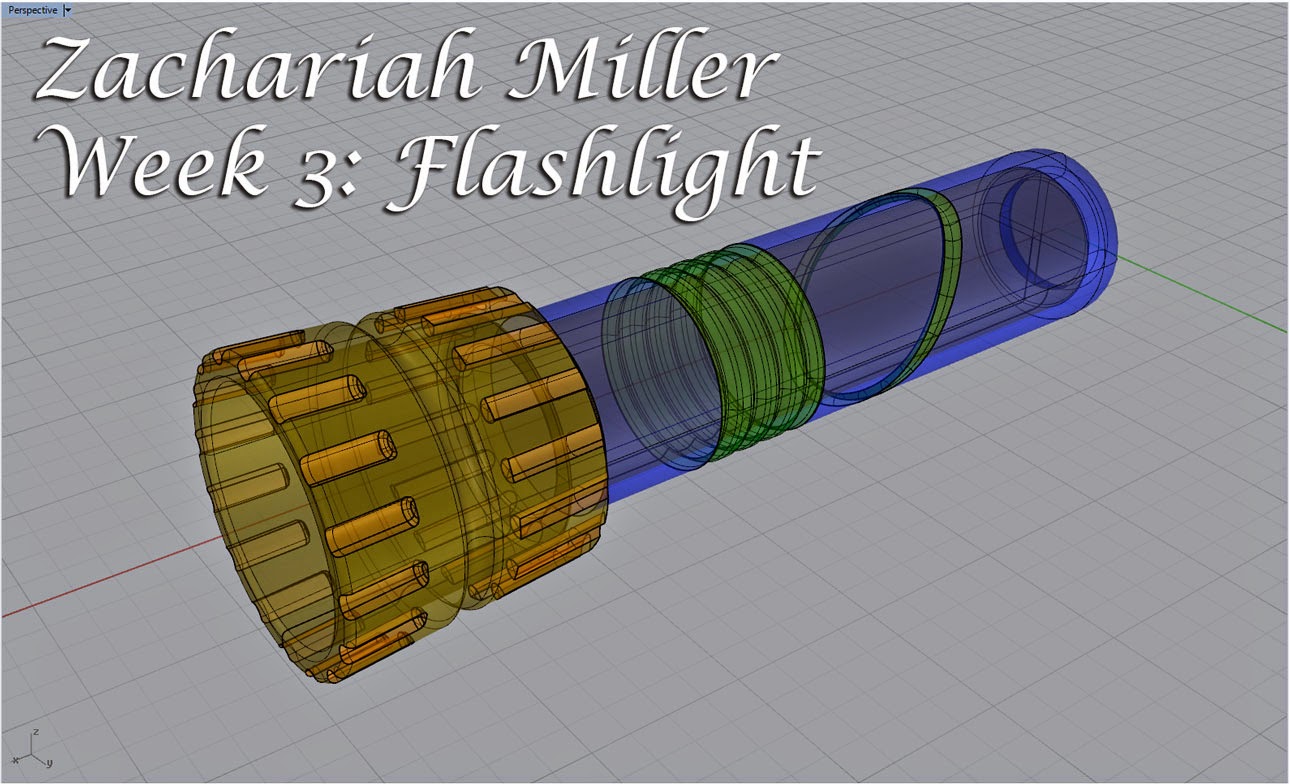
The ghosted image below shows the basic construction of the model. With the command 'Show Edges' enabled, we can see that the model is completely watertight for 3D printing. Any loose edge would be highlighted in pink.
 |
| Ghosted Image |
Although my flashlight looks very simple, it employs many different modeling techniques.
There are two main sections to the model; the top cap and the shell. The image below shows how the cap screws off to reveal the battery chamber within the model's shell.
 |
| Flashlight Top and Body Separation |
Within the cap holds the lens, reflective cone, and LED light along with the flashlight's circuitry.
The shell is hollow to accommodate the battery and house the button.
 |
| Flashlight Button Exploded View |
My main source of inspiration comes from Apple's iPod Shuffle. Along with many of their devices, the iPod Shuffle is milled out of a single piece of aluminum. There are no visible seams, just one single body made of anodized aluminum
 |
| Apple iPod Shuffle |
I also took into account the iPod's simplicity. There are five clearly marked buttons on the front, and nothing else to distract you from its purpose. It has a very straightforward design.
I used these two key points to design my flashlight to be sleek and simplistic. The flashlight exists to serve a function and is designed to be milled out of one block of aluminum.
I also took cues from Apple's AppleTV Remote.
 |
| AppleTV Remote |
The remote is also built out of a single piece of aluminum with no visible seams. It is also very simple in its construction and extremely sleek. My favorite design element is how the buttons on its surface match the curvature of its body.
The rounded buttons on the remote and on the iPod were also very important to me.
 |
| AppleTV Remote |
I used these devices as inspiration for my flashlight.
The model itself started out as a PolyLine which I rotated full-circle to make the body of the flashlight. Once I had the body, I created a circle and extruded it slightly to make it large enough to be the button.
Once I had the button in place, I used BooleanDifference to punch a hole in the shell. I then used another circle to trim the top of the button, rounding the top to match the body.
I used another PolyLine to split the top with the rest of the body. To make the cone, I extruded the curve and tapered it down towards a point. The LED is represented by a simple cube.
Below is an image of how the model's key components have been organized into different layers, ready to be rendered.
 |
| KeyShot Material Organization |
Below are renderings created in KeyShot. KeyShot allowed me to specific the exact materials to be used in final construction. After using Apple's iPod Shuffle and AppleTV Remote as inspiration, I decided to go with Silver Anodized Aluminum for its shell and use a hard-plastic button like those found on the iPod and remote.
 |
| KeyShot Render |
I didn't want the flashlight to look and feel cheap. I think that the metal construction and clean surfaces and edges make this a very simplistic premium product that is very easy to use. Its simple construction methods should also keep costs relatively low.
 |
| KeyShot Render |
Castle Model
I started this project after completing the flashlight tutorial and after watching walkthroughs on Lynda.com. This castle is my first attempt at a Rhino model without following any kind of tutorial or guide.
My biggest difficulty was trying to come up with something to build. I almost always took an existing product or concept and created a 3D model with that reference. I rarely built something on my own. I looked through a lot of images of castles but liked the futuristic castles shown in the example student work. I decided to do something along those lines and build something different.
Since the tutorials paid strong attention to revolving curves, I decided to start with that. I began with one elaborate curve that created the mushroom structure of the main body. I was looking for something overwhelming and futuristic. I had an idea of some kind of space castle and used The Jetsons as inspiration.
Below is a ghosted image of my model to demonstrate how each component is built and assembled without any naked edges.
 |
| Ghosted Image |
The image below is a snapshot from an episode of The Jetsons that showed off their building architecture and design. I tried to make something similar in style with large curves and symmetry.
 |
| Screenshot from The Jetsons TV Show |
My initial idea to make a long base that connected to the ground did not go very well. I didn't like the way it looked and found it difficult to create. This is when I decided to go for some kind of floating fortress and came up with the idea of rocket pods stretching out from each arm.
Each of the four pods were created out of two curves (which I found very impressive). Most of the smaller pieces, such as the rockets and radar dishes, are all made by single curves revolved through a full circle.
Below is a screenshot of how each part is organized into its own layer. Notice how each of the four arms are identical. I built one and rotated a copy by 90 degrees from the center.
 |
| KeyShot Material Organization |
I tried to make sure each component in the castle served a purpose and wasn't slapped onto the design as an afterthought.
As the model became more complex, it started to slow down my computer. Keeping the differnet objects in their own layers and hiding them made it a lot easier to move around the 3D space.
For my first original model, I think it turned out pretty well. I learned a lot about making different shapes and keeping things organized.
It took me a while to figure out what colors to use when rendering the model. I decided to go with my space theme and take inspiration from Star Trek: The Next Generation. Many Earth ships on the show are a grey and metallic color. I decided to use these colors on my model as well.
Below is a screen capture of a starbase from the TV show Star Trek: The Next Generation
Below are renders created in KeyShot 5.
 |
| KeyShot Material Organization |
As the model became more complex, it started to slow down my computer. Keeping the differnet objects in their own layers and hiding them made it a lot easier to move around the 3D space.
For my first original model, I think it turned out pretty well. I learned a lot about making different shapes and keeping things organized.
 |
| KeyShot Material Organization |
It took me a while to figure out what colors to use when rendering the model. I decided to go with my space theme and take inspiration from Star Trek: The Next Generation. Many Earth ships on the show are a grey and metallic color. I decided to use these colors on my model as well.
Below is a screen capture of a starbase from the TV show Star Trek: The Next Generation
 |
| Screenshot from Star Trek: The Next Generation |
Below are renders created in KeyShot 5.
 |
| KeyShot Rendering |
 |
| KeyShot Rendering |