Wednesday, March 30, 2016

Alyssa Phillips: Serial Slice


Concept: The inspiration for my serial slice came from looking at topographic maps. I wanted something with an organic feel to it, but I also wanted to give a postmodern architectural element to the piece. This led to the decision to extend my object upwards and then give it more character by twisting it.


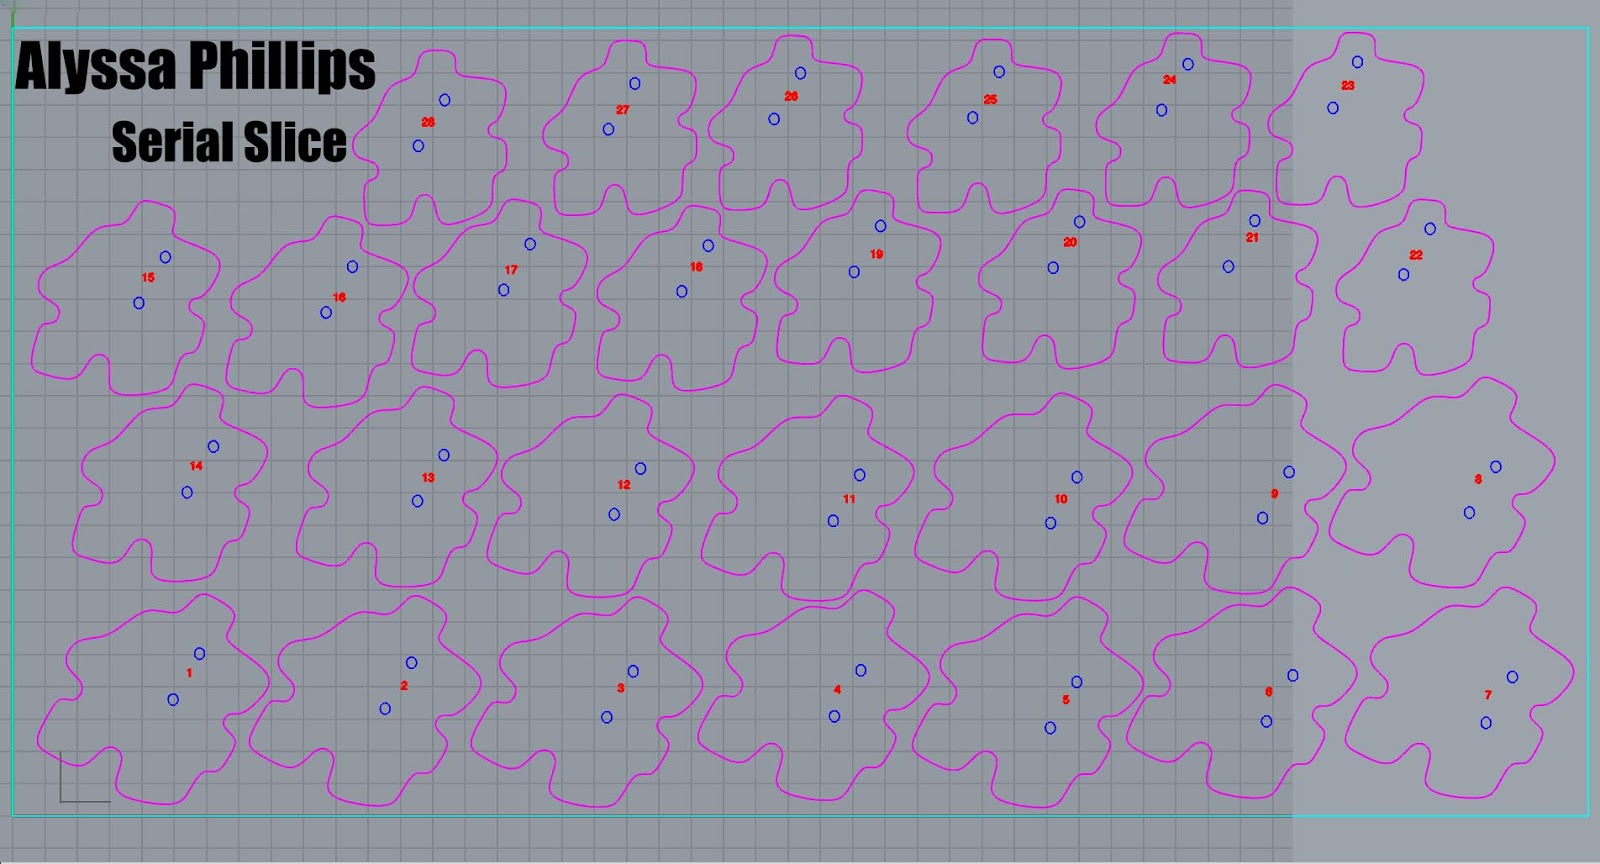
Technique: My technique simply involved creating a freeform curve using control points, making it into a surface, and then extruding it upwards, and twisting it with a slight taper at the top for a slightly wider base. The actual model that came out, after I laser cut it, was a little shorter than I expected it to be, so the dimensions are not the same as seen in the digital model. I do love the curves that came out of the extrusion process and how they give the model depth and character. 


Material: I used 2-ply cardboard for my material and since my model was twisted and angled, I used two metal round cores to keep the slices together. I used Loctite glue to keep the pieces together as I slid them numerically through the two cores. It was a little tough making sure they were angled together the right way before the glue completely dried in case i needed to make minor adjustments to each layer. Once I got it all together, I spray painted the whole thing to give it more emphasis versus the plain cardboard color. 


Victoria Mayfield: Serial Slice

Concept: For this project I really struggled when it came to deciding on a model that I was pleased with. I went through a few different prototypes before I decided on the design that I serial sliced. I knew I wanted to stick with a modern design, and dabble in suspension with the posts. I was inspired by modern cake designs, as well as decorative cupcake stands. I decided to stick with the modern theme and create something that could be showcased as a modern piece of art. 


Modeling: One of the main modeling techniques I used to achieve this piece was the polar array tool. This was the tool that I used to create a box, then create a tight array which gave me the star effect that I liked. I was then able to group those boxes, duplicate that whole tier, and scale is a bit smaller. This was how I achieved the four separate tiers. I then used the torus tool to create a band around each tier, which I used boolean difference to cut that section out. This left each tier with a nice hourglass shape. I created the 6 posts out of basic cylinders and decided to incorporate them into my design and have each tier be suspended. 


Materials: The material I chose for each tier in my keyshot is a frosted glass. I chose this material to stick with my modern theme. The glass is what I imagined the sculpture to be made of since it would be a purely decorative piece. I decided to make the internal posts a bold, bright red metal. I felt like this added some interest to the sculpture and made it more interesting and pleasing to the eye. For my actual serial slice I used MDF wood, then just basic wooden dowels for the support posts. I love how the laser burns the edges of the wood when it has been completely cut through, and this was the effect I wanted to achieve. Then I was able to just glue each serial sliced tier together, and use hot glue to suspend each tier along the posts. In the future I would like to experiment more with paints, as well as different materials. 

Tuesday, March 29, 2016

Charlotte Guzman-Russell: Serial Slice

Concept: For this project, I wanted to make the model very simple, fluid, and organic. I was inspired by spirals that occur in nature, such as certain seashells, ferns, and whirlpools.
Technique: I first created a rectangle and then used the Twist command in different places to distort it's original shape. I then used the Taper command to make the very top of the shape slightly smaller than the rest of it. I created two poles and set them inside the shape and then used the Contour command to slice the shape so I could later cut it with the laser cutter.
 Material: My Keyshot material is a white marble with black veins to make the model look like it was a tangible sculpture. I used a 2-ply cardboard for the actual laser cut because it is the easiest material for me to work with and also because I like way the inner structure of the cardboard looks. In the future I would like to experiment with different materials and shapes.


Michael Bradley: Independant Study - Speaker Project


Design: The design for this project is based on the concept of spherical acoustic enclosures.  Theorized to be superior to cubical enclosures, spherical enclosures are often expensive and difficult to produce.  As a proof of concept and for future testing, I chose to base my design on the Bowers and Wilkins 800 Series Diamond speakers, which cost upwards of $10000 each.  The interrior dimensions of the enclosure is based on the B & W model, however the final shape takes influence from modern LED lightbulbs.  While their designs are more practical than artistic, I thought it added a nice artistic flare to the otherwise simplistic shapes.

Reference 1: B&W 800 Series
Reference 2: B&W 800 Series

Reference 3: B&W 800 Series
Reference 5: LED Lightbulb

Reference 4: LED Lightbulb

Techniques:  The original shapes are based on reference images scaled to the proper dimensions for my own speaker.  The shape was modeled with simple curve functions and made solid using the revolve command.  The exterior shape went through several variations before I decided on the lightbulb inspiration.  Most other modeling techniques used were filleting, Boolean commands, and contour mapping.
Interior shape

Design 1
Design 2
Design 3 a
Design 3 b
Design Final a

Design Final b

Material:  The material will be .25 inch MDF as this is, based on research, optimal for speaker enclosure construction.  To build the enclosure, I chose to use a mix of Horizontal and Vertical slices to create the optimal acoustic profile inside the model.

Curves
Final Model

Cut Sheet Layout

     After cutting the pieces out and gluing the middle section, I realized I made the obvious mistake of assuming MDF is .25 inches when it is not in reality. The result was that the opening in the front which should have been circular was more of an oval.  I ended up having to remove material as shown in order for the speaker to fit properly.  The mistake was avoidable, however not the end of the world.  Thankfully it saved me from making that mistake on my next project.

     The rest of the assembly was pretty straight forward.  I used a combination of  Loctite liquid and Loctite GO2 glue; liquid for placing the pieces, and then GO2 to seal any gaps.  GO2 drys in 30 minutes, and has a rubbery consistency, so it was easier to clamp the larger sections in place over night.  To finish it, I mounted the speaker and a small wire jack on the side so that it can be plugged in easily
The opening which was supposed to be a circle
Material to remove

Final Gluing
Final shot 1
Final shot 2


Testing in the Anechoic Chamber

Alec McKay: Laser Engraving


Concept: I wanted to create the image of a portal, like those often seen in science fiction. My goals were to create a composition that was dynamic and had great depth. While my piece did not go exactly as planned, 


Technique: Most of my work was done in Rhino, by modeling a shape and then using it to create curves. First I modeled the shape of the portal by making a cone using heptagons. I used Sweep2 to make surfaces from each ring around the cone. After that I used Make2D to take the perspective view and create 2D curves with it.


Material: For the material I used plywood, which unfortunately burned around the edges a little more than expected. In part because of this, and in part because I hoped to make the thin engraving lines stand out more, I decided to paint my piece. While I think the blue is a strong color, it currently looks too flat, so in the future I plan to add more paint to give the piece its intended depth using color.

Monday, March 28, 2016

Jonathan Gloria: Serial Slice


 Concept: For my model concept, I got the idea from a chess piece, mostly the king or rook. I thought that making a normal chess piece would be boring, so I made it stand out a little more. In the end when I put it together with the cardboard serial slices, I also thought it looked a little like a trophy. 


Techniques: I used curves to make the shape of my model, and after I did that I used Boolean difference to make some dents to the top of my chess piece. It stared to look like a sun, so I added a sphere in the center to make it look more like the sun. I used Boolean union to merge it into the top of my model. I also used other shapes like tube and torus to cut some of the the bottom parts of my model. 


Materials: For my materials, I used different types of blue glass for the middle and bottom part of my chess piece. For the other pieces, I used a plastic blue so that everything wouldn't be see through. Since the top looked like a sun, I used gold for the top part, so that it would also reflect the light when it bounced off it in the renders.


Julio Romero: Serial Slice


Thresher sharks are one of my favorite animals because of how ridiculously long its tail fin is, so I decided to make one. It was difficult to find good multiple views of a thresher, so I used a side view of a thresher shark and just use other types of sharks for the other views. I also wanted to squish it down to be short and fat to make it look abnormal compared to real sharks, which are long and thin.

For the beginning model I used profile curves and the network surface tool. After that I used the contour command to create the curves I wanted to cut out. I laid them all flat and scaled them up to take up as much space of a 2x4ft piece of cardboard as possible, which caused the pieces to only be scaled in length and width, without affecting the depth.

To add a different form of contrast to my KeyShot renders, I chose to use 2 glass materials. Sharks are usually seen as being tough and powerful, so using glass would make it delicate and fragile. I made the top blue and bottom clear because it helps sharks to camouflage (they blend in with the dark blue water if seen from above and with the bright sky if seen from below.