Sunday, December 5, 2021

Anita Chap: Final Project

Concept: The concept of the design I went for was a sphinx and a gargoyle. 


 Final Pepakura Group Project: Gorgon


    For the final project we chose Keyerra's Gorgon design because we loved her design and thought it was different and unique. Looking at Will's design he wanted to do a horse and dachshund but if we move forward with his design we would've faced the issue of his top head being to heavy.


    The responsibilities for this project originally was for Keyerra to model her design, Will gets the model ready to cut in pepakura and then cut out, and I work on post processing. We all agreed to go in equal on our material but during the beginning of the project I got sick with Covid and I couldn't come into class or attend the open house. In return of not being able to attend I offered to pay for all the materials for post processing. In the end I had to get the cardboard from Keyerra and do the get the model cut in Pepakura and learn how to cut out the model.


     Our group had many difficulties during this project. Unfortunately the file I received wasn't going to fit the laser bed so I had to redo the entire model and get it cut out. I found it a struggle having to start all over and not having a lot of time because I didn't get the file till the week of Thanksgiving. I went up to TheLab Makerspace and got someone to train me on the laser bed to get the file cut out. Although once I was ready to get the file cut out the file didn't transfer over the cut lines correctly and my cuts shifted and overlapped.  I found it very frustrating with the lack of time I had then having to learn a few applications and learn how to cut it was a little stressful. I wish the outcome could've turned out differently because I thought this project would've been really awesome.


Saturday, December 4, 2021

Sebastian Tatum Lamp Project

Makercase Lamp Project - The Void

For this project I decided to take advantage of the lack of specifics, so I made a hanging wall lamp, plus I don't have any extra table space in my room/fablab anyways. I personally don't like the look of laser cut wood, especially in the use of electronics, it makes them look cheap. With that mentality, I used the laser cut wood as the backbone of a foam sculpted lamp. The last time I ever worked with floral foam was in high school, but back then I did not have the tools I have today.


To create the digital files for my project, I used a lot of scanned drawings and Adobe Illustrator. Working with separate svgs was a very different work flow than I am used to. Usually all of my drawings are made in the same software as my stls. When I needed to create a shape with a lot of weird angles, I would draw the shape on graph paper, scan it, open it in Illustrator, trace it, then finally bring it in to rhino to work with. Of course there are thousands of more efficient ways to do that, but I like being able to use a pencil when I can.


After signing up for the free trial for the 3rd time, I setup the scene in Keyshot. For the materials I went with wood, of course, for the laser cut wood sections. With the raster burns I just used a slightly darker wood. The foam was really easy, the foam gets an interesting texture when painted that is very similar to the fuzz materials in Keyshot. The insert is paper, but when its turned on its a luminescent material.


Wednesday, December 1, 2021

Miko Aguon: Makercase Lamp Week 12

 Concept 

==========================================================================

The board I wanted to make would be a board that is based on the old comic strips I used to draw as a kid. It would be the centralized image of them all spreading their wings out to the other drawings that have stuck with me. While it may not look good, it still holds sentimental value to me. Nothing much else to it. Characters from both the past and present.

Characters include Jimmy, Mr. Bass the Bass, Alchestbreach, Steve the Roach, the Love Monster, Me, Kyle the King, Kara the Killer, Annikah the Agile, Bob, and some misc. faces and side characters. 


Techniques

==========================================================================

I used an already made model for the skateboard to 3D with then used the AI file to extrude from it, leaving a hollow hole, then used a copy of the AI file to "fill" it in, giving it the colors and engravings. For the laser cutting, I went to Makerspace and they helped me out. I had to hatch my drawings in Rhino first and then convert it into an SVG (that was required for maker space) and then start laser cutting after a few test runs. 


Materials

==========================================================================

The material used for the render was the wood pine material as it was closest to what my skateboard's material looked like. I used Keyshot to get my render and grabbed the render and put it into photoshop to get the final images. 

Close Up

Tony Hawk Holding My Skateboard

Skateboard Leaning On Wall

Skateboard Hanging On Wall


Finalized Product

==========================================================================

I ended up using an alcoholic marker (do not recommend, use colored pencils instead) to color the engravings. It bled onto the rest of the board and I could not get it out. I am however somewhat happy with how the colorings turned out. 


Tuesday, November 30, 2021

Sarah Cepeda - Final Project: Skateboard deck

 So this skateboard deck is one of those things where I started off with an idea I really like and through the power of experimentation, I made too many mistakes and ending with a secret love child I'm too ashamed to show. I have the finished product, but I tried some post-processing to fix it and ended up hating it. Anyway, here's the bit of this project I have to show for it.

For starters, I worked on the graphic for my concept in Illustrator which translated straight into Lightburn and Inkscape, the MakerSpace recommended programs. I got the printing done rather quickly as a result, but the 3D model proved to be a different beast. Anyway, here are the concept images: 


Here is the Illustrator SVG: 

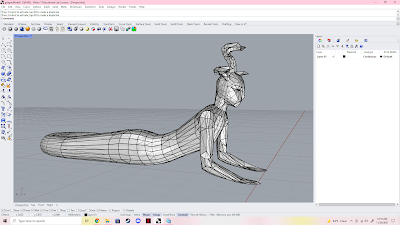
And to be perfectly honest, I remade the Rhino file at least 8 times, I didn't bother saving the failed files (at some point I could no longer boolean difference the parts I needed to, so I would scrap and restart a new file with some minor technique variant). 

For the majority of Rhino techniques, I'd create planar surfaces from vector lines in Illustrator. From that, I extruded the skateboard deck 0.5", the branch and pollen dots 0.25" and the flowers 0.125". I would then boolean difference everything from the skateboard and at first I kept getting errors so then I did it in segments and found the problem parts and attempted to fix them. I scrapped many times during this point and had to edit the Illustrator file so many times. During my first attempt I did not notice I had issues during this part and used the bend tool as well as a center line straight through the skateboard and marked at even points on each side to snap the bend tool to it and make symmetrical bends. 

Unfortunately, after my most recent attempt at fixing the Illustrator file I noticed that I did not save a copy of the original so I could not properly reset my progress and really messed it up for 
Rhino. I basically gave up at this point so I apologize for not having anything to present from here. 

I do have the final renditions of it, but I made the mistake of experimentation and messed it up pretty badly, so I debated even turning it in. Ultimately I decided I better so here are my lackluster photos of this subpar finished skate deck. Somewhere along the lines my measurements got messed up (which I noticed during the lamp engravings, when I imported my files into lightburn and inkscape it would always change my units and measurements, but I don't know why I didn't catch it ). Anyway, it printed way too small on the board so I tried adding some details around it and sprucing it up, but I've got that "too much" gene and I basically horribly maimed it. Here is the collection of probably one of my most shameful submissions I've forced myself to submit to date: 


I don't know why I thought the stain would be light enough to still be visible, so that was my first mistake when I painted the raster engravings on the branch portions. My second mistake, I thought I could fill it in with glue to make it more visible (at this point I was desperate). And my third and final mistake, I wanted it to appear as a larger piece so I did my best to paint some petal like features onto it, but then ended up more like polka dots and I made way too many. 

If I had the change to remake this, I would most definitely have learned from my mistakes and planned my designs more accordingly. Unfortunately, because it is so one and done, money and time both being tight, I just had to roll with the punches and tank the losses. 

I also have an unforseen poor internet connection that has left me unable to even properly post this blog on time. 

Monday, November 29, 2021

Cristian Resendiz: Week 12 Pepakura Creature

 Concept: For my creature I wanted to combine one of my favorite animals with something that would believably aid in it's speed. After some brainstorming I made the conclusion that something that would create less drag would be the solution. One of the things some insects have are smooth exoskeletons, so I simply applied some aspects from those to create the final design. The smoothness of the wings and the head reduce drag, the back legs add extra grip, and the tail and arm fins aid in stabilization at high speeds.


Techniques: For my creature I used Blender to create the model. I started with various cubes and added some subdivision modifiers to smooth them out. Once I got the general positions I combined the objects together using boolean union and started sculpting them into shape. After I got the rough shape I wanted I then started to retopologize the model since such a high poly model could cause problems along the line. I sliced the model in half to make it easier to work on and would apply a mirror modifier later on to fix it. Next I used a shrinkwrap modifier and a plane to start the retopology. I went all around the model using various extrudes from the plane's vertex's and filling any holes with grid fill. After all that I went around the model fixing various issues and finally added one last subdivision modifier to smooth out the model.


Materials: I used an orange color to relate back to it's original animal, the cheetah. If I were to display this piece I would want to place it somewhere with natural lighting since the outdoors is where a cheetah would naturally be comfortable. The post processing involved using loctate super glue and tape to attach the pieces to one another. We debated various colors but in the end we choose to keep the color white and clean it up with paint on the edges to give it a more uniform look.


Final Project Brief


Design

We all looked at each others designs and came to the conclusion that we should use my design. There were a couple deciding factors that made it the most viable choice. Such as JieXing's design loosing too much detail in the reduction process. While it looked good in it's non-edited state once it was reduced to less polygons certain details would be lost, such as losing the horn it had, or the wings becoming a mess. And Jackie's model was still in the rough stages, needing more time to be done thus we weren't able to fully decide on Jackie's design. My design was the only one that read well when we reduced the polygons so that's why we went with it. Once we all agreed on the design we all took our own stab at making a layout it for pepakura and choose the best one. The design never had it's final name decided, we all simply referred to it as Chimera since we couldn't think of one at the time. If I were to give one though I would probably call it "Swift Tail".


Responsibilities

We split up the responsibilities into 2 parts, one would focus on getting the parts cut, and the others would assemble and add any post processing to the piece. I was in charge of getting the pieces cut since I was the only one able to go to the lab and get a membership at the time. It was very stressful time since the lab usually had someone at the cutter. And since not many had any experience with the machine it took way longer since everyone had to get their layout's adjusted. I took the materials and eventually got them cut over a couple of days. Once I finished cutting the materials we split the payment for the service 3-ways.


Process

 After finishing and handing off the pieces, JieXing and Jackie were tasked on constructing the model. The model itself had some issues being put together, as told by my teammates, the cardboard was not easy to work with. The pieces were so fragile at times yet quite tough, such as when folding certain pieces. Some pieces, even when we could see where they went in the files, confused us on how exactly they fit into place. Once it was finally done the we checked the model to make sure all the edges were together and added some paint to them so that the inside color wouldn't show. 

Some of the pro's in the way we decided the roles was that we were given time to do things in-between, such as work on other classes. The downside was that one could not progress unless the other had finished their part. And if something were to go wrong one would have to go fix it and report to the others when the fixed part was ready. That left the other's with little to do at times.