Sunday, October 31, 2021

Clarissa Cruz-Duran : Week 9 : MakerCaseLamp

 MakerCaseLamp

Image 1 : Sketch

Image 2 : References

Image 3 : Rhino Ghosted

Image 4 : Rhino Ortho w/o Drawer


Image 4 : Rhino Ortho w/Drawer


Image 5  : Laser


Image 6 : Keyshot Orthographic

Image 7: Appropriate Environment


Image 8 : Details

Image 9 : Orthographic


Image 10 : Lamp in Environment


Image 11: Lamp Details

Concept
 
I don't have extensive knowledge of interior decor but I have been seeing a lot of Anthropology's displays + store decor. They hire visual artists to create displays and I particularly liked Dirtsa's "High Chest, Cute Knobs" knob display. I wanted to make a playful chest and while looking around I saw several chests where their charm came from their handles. The handles looked like flowers to me and so I searched flowers until I found the lotus flower. Lilypads and lotus flowers were simpler and fun shapes that would add charm to my chest.

Techniques
To make my drawers I began with rectangles, once I figured out the sizing of them, I extruded them. The tricky part was making my lotus flowers and lilypads. I made a few closed curves and moved their points around to create petal shapes -- adding a circle for the "bulb". The tool I used to join together the curves was CrvBoolean, I then chose the areas I wanted to keep from the curves and created a single curve. I then extruded the curve. 

I kept the joint petal curve and the rectangles so that I could copy and paste them to be vectors, so the wood would have the line of where to place my drawers. I put the 3 extruded rectangles on the side so that they would be cut separately and allow me to have a 3D effect. I also put 3 extruded lotus flowers on the side for the same reason. I extruded all at 0.25 inches. Each "drawer" rectangle had two lotus flowers, one a curve on the surface labeled for vector and one that I used booleandifference to cut out a spot where I could slide in the lotus flowers. 

Lastly, to make my raster engraving, I played around with the scale of a copy of my original join petal curve to make a slightly different design, once I found a size I liked, I used hatch to mark the surface. (In order to render my 3D model I made a surface using planarsrf for this joint petal curve.)

Materials:
In Keyshot, I used pine wood because it looked the most similar to birch plywood unstained. I also used matte white paint for my lotus flower wood pieces because I wanted to highlight the flower. I plan to paint the flowers in post processing. I used mahogany wood to model my raster engraving as it would be slighlty darker. Lastly, I used emissive warm light on my "lightbulb" which was just a sphere and cylinder joined in order to show where the light would peek through in my physical model. In deciding where to cut out the flowers, I would stop halfway through my design to test it out in keyshot. I am really happy with my design and hope the physical product looks very similar. 

Post-processing Update: I used loctite glue to put together the pieces of wood and found it easiest to assemble by adding the bottom piece to 1/4 walls instead of gluing the walls first. I wouldn't have been able to glue the inner part or slide it into the other four walls once they were closed.  I also used the glue to glue on the drawers then the lotus flower cutouts. I painted the lotus flower cutouts as I had previously mentioned. I used two coats of acrylic paint and achieved the desired effect and make them pop. Too much light was coming from the holes in the lamp so I covered them from the inside with paper acetate and glued the paper on. Finally, I glued the socket inside of the lamp as I found the lamp stood best this way. 


Akhil Mulukutla: Week 8 MakerCase Lamp

 Project 3 MakerCase Lamp


CONCEPT

For my lamp, I wanted something that looked very unique and minimalistic. The pattern was inspired by the countless variations I've seen on the internet with random flowing hexagonal holes along the sides of the box. I wanted this lamp to be more of a night light than an everyday lamp so I kept the hexagons small and created multiple of them to create more of a constellation type of effect. For the final version I've dropped the idea of adding a bee to instead add my last nickname around the edge of the box. It gives it more of a professional look with the wood as I want it to fit in with my personal lifestyle.


TECHNIQUE


I made the initial layout of the box on the MakerCase website and made it so that it had a top as well
as a bottom to keep a majority of the light in. After that, I brought it into Illustrator to create the hexagon
pattern. Then I brought the lamp layout with design into Rhino and created the box and then the inner cuts, raster, vector all layer by layer. I used a lot of Boolean Union and boolean Difference for outer and inner cuts. For the pattern I used a hexagon tool and ExtrudeCrv to speed up the process. I got my top view picture and finally assembled it for Keyshot. In Keyshot I applied a mahogany wood texture to the box and a darker shade for the engravings.


MATERIALS

I used a Mahogany texture in Keyshot for my finalized renders to give the lamp a very refined look. For the engravings I used Dark Walnut to keep the wood texture while also giving it that dark laser edge look. I used a marble kitchen counter for the product display picture but really this kind of lamp would on a night stand or a desk.


Kristy Yin: Week 10 - Project 3: MakerCase Lamp


Concept: 

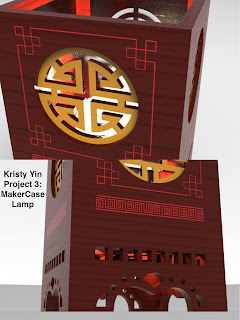
    When brainstorming for a design for the lamp, the first thing that came to my mind was traditional Chinese lamps/ lanterns. Because I am Chinese I thought it would be great to do something inspired by my culture. After some research on Chinese lantern designs, I decided to go with four traditional symbols, one on each side of the lamp that represents good luck/blessings. The first character fú means fortune or good luck. The second character lù stands for prosperity. The third character shoù represents longevity. Finally, the fourth and last character shuāngxǐ meaning double happiness, a character that is usually associated with love and marriage.


Techniques: 

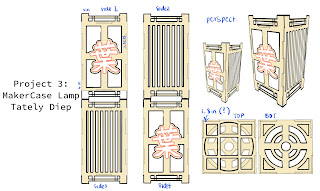
   I started off with all my designs as curves for the laser cutting and assigned each component to its correct layer to be an outer/inner cut or a Vector/Rastor. The base designs used various commands such as 'Mirror' and 'Copy' to create the repeating patterns and shapes. For the 3D model, I used 'ExtrudeCrv' to extrude the sides of the lamp as a closed planar curve. I made my design for the four symbols in illustrator and brought them into Rhino3D, they were brought in as a 'Hatch', which was good for the laser cutting Rastor but not for the 3D model and Keyshot. I was able to use the command 'DupBorder' to make a border of curves around my hatch design and then 'PlanarSrf' to make the design a surface. I created the cutouts in the lamp by first making the shape of what I wanted to be cut in curves. For the symbols, I created a circle as an outline and then 'Explode' the border of the design and then 'Join' the appropriate curves to obtain the shape that I want to be cut out. Then I used the command 'ExtrudeCrv' and simply 'BooleanDifference' to create the inner cuts. To show the Rastor cuts I made a small indent using 'ExtrudeCrv' and 'BooleanDifference' as well and then moved the surface of the symbol in the indent. For the Vectors in the 3D model for Keyshot 'PlanarSrf' was utilized to get the surfaces. Then I used 'Rotate' on each side and 'Move' to make them fit into a box.


Materials: 

The main material for the lamp was a birch wood board that I decided to give a cherry wood stain in order to get a more oriental aesthetic. Painted the main symbols gold and the Vector patterns red, both colors are important in Chinese culture, red for good luck and gold for wealth, they can be seen everywhere on Chinese New Year and they are also colors of the Chinese Flag. For the post-processing, I buffed, polished, and waxed the painted wood, then I put acetate paper behind the four symbols to imitate the look of traditional paper lamps and lanterns. However, because the vector lines were so thin it was hard for me to find a way to color them red. The rasters were also not as deep as I thought that they were going to be but other than that overall I am content with the outcome. 


Carly Kight: Week 8 MakerCase Lamp

Concept:

Because the MakerCase lamp has four sides, I wanted to make each side a part of a themed whole. I chose to have each face of the lamp represent one of Earth’s seasons (the weather has been transitioning lately, so it has been on my mind). I was also inspired by memories of learning about the seasons in school as a young child. In my research, I was able to find an image with all four seasons that embodied my memories well enough. I also found some good references for the flowers, leaves, and snowflake.


Techniques:

After I imported the outline of the MakerCase, I began to use the control point curve tool and the polyline tool to draw my designs on their appropriate layers. For the snowflake, I used the ArrayCrv command to make sure it was all symmetrical six ways. Then I extruded it all to the appropriate thickness. I used the hatch command to fill in all of the rastors as solid areas.


Materials:

I chose to make the body of each face a light wood material, and each vector line a dark brown. Inside the rastored areas, I chose to fill them with a darker color that matches with whatever face they are on (ex: leaves are orange, so the rastored area will be a dark orange/brown). This is because I will be staining the wood, so the darkness of the burn will show through. I will also be staining the insides of the vector lines/shapes similarly, and that is reflected in my renders as well. I chose to stain the wood because I want to maintain the natural aesthetic of the wood. This matches my naturalistic theme more closely than paint. Lastly, I plan to have colored/stained acetate showing through each inner cut. This will diffuse and color the light passing through each side from the light source.


Tately Diep : Week 10 MakerCase Lamp


Concept: 

For my sketches, I was inspired by Japanese and Chinese-styled lanterns. I really liked the shadows projected from the design shown above so I wanted to incorporate similar shadowplay into my design. To make the design more personal, I added my family's name character "." Overall, I tried to make sure that there were enough cut-outs within my design to have plenty of airflow.


Techniques: 

I utilized a lot of Free-form curves for the more organic shapes within my design, tracing on top of my sketch directly. As for the other details, I relied heavily on the standard Line tool and the Trim tool came in handy for my more intricate cut-out shapes. As for the raster outline of the Chinese character, I used the Hatch tool to indicate where the material will be slightly burned. When making the 3D model to render in Keyshot, I used the ExtrudeCrv tool to make my outlined panels into solids that I joined together with the transformation tool. Also, because I wanted to add paper acetate onto the sides with the character, I created a thin polysurface by drawing a rectangle and PlanarSrf.

Materials: 

When assigning materials, I decided to go with a darker wood color as I plan to stain my MDF board with coffee or paint to hide the burn marks made from the laser cutter. I wanted to keep my concept fairly simple in order to achieve the minimalistic looks seen in my inspirations. As I mentioned before, I plan on adding sheets of paper acetate to my lamp to replicate the paper lantern style. In KeyShot, I assigned the planar surfaces with frosted glass to give the transparent effect. For the render, I added a small lightbulb-like shape inside and assigned an emissive warm light to simulate how the light would project the shadows of the designs.