Monday, January 30, 2017

Griffin Korns: Week 3 Flashlight


     The design for this was to be a regular flashlight, with an element of implied movement in the front, end, and buttons. The head has cutouts rotating one way, the tails cutouts rotate opposite, then the buttons decrease in size moving towards the tail. The middle rings exist to section off the parts and imply that they could twist.
     The base model was the flashlight created by the tutorial, slightly enlarged. Cylinders were created around the head, then they had one end rotated to create the twisting effect. Those cylinders were mirrored over to the back and scaled down - before being subtracted from the base model. The buttons were created from two cylinders combined each, progressively sized down. The rings were projected lines being the basis for pipes that were then either subtracted or added to the base model.
     The material choices were neutral in color, with colored accent pieces being designated to the important elements that are the buttons. The flashlight is designed to be contrasting, with the wooden rings being placed to help create a median color and unique texture.

Griffin Korns: Week 1 Duck


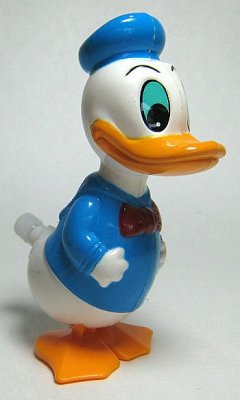
     For the duck I wanted to mimic those wind up toys that move the animals legs, similar to the picture below.

     Modeling techniques were pretty simple, I followed the tutorial, then narrowed the ducks body to appear more angular. After that I reshaped the head and neck, then fixed strange gaps that appeared between the head, bill, neck, and body with some mesh tool. I then drew out the feet, filled in the curve, then extruded the curve upwards - followed by using a boolean union to join the foot with a cylinder which I had bent in the middle to form the leg. The hat was two cylinders joined together with a union, then placed on the ducks head. I tried to mirror the leg over but couldn't create a suitable plane, so I duplicated and rotated it, giving it a slightly uneven look.
     Material choices were regular duck paint colors, chosen to mimic the plastic toy it's aimed to replicate. Lighting was designed to be polarizing, separating the duck into light and dark - with a small part of it in the middle.


Griffin Korns: Week 1 Castle


     I felt that a house was a suitable level to start at due to the relatively simple geometry design language, and after looking around for inspiration images, I found a few cabins to take ideas from. 

     I began by creating a cube, which served as the main body for the cabin, from which I created the awning, top step, roof, pillars, and chimney, using the SplitFace command and extrusions. I made the windows by creating holes and projecting them onto the cube sides, then extruding certain sections. The bottom step was simply joined with a boolean union to the rest of the object.

     The walls of the cabin were intended to be a sort of forest green wood, with darker oak window trim - matching the roof, offset by the lighter pillars and chimney accent pieces, resting on a supposedly asphalt foundation. The colors were chosen based on their relation to what a forest would look like - rocks, various wood colors, and leaves.


Jason Doze: Week 3 Flashlight


 Ghosted/Edges


 Exploded/Layers


 Shot 1


Shot 2


Shot 1


Shot 2


 Concept: My first idea was to model a light saber and then I realized that was most likely the least creative thing I could do.  So instead, I decided to make something that made sense for the sleeve of this flashlight.  Since the flashlight is so small I thought I would try to optimize its grip for an adults hand.  I noticed while gripping the light that I could really only get 3 fingers around it, so I designed the sleeve with that in mind, making 3 large grooves for my fingers to grip around.  Then I added the ellipse cutouts making horizontal grooves that are reminiscent of a billet motorcycle handle.


Technique:  I took the original template curve provided and sketched 1 curve, alt dragged it twice and scaled up 2 of them leaving one small.  Then I revolved that template and used filet to smooth it out. I used ArrayPolar to multiply my objects around the axis and boolean difference with ellipse, sphere, and truncated cone to notch out the sleeve. Then I did a filet on the top inside, outside, on the edge of the spheres, and again at the bottom of the sleeve.  

Materials:  I wanted to go with a shiny metal so I used chrome for the sleeve, brushed copper for the top notches, anodized black for the horizontal ridges, brushed aluminum for the sphere notches and brushed copper for the truncated cone notches.  I tried many combinations of metals and textures with bumps as well as color combinations of anodized brushed metals but I think for this project that less is more and it helps the sleeve achieve a solid and strong look.  I wanted to add an emitter for the flashlight end of the sleeve but I'll have to look that tutorial up at another time. 

Lisa Brasier: Week 3 Flashlight (Old)

I used control points and Boolean difference to add detail to the flashlight. For the snake I used a torus, projected a straight line through the middle and split the sides. I then rotated the sides to begin making the wrapping pattern around the flashlight. I couldn’t figure out how to use the fillet and chamfer tools so my model doesn’t have either of these at the moment. For the material, I used nothing but metals.


Lisa Brasier: Week 1 Duck

For this project, I wanted to make a simple toy duck with wings and an open beak. I did so by applying what I learned through the tutorial on how to make the head and body using control points and curves and used the same process. I used a mixture of materials like plastic, metallic, and paint.


Lisa Brasier: Week 1 Castle


I wanted to design a more traditional castle. I looked up different kinds of castles and combined aspects that I liked. The castle is mostly made up of unedited basic shapes joined together. I used Boolean difference to create the windows and door. For the material, I used paint and wood textures on the castle itself and a mix of plastic and metallic for the rest of the scene.


The colors I chose using a free home trial looked way different when rendered on the schools computers. I’m not happy with the colors and textures I currently have picked out.

Lauren Barbieri:Week3 LED Flashlight Sleeve


Concept
My concept was based primarily off of ornate mythological looking metalwork. That and I was looking for an excuse to practice making curves. One of my major focuses was getting those curves just right.
Modeling Techniques
I drew the shape of the base with the curve tool and then used revolve to create the main case. From there I created the curves for the metal work projected them onto the model split the curve into a surface, then scaled and extruded the surface multiple times. I then split the details using the casing as a cut object (and vice versa) then joined the segments. The rivets were duplicated using polar array as were the top and bottom spirals. 
Material and Lighting
The flashlight has a leather sleeve for a firm grip, an intricate and impractical bronze inlay metalwork hiding a factory made steel casing. Someone went to the trouble of buffing and scratching the bronze but the steel casing is practically factory new. Still there is a nice contrast between the bright bronze and the dark leather, and a flash of silvery steel as an accent color. 

Kyle Walker: Week 3 Flashlight Sleeve

Ghosted
Model breakup
Keyshot Front view
Keyshot Front view
Inspiration and Influences
The things that inspired me were some of the old MAG flashlights that were pretty much made of solid metal, and I always liked that style.


Modeling techniques
I used the Boolean curve to give it its ridges and give it a flat grip. Then after I filleted the edges I revolved it and created a cylinder and used the ArrayPolar to create multiple cylinders around the sleeve and use a boolean to create the notches.

Material and lighting
The materials used were types of metal that complimented each other and the simplistic model.

Sarah Roberson: Flashlight Sleeve


Concept:
So my concept for my flashlight sleeve still sticks with my theme of doing board game pieces or board games themselves. It is based on a Bishop piece from the game Chess. I wanted to be able to include every curve that is traditionally in a Chess piece.

Ghosted Painted Black (Above Picture)
Keyshot Layer Assignment (Below Picture)


Modeling Techniques: 
To get the shape that I wanted, I ended up image tracing a line drawing of a Bishop that I found online and transferred that into Rhino. I then made sure that it fit the dimensions of the sleeve by using the flashlight template provided by Professor Scott.


Material Choices:
For the material choice, I used carbon fiber gloss with a fiber weave texture to give it some flare. For Keyshot use only, I created a lense and added a light texture to signify the direction that you will be pointing the flashlight if you were to actually turn it on. I also tried lowering the brightness so that you could see the light more, because I couldn't find a light material good enough to shine out. This assignment made me very happy because it looked amazing as a sleeve and then when I added the clicker, it made it even more amazing.


Finishing It:

In finishing my design, I painted it black like the traditional color of one part of a chess set and then dry brushed it with a silver to give it a distressed look. I really like how this turned out because it made it almost look like stone. This project was a lot of fun to finish, even though I splotched the dry brush just a little bit.


Michael Creamer: Week 3 Flashlight


The concept for my flashlight was was to take the simple cylindrical shape of the flashlight and repeat that shape around it in different ways so that it would look completely like a flashlight but exaggerated in some ways. I also wanted to be able to see the flashlight through the case, almost like a skeleton, surrounding and exposing certain parts.


To model this, I created curves out and made them radially surround the flashlight. The bottom piece is a hollowed out cylinder that I projected rectangles onto and then extruded in. I then used boolean difference to cut the rectangles away. For the top piece I radially applied oblong spheres and used them to make cutaways.


My material choice is my personal favorite scheme. A subdued brownish gold with black. The bottom piece is clear because I know I will be able to print my flashlight on clear plastic and I think that should be a feature.


Darrius Williams Castle,Duck,Lightsaber


For the model of the castle I wanted to go a Roman/Greek style in architecture while also not sticking to close to traditional building plans. I also wanted to mix in some attempts at unusual shapes from curves and Boolean to make the fountain and center element in the cage structure.


the design was pretty simple and to the point. I based most of it on round primitive objects and a few shapes that come standard such as star shapes.  the cuts at the top of the towers were done with the same shape I used to cut the windows into the towers.


Material wise i went with stone and lots of it. I used brick for the towers and a rough sandstone for their foundations. for the pillars and obelisk i used black marble and white plastic as the fountains.


for the duck I wanted to design it to be used as a future inscent holder and possible oil diffusers. so i designed it in rhino but finished it in Maya after time constraints required me to continue at home with an obj. i brought it back into rhino to separate the parts for the keyshot render.


for Materials I couldnt narrow down what i wanted so i did two. one primarily made of gem and a metal head while the other is all hard metals such a s titanium and gold. with an anodized neck coil.


For the light saber I didnt want to base it on any current design i just dove right in and played around until i found the kind of saber i walk around with.


material wise i went strong metals that have seen a little damage while i wanted to use red marble as its top cap for a little stone flair. the grip is highly raised leather and the bottom nobs are brass/