Saturday, February 29, 2020

Twinkle Shah: Hammer Model


Concept
For this project, I tried a different approach and decided to do some brainstorming on paper before working in Rhino. I did some sketching, and found a reference of a walking stick that gave me some inspiration for the shape and form of the 3rd hammer I sketched below. This is ultimately the one I chose because I found the shape unique, ergonomic, sleek, and minimalistic. 
Ideation Sketches

Victorian Walking Stick - Inspiration for form of the hammer


Rhino Model with Layers

Rhino Model Ghosted Painted Black

Rendered Hammer Model

Rendered Hammer Model - Perspective Shot


Process
To make the hammer model transform from a sketch to a 3D model, I started out by perfecting a curve for the head, and a curve for the handle, and then piped the two with flat caps. I then joined the 2 and then worked on trimming the 2 ends of the pipe for the head into a shape that would be suitable for hammering. Next, I extracted a subcurve from the curve I used for the pipe, and then moved it closer to the edge where the pink silicone part would be on the handle. I then duplicated the handle and then trimmed out the pink piece from the duplicate, and then capped that with an extrusion from the subcurve, and then joined the 2 pieces back together. I repeated this for the top of the hammer as well. Next I added some chamfers at the bottom of the handle, and at the 2 sides of the hammer head. 

Then it was time for rendering. After I assigned my materials and set up my environment and lighting, I took the images into Photoshop and gave more shading and highlights to the pink silicone parts, because I could not get it to look realistic enough in Keyshot. I used the dodging and burning tools in Photoshop and dropped the opacity of those adjusted layers, and changed the mode to soft light. I think the result was much more realistic looking than the 2D plastic look from before. I also toned down some of the highlights on the metal because they looked too dramatic next to the silicone's.

Materials
I wanted to keep the materials simple and straightforward, so I stuck to only 2 materials: a silicone/rubber type material, and a silver metal. For the silicone, I used a Axalta painted plastic, and added some more dimension to it with the dodging and burning tools in Photoshop to make it appear more realistic and more like silicone. The metal is a Zinc with a radial brushed texture, which I think turned out to compliment the form of this hammer well.
Monday, February 24, 2020

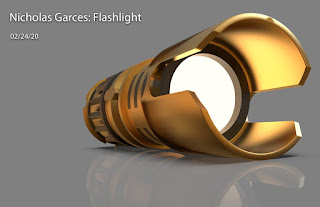
Nicholas Garces: Project 2 Flashlight

Concept
For the flashlight model, I decided to try and create a custom lightsaber design. I remembered that in the new StarWars Jedi Fallen Order videogame there is a lightsaber customization system that allows you to combine several parts to create your own lightsaber design. I used this to create a unique design that still felt true to the StarWars universe. I loved the gold and black color pallet and the extended walls that are easily recognizable from the game’s starting saber.


Process
I started by creating the basic outline of half the cross-section and used a revolve to create the basic shape. I repeated this process several times until I found a shape that worked. I used polar arrays and booleans to add details and cut-ins that revolve around the cylindrical base. I separated two top walls to more easily add details and fillets. To get all the edges filleted, I scaled the model by a factor of 100 allowing me to add detail to the fillets without stressing the system for a value smaller than 0.001.


Materials
For the materials, I went with a gold and black metal design similar to what is shown in the reference. I also added a stand-in light and rubber button to approximate how the flashlight might look once it is set up with the LED inside.


Marvin Robinson: Hammer


FlashLight

 Concept: My flash light was inspired by the desert Dragon blood tree. I was inspired by its fluted shape architecture and tubular interwoven branches.

 Process: The process involved  revolving a boolean curve that is revolved. Once I had the form I used are array and spheres to mimic the rough bark texture, while maintain a functional grip. I used multiple torus to replicate the branches and boolean an array of holes for the light to pass through.


Material: Wood shape textures that give it a rough texture and a yellow spectacular that to blend with natural light.

Twinkle Shah: Flashlight Model


Concept


Inspiration: 

I wanted to take my flashlight model in a mystical direction by creating a model that resembles a magical wand. I did not model my flashlight after a particular wand that I found, but I did like some characteristics of the ones below, particularly the 3rd one from the right.


Image result for wand
https://images-na.ssl-images-amazon.com/images/I/61HXIBPyAtL._AC_SL1500_.jpg
From Ernst Haeckel's Art Forms in Nature


I also took some inspiration from the illustrations in Art Forms in Nature. I liked the fluidity and mystery of the filament like objects in these illustrations, especially the middle object. I thought it would go really well with the mystery and whimsy for a magic wand.


 Process
 
Flashlight Wand in Rhino with Layers


Flashlight Wand in Rhino - Painted Black


modeling process: To create my model, I created a curved polyline for the base of the model. I put some rounded rectangle shapes near the top and the bottom of this line, and then used CurveBoolean to join the curves so that I could revolve it. After that, I created a pipe out of the segment of the curve that aligns to the main body, and then made a pipe out of that of varying thickness. I created a curve to trim that object at the top in a slant, and then used the same curve to extrude and re-cap the pipe. I then used an ArrayPolar to create 4 of these snake like pipes all around the body. I added some tourouses near the neck of the flashlight, overlapping. At the top and at the bottom, I put small diamond shaped boxes in an ArrayPolar for added detail. At the top, I also did a BooleanDifference with a tourous. Lastly, I filleted as many edges as possible for a smooth design.


Materials
I used anodized niobium brushed purple for 2 of the rings at the top as well as the snake like structures along the body of the object. For the thicker ring, I used a tourmaline pink gemstone.The diamond shape details at the top and bottom are in copper brushed 90.


UPDATE: 3D Printed Sleeve 

Here are some images of the 3D Printed Sleeve in black!


Sophee Martinez: Project 2: Flashlight WITH 3D Print

Concept

 I wanted to create a flashlight sleeve inspired by Magical Girl Wands and Sailor Moon Wands.

Process

I used  mainly BooleanUnion, FilletEdge, ArrayPolar, Rotate, Trim, and I had to troubleshoot naked edges for several hours.


Materials

Keyshot: I wanted to resemble a toy wand with shiny metallic paint. I wanted it to be feminine and fun, and this reference is the best one for me to paint with metallic spray paint and acrylic paint.

\

Final Result


Project 3 Hammer

Concept 

My concept for my Hammer was the Super Sledge from Fallout 3 I wanted to keep the fuelsolodge but turn the head into a rocket and make it a little goofy.


Process

I built my handle 1st, using the helix method to paint a spiral stripe & then creating the grips using the revolve tool with boolean difference. Next I created the hammer head with the fins using polar arrays and extensions. The pommel is created using the same methods and then rounded with fillets.

 Materials

I utilized several metals for the head, polished steel and a polished brass, gold rings, and leather grips for more emphasis. I also had the wire behind the head in red plastic.