Wednesday, September 21, 2016

Andrew F. Scott: TopMod


Rhino Got you down, Maya feels a little too overwhelming. Well, here's an oldie bur goodie yet freebie from Texas A&M University. TopMod, Short for topological manner is a polygonal modeling program that you can use to create a variety of interesting forms with. There are some wonderful subdivision algorithms, extrusion tools, shells and branching operations that you can use to create some really fantastic forms for digital fabrication processes. Don't sleep on this one. You can download it and run it off of your usb drive in windows or mac osx format. Here is a link to some TopMod Eye Candy. Use this link to find tutorial videos.

Saturday, September 17, 2016

Michael Hosler- Week Two- Duck


My inspiration for the duck project was collectible wooden duck statues and decoys, common among hunters and bird enthusiasts. to make my duck, I used solid tools, stretching, point manipulation, orientation on a surface, tangential blending, trimming, splitting, and boolean unions. The entirety of the duck is various types of wood, owing to my inspiration. The head is wood planks and the eyes are herringbone, the beak being light ash. The main body is mahogany because I like to say the word mahogany (no, really). since there were certain things I couldn't figure out to do without taking another entire week and I still needed contrast between body and wings, I simply did a split where the wings would be and rendered them in a different material, black walnut. 


Michael Hosler- Week one- Castle

As far as my intent and inspiration here, I got most of my rhino instruction through the video tutorials on YouTube, where professor Scott referred to the project as a space station rather that a castle, so i thought "If it's a space station, why am I making a floor?" So after  following the tutorial long enough to learn how to do everything I needed for this, I rotated it horizontally and made a space station. the techniques I used here include rotations, polar arrays, mirroring, exploding, joining, and use of the solid creation toolbar.  For my materials, I simply went with what I thought looked good. I don't have a huge artistic vocabulary, but bear with me. the bars around the outside and the array of tori are both Axalta, while the center pieces are carbon fiber. through the center of the whole station, there is a steel rod to allow free spinning for the creation of artificial gravity (though, admittedly, I don't understand the nuances of that technology, but hey, art).  the discs are cubed black glass to simulate photo-voltaic cells (solar panels), and the pyramids attached are polished silver (mirror) for reflecting light into the solar panels.


Monday, September 12, 2016

Chelsea Griffin - Week 1 - Castle


Concept
When I initially began, I was uncertain of what exactly my ideal castle would look like. I am pretty new to modeling and entirely new to Rhino, so I ended up just following the YouTube castle tutorial and messing around with different shapes. I knew that whatever I made, I wanted it to have a sort of lair-type vibe. I started off making the morning star balls and just kept coming up with ideas from there. I had an ellipse at the base of my model and decided that I wanted it to become an eye, as I really enjoy drawing and looking at eye art. I find eyes pretty profound and a lot of my work in various mediums has incorporated them in some way or another so it only made sense that they would be the center of my lair. 

Modeling Techniques
As I was learning about the Rhino environment, I found that I used the rotate and mirror tools quite often for the sake of symmetry. Pretty much every object, excluding the center eye, was mirrored or copied in one way or another. I utilized the pipe tool for the beams around the spheres, as well as the veins that lead into the eye. For the iris and pupil of the eye, I used the split tool as well as the extrude tool. I learned that I had to join these parts in order to avoid any naked edges. The scaling tool came in handy as well to create the larger spiked-beam-sphere centerpiece. The methods I used were fairly simple but I am satisfied with the outcome. 

Materials Used
Although my castle is abstract, it is still an edifice of sorts. As such, I felt the best materials would mainly be stone. I used granite for the iris and eyeball,since I imagine that that would be the actual living space of the castle. I also made the spheres a black granite for the same reason.The veins are mainly for aesthetic purposes as opposed to functional, so I figured it made sense that they would just be red glass. For the pupil, I wanted a sort of reflective pool, so I ended up using the coffee liquid material. The spikes are also mainly aesthetic, though I suppose they could serve as a defense. Either way, I felt using the glass effect worked well

Chelsea Griffin - Week 2 - Duck


Concept
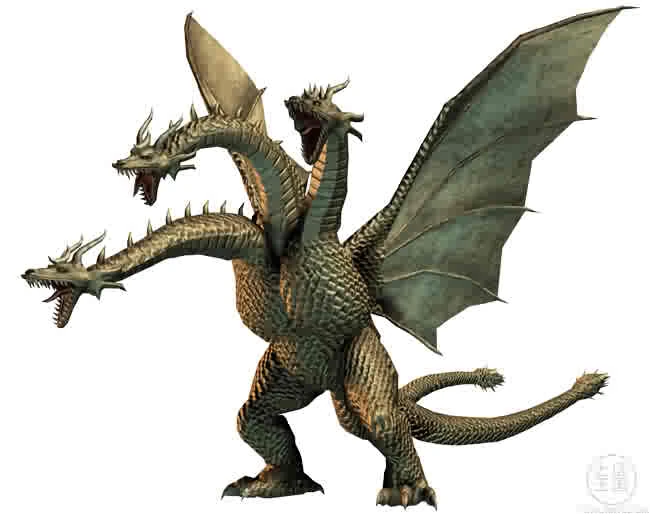
This is Steve. My initial idea was to create a swan as opposed to a duck.  As you can see, I kind of got carried away. While making the swan, the feathers on the wings became a little too complex to execute for me and my newbie modeling skills. I had the body of the swan completed and I was pretty proud of it so I came to the conclusion that I would have to mutate the poor thing. I came up with the idea of bat wings, as those are significantly simpler than birds wings. After that, I decided that this monstrosity needed to have some pretty unique limbs as well, and that's how I came up with the idea for his tentacles. I came to the decision of the three eyes and head spikes in a similar manner. While being created in Rhino, Steve was mainly green and purple, sort of like a dragon. But once I brought him into Keyshot, nothing really seemed to look right in these colors. I began messing with metallics and came to find that Steve actually makes a pretty gnarly robot. And thus, Steve the mutant robot kaiju was born.    

Modeling Techniques 
Although Steve was a bit different from the original duck example, I tried to use most of the techniques that were used in the duck tutorial. For example, for the wings and the head, I used the project tool as well as blend surface to make the body parts blend naturally. I used the project tool for the tentacles as well. The eyes were also oriented on the surface, just like in the duck tutorial. I utilized the mirror tool for the wings as well as the tentacles. The most useful of all in creating Steve was creating the neck, wings, and tentacles using the curve and the pipe tool. 

Materials Used


As I had mentioned before, the final materials I chose for Steve were not what I had originally intended. When messing around with Keyshot, I came to find that scratched metal was perfect for him. I used the infrared gradient material for his eyes to complete the robot look. As for the tentacles, I still wanted that part of him to be natural and organic, to emphasize the fact that he is a mutant. Creepily, I found that the best effect for this was using the human skin texture, which I darkened quite a bit to look a little less human. 

Corrina Spurlin: Week 2 Duck

Ghosted painted black

Ghosted with Keyshot assignments


Concept
The main idea I had when creating this duck was that it would be some form of minimalistic. By forming the body and other parts into simple shapes, or with simple geometry, this was achieved. I also kept this idea throughout the whole composition by reducing the amount of parts that would need to be created. Parts that already seemed connected were combined to continue this theme. I also attempted to make the duck have a more stylized and cute look rather than being realistic. 

Modeling Techniques
The main modeling techniques I used when creating this duck were varying commands relating to the surfaces of the objects. For example, I used commands to orient an object onto the surface of another one. I also used the command Rebuild in order to create the simplistic look. F10 was used in order adjust the shapes of some of the objects. 

Materials
The materials I used for my duck were chosen around the idea of simplicity. I almost used materials that appeared to be toon-like but they lacked depth and seemed too fake. Instead, I ended up using smooth materials that would work well in showing the shapes and edges of the design. The colors I used with the materials followed the general idea of a standard rubber duck but included underlying tones of colors from other objects. For example, the red objects would have underlying tones of yellow and vice versa. 

Corrina Spurlin: Week 1 Castle

Ghosted painted black

Ghosted with Keyshot assignments


Concept
The main idea for this castle was based on how churches often look. A reference image wasn't used as I wanted the idea to be original and see how it turned out. To achieve the theme I included repeating archways with an ascending design. I kept the design more simple than complex because I wanted to combat the standard of how intricate some churches can be. The colors involved were used to also counter how natural-toned churches are. The church idea for the castle was meshed with the idea of making it look mildly human, which was accomplished by putting a sphere on top to represent a head.

Modeling Techniques
The main techniques I used when creating this castle were MakeHole, rotate, and scale. Translation was also involved whenever I changed the location of something as I wanted the design to be different. The MakeHole command was used in varying ways, as I sometimes used it to cut all the way through an object and other times only to cut into it part way. Rotate was used often in order to create the repeating patterns around the structure evenly. Scale was used to copy objects and put them in another part of the work, such as the rings, to make the piece balanced. 

Materials
I wanted to use materials that would allow for a general stylized feel, in order to continue the idea of having a non-traditional church-like structure. To accomplish this I only used smooth / sleek materials. The material used throughout has a metal-like texture to it, allowing for underlying tones that can be intriguing to look at. I used contrasting colors to continue the idea of having something different from a church, which typically can be monotone. 

Draven Ashorn-Hejl: Week 2 Duck


Concept: Whenever I think of a duck, thanks to reading the webcomic El Goonish Shive I generally end up thinking of those hilarious little demon-themed rubber duck toys. Since I am ridiculously new to modeling, a simple toy seemed like an attainable goal, so I went for that.


Modeling Techniques: Since I don't know much about 3D modeling, I mostly followed the tutorial. I used multiple spheres and then deformed them to create the body, head, bill, and eyes of the duck itself. To keep from exactly copying the tutorial, I focused a bit more on trying to make spread wings on the duck. I also added horns for the signature touch of the demonic duck idea.


Materials: For the materials, I simply used the Rubber material for all of the pieces due to my goal being to replicate a toy rubber duck, and recolored the material for each individual part to create the look and coloring I was going for.

Draven Ashorn-Hejl: Week 1 Castle


Concept: This is the first time I'd ever used a 3D modeling program before, so I wanted to keep things nice and simple. In many videogames that use sprites, a castle is depicted as a wall with a single keep inside of it, so that tends to be how I think of them. It is this simple idea that I went with to recreate in 3D.


Modeling Techniques: As this was the first thing I'd ever made with 3D modeling I kept things extremely basic, using only basic cubes, cones, and a cylinder to make my castle, using specific number coordinates to place each piece to keep it from becoming a mess. To keep it from being too boring, I used Boolean Difference to cut a gate into the outer wall and hollowed out the central keep to create a 2-story inside, and I also added windows to it so you can see inside.


Materials: For my castle's render I went with an Obsidian texture to give it a dark sheen, enforced by me removing the marbling by customizing the texture to be just the pure black. I also used a glass texture for the central keep's windows so that they could keep their function of letting you look inside the keep.

Sunday, September 11, 2016

Michael Crow: Week 2 Ducky


Concept: I really liked the idea of a basic rubbery ducky sold to rich upper crust children. one where kids could have a ducky dressed in a tux, but of course that means that he cant be a bath toy, so extrapolating that he couldn't be a bath toy anymore so I changed his material to a harder plastic for everyday play.

Modeling Techniques: Following the tutorial i continued using "Project" to create curves on my duck to make the layers of clothing and the layers for the hat and the cane. The monocle comes form basic shapes. and the duck tails i used for the overcoat came from subtracting a square form the body of the duck. Due to this I was unable to have all closed edges, but that wasn't a requirement for this project, so oh well.


Materials Used in Concept: I wanted to stick as close to the original duck idea as possible so i stuck with rubber and plastics, making it a harder plastic since it would be a small child's toy. I wanted it to last a long time. the colors mimic that of a Tux mixed with the colors of a rubber ducky. The monocle is made of glass and gold. Making the duck a much more expensive toy and fulfilling its purpose as a toy for the rich elites.

Muhammad Martinez: Week 2 Ducky

Ghosted black

Ghosted with colored layers

Keyshot with material - bird's eye

Keyshot with material - ant's eye

Concept
With ferocity only matched by King Ghidorah himself, this terrifying trio transforms the rubber ducky into a force to be reckoned with. These guys can proudly join the ranks alongside other three-headed avians.

Model Techniques
I continously rebuilt the body with different points while teasing it into shape. The shape of the bills were drawn out in the right viewport then projected onto the heads. Commands like Join, Explode, Blend, Patch, and EdgeSrf were needed remove the naked edges formed between the head, bill, and neck.

Materials
Colored plastics were used for the body and heads of the model.Colored stainless steel is used for the bills along with precious metals for the eyes (gold and platinum).

Muhammad Martinez: Week 1 Castle


Ghosted black

Ghosted with colored layers

Keyshot with material - bird's eye

Keyshot with material - ant's eye

Concept
My original castle was inspired by the Weisman Art Museum with its use of partial cones and cylinders. Needless to say these designs were over-ambitious as a beginner to modeling. After a few iterations, I learned to compromise with Rhino to create something simple and interesting.

Model Techniques

This model exercised editing, rotating, and positioning polysurfaces. After plenty practice, I began quickly switching between viewports and getting a feel for thinking in three dimensions. ArrayPolar is a fun command that I played with in every castle attempt. This project gave me a solid introduction to the various objects in rhino.

Materials
Earthy materials like porcelain, red granite, and a paint matte gray were used for the buildings. Metals including copper, steel, and gold were used to add detail. Ruby was used for the rings, and everything sits on a glass base.

Timothy Smiley rubber duck assignment 2


Concept

I had a great idea to make a model of something seemingly harmless into a borg drone like a goldfish 
or a rubber duck. so when I got the assignment i immediately knew I needed to make a borg duck (from star trek if you didn't know). 

modeling technique

I used maya polygonal modeling for the duck starting off with a cube and shaping it out. I was surprised at how easy the basic shape was to carve out.to make the prosthetics i used faces from the ducks face and duplicated it so it would fit perfectly.

materials

I used plastic material for the duck and black chrome and stainless steel for the implants. there was a very cool emitting shader i used for the light from the bionic eye.

Saturday, September 10, 2016

Melanie Estes: Week 2 Rubber Duck

Ghosted

Layers

Overview

Closeup

     I intended to make my rubber duck to look like a cartoon character. In light of the recent Olympics, I decorated the model to be “Katie Leducky”. I gave the duck a swim cap and some goggles, and made a gold medal to go around its neck. Overall I tried to make the rubber duck look like a cute toy that loves to swim.
     After modeling the general shape of the duck, I added accents to the body. I used modified ellipsoids for the tail feathers. The wings were made by projecting a curve onto the sides and extruding the wings out. I used a similar process to make the swim cap. I made the feet by drawing a curve of the outline and curving the silhouette to keep it from being flat. I extruded it slightly and added a cylinder to connect it to the body. I used the mirror tool when modeling the goggles. I made one lens out of cylinders and pipes and made half a strap out of extruded curves. I then mirrored it across the face and connected the straps. I used an extruded curve for the ribbon of the medal as well. To decorate the cap with the name, I used an image found here to trace the letters with curves. I then positioned and projected them onto the cap, used the split tool, and moved the cut out names to another layer. I traced over this image to make the design on the gold medal. As a last accent, I made eyelashes for her out of extruded curves, and made sure she was to be smiling.
     I wanted to make my duck look like a toy, so I applied mostly plastic-type materials. I chose a skin tone for the body of the duck and a classic orange for the bill and feet. I made the cap blue like some of the ones used during the Olympics. I was able to add the American Flags as stickers above the name on either side. Finally, I made the medal an appropriately shiny gold.