Sunday, December 5, 2021

Anita Chap: Final Project

Concept: The concept of the design I went for was a sphinx and a gargoyle. 


 Final Pepakura Group Project: Gorgon


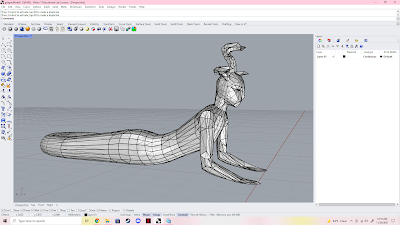
    For the final project we chose Keyerra's Gorgon design because we loved her design and thought it was different and unique. Looking at Will's design he wanted to do a horse and dachshund but if we move forward with his design we would've faced the issue of his top head being to heavy.


    The responsibilities for this project originally was for Keyerra to model her design, Will gets the model ready to cut in pepakura and then cut out, and I work on post processing. We all agreed to go in equal on our material but during the beginning of the project I got sick with Covid and I couldn't come into class or attend the open house. In return of not being able to attend I offered to pay for all the materials for post processing. In the end I had to get the cardboard from Keyerra and do the get the model cut in Pepakura and learn how to cut out the model.


     Our group had many difficulties during this project. Unfortunately the file I received wasn't going to fit the laser bed so I had to redo the entire model and get it cut out. I found it a struggle having to start all over and not having a lot of time because I didn't get the file till the week of Thanksgiving. I went up to TheLab Makerspace and got someone to train me on the laser bed to get the file cut out. Although once I was ready to get the file cut out the file didn't transfer over the cut lines correctly and my cuts shifted and overlapped.  I found it very frustrating with the lack of time I had then having to learn a few applications and learn how to cut it was a little stressful. I wish the outcome could've turned out differently because I thought this project would've been really awesome.


Saturday, December 4, 2021

Sebastian Tatum Lamp Project

Makercase Lamp Project - The Void

For this project I decided to take advantage of the lack of specifics, so I made a hanging wall lamp, plus I don't have any extra table space in my room/fablab anyways. I personally don't like the look of laser cut wood, especially in the use of electronics, it makes them look cheap. With that mentality, I used the laser cut wood as the backbone of a foam sculpted lamp. The last time I ever worked with floral foam was in high school, but back then I did not have the tools I have today.


To create the digital files for my project, I used a lot of scanned drawings and Adobe Illustrator. Working with separate svgs was a very different work flow than I am used to. Usually all of my drawings are made in the same software as my stls. When I needed to create a shape with a lot of weird angles, I would draw the shape on graph paper, scan it, open it in Illustrator, trace it, then finally bring it in to rhino to work with. Of course there are thousands of more efficient ways to do that, but I like being able to use a pencil when I can.


After signing up for the free trial for the 3rd time, I setup the scene in Keyshot. For the materials I went with wood, of course, for the laser cut wood sections. With the raster burns I just used a slightly darker wood. The foam was really easy, the foam gets an interesting texture when painted that is very similar to the fuzz materials in Keyshot. The insert is paper, but when its turned on its a luminescent material.


Wednesday, December 1, 2021

Miko Aguon: Makercase Lamp Week 12

 Concept 

==========================================================================

The board I wanted to make would be a board that is based on the old comic strips I used to draw as a kid. It would be the centralized image of them all spreading their wings out to the other drawings that have stuck with me. While it may not look good, it still holds sentimental value to me. Nothing much else to it. Characters from both the past and present.

Characters include Jimmy, Mr. Bass the Bass, Alchestbreach, Steve the Roach, the Love Monster, Me, Kyle the King, Kara the Killer, Annikah the Agile, Bob, and some misc. faces and side characters. 


Techniques

==========================================================================

I used an already made model for the skateboard to 3D with then used the AI file to extrude from it, leaving a hollow hole, then used a copy of the AI file to "fill" it in, giving it the colors and engravings. For the laser cutting, I went to Makerspace and they helped me out. I had to hatch my drawings in Rhino first and then convert it into an SVG (that was required for maker space) and then start laser cutting after a few test runs. 


Materials

==========================================================================

The material used for the render was the wood pine material as it was closest to what my skateboard's material looked like. I used Keyshot to get my render and grabbed the render and put it into photoshop to get the final images. 

Close Up

Tony Hawk Holding My Skateboard

Skateboard Leaning On Wall

Skateboard Hanging On Wall


Finalized Product

==========================================================================

I ended up using an alcoholic marker (do not recommend, use colored pencils instead) to color the engravings. It bled onto the rest of the board and I could not get it out. I am however somewhat happy with how the colorings turned out.