Monday, October 31, 2022

Owen Chou: Serial Slicing

 Concept

The concept for my model is a vase. The model is quite simple so I decided to add more details to the model's surface.


Technique

I built my model with the circle tool and created seven lavers from down up as an outline I then used the loft tool to create the volume of my model. With the grasshopper surfacing technique, I added some details to the surface of my vase. I used a sphere for the geometry input to load the population object from Rhino. 


Taylor Champ Serial Slicing


Voronoi Vase

Design Intent:
I've always found the voronoi textures intriguing, I wanted to see if I could surface populate well onto a vase-like form using the tools we've been taught. Using grasshopper information from lectures and from the videos, I went about using Grasshopper to create the voronoi, extruded into a 3d shape, and used FlowAlongSurface to place it on my vase form. This is the final result.


Vincent Joubarne Project 3 Serial Slice

 Design Intent:

For this project, I wanted to create a style 3-D model with the main inspiration being a spiral. Spirals are visually appealing and allow for unique and exciting results, especially when connected to art and applied through different mediums.

Modeling:

Modeling the main command was Rebuild and then adjusting and using the control points until the model came out the way I wanted it to use a lot of rotations. Then it just came down to using grasshopper to come out with a serial slice version of the model and then separate out the different pieces. The files that were given were a great help in completing this project and are what I used to get the serial slice of the original model. Then it came down to trimming, curve boolean, and some repositioning of the text to make the cut sheet ready for laser cutting.


Rendering:
Finally, I used artic in Rhino to get the renders of my model. Artic is such a great way to quickly get a clean render of your model in Rhino and I got some nice results from moving around the model and finding some different views of it.


Rainey_Josh Serial Slicing


Reference - My original idea steamed from abstract pieces I have seen in many setups, while my design isn't a mimic of these marbles, it does fit in the same abstract desk style art I would love to see on my desk. 


Methods


My methods involved a lot of different shapes in Rhino, I primarily worked with the rectangle and circular tools to give it a nice abstract feeling. However, I made sure not to add too many shapes so as not to overcomplicate the model. I made the base more of an off-centered rectangular shape and went with a few different shapes on the following upper layers.


Base Rendering

This is the initial look I was going for without adding in the material.

Rendering


Jonathan Conde // Serial Slicing and Surface Population

 For my Serial Slicing and Surface Population assignment, I created something that resembles a vase. First, I spawned in a cylinder and edited it to create a unique shape as it is. After that, I made 4 objects for the surface population. When I set those geometries on Grasshopper, It automatically created a pattern with the 4 surface population objects, which I was satisfied with. For Slice Cutting, I have 64 layers, each 3mm thick. I laid them out in rows of 10. 

My friend Brock Fuller helped me a lot with this assignment. We figured many things out together, and he taught me a lot of valuable tips and tricks for Rhino7. 


Lindsey Nguyen: Week 9 Serial Slicing / Surface Population


Design Intent 


For my design intent, I wanted to create a candle holder for my candle, where the candle is kinda lifted above since I know the materials will be mainly made from cardboard. I also wanted to design from a movie that I enjoy watching which is called, Spirited Away. The perfect part was one of the characters who would have to bring coal to the fire which were called Soot Sprites, and would be awarded these stars. So I made my candle holder based on the sprites and stars. As well as this artistic candle that I took inspiration from to create mine.

Candle Holder Inspo 
Spirited Away Soot Sprites 


Modeling Techniques 


I made my reference to my White Barn candle, with a little elevation for the candle so it can be extruded out on top of the box. I first started with a cube then created a cylinder which was then a boolean difference. Then I created a six star and used the grasshopper method to use the surface population. I wanted to create the star with the randomizer method but knowing it will be problematic in the future. The slicing wouldn't come out smooth as well it wasn’t able to boolean union onto the candle holder / box. Then I created small spheres with eyes to represent the soots looking at the “candle” with stars on their side. 


Artic + 2D Shots


Rendering/Materials 

Blender Rendering


For rendering, I went for a wooden look as the project is gonna be sliced into cardboard so I wanted to have an idea on how the project will end up looking in the end.

Sunday, October 30, 2022

Jolynn Yeh Project 3 Serial Slicing

Reference

I wasn't really sure what to do in the beginning, I only drew curves and went with the flow. Before I knew it, it looked like a twisted mountain to me, so I just went with that.


Methods

I drew curves for the base, lofted the curves, and patched the top and bottom. I used join to join them all together and Boolean union to make it into a single object. I had originally wanted to see how rhino would take my curves and put them together, I didn't expect how many twists and curves there were but I liked them, so I kept them.


Rendering

The final rendering, I went into keyshot and used wood as the material because it was the closest to cardboard but also, I like looking at the smooth twists and curves it has. I had rendered out ambient occlusion too and multiplied it into photoshop with the original rendered picture.


Final

This is the final product. It turned out bigger than I thought it would, but the curves look really satisfying. Overall, I'm pretty happy with how it turned out and the curves are fun to just follow along and touch.


Brock Fuller: Serial Slicing and Surface Population


Muli-view (rendered)


Mult-view (ghosted b&w)


Populated object (rendered)


Populated object (ghosted b&w)


Slices (rendered)


Slices (ghosted b&w)


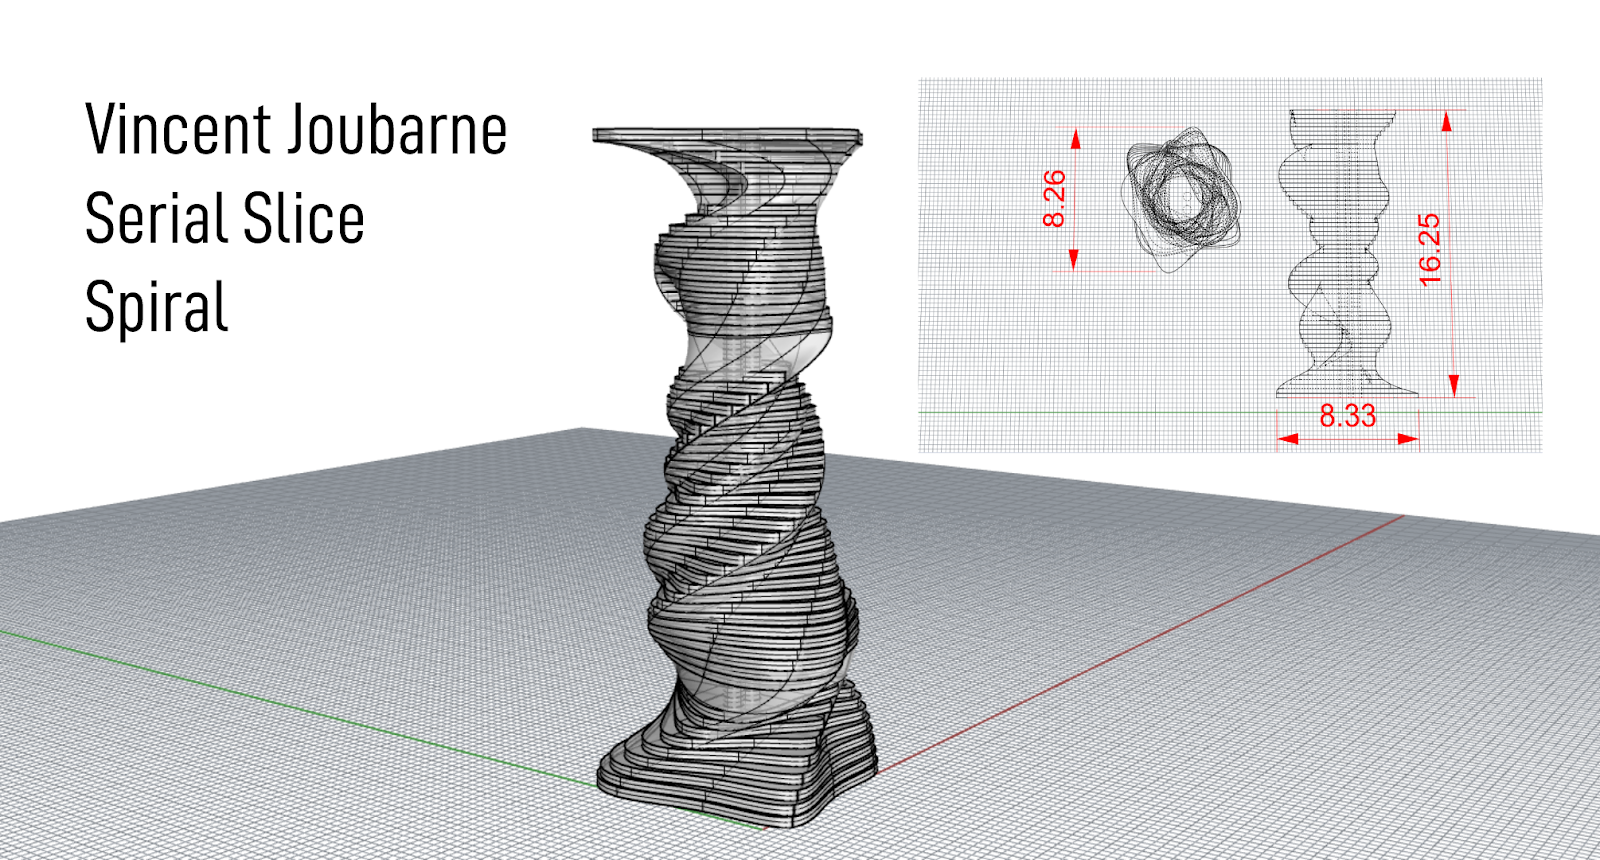
Even though I am far from confident in my ability to use grasshopper, this assignment was the first time I found myself enjoying the software. I experimented with many different geometries and height values, but I was ultimately drawn to the design you see here. It is merely a vase-shaped surface curvature populated by a single geometry consisting of raised diagonal lines. Although its components are quite simple, it produces a very interesting pattern upon population. By setting the height randomness to zero, all of the diagonal elements align perfectly to form a series of spiraling ridges.
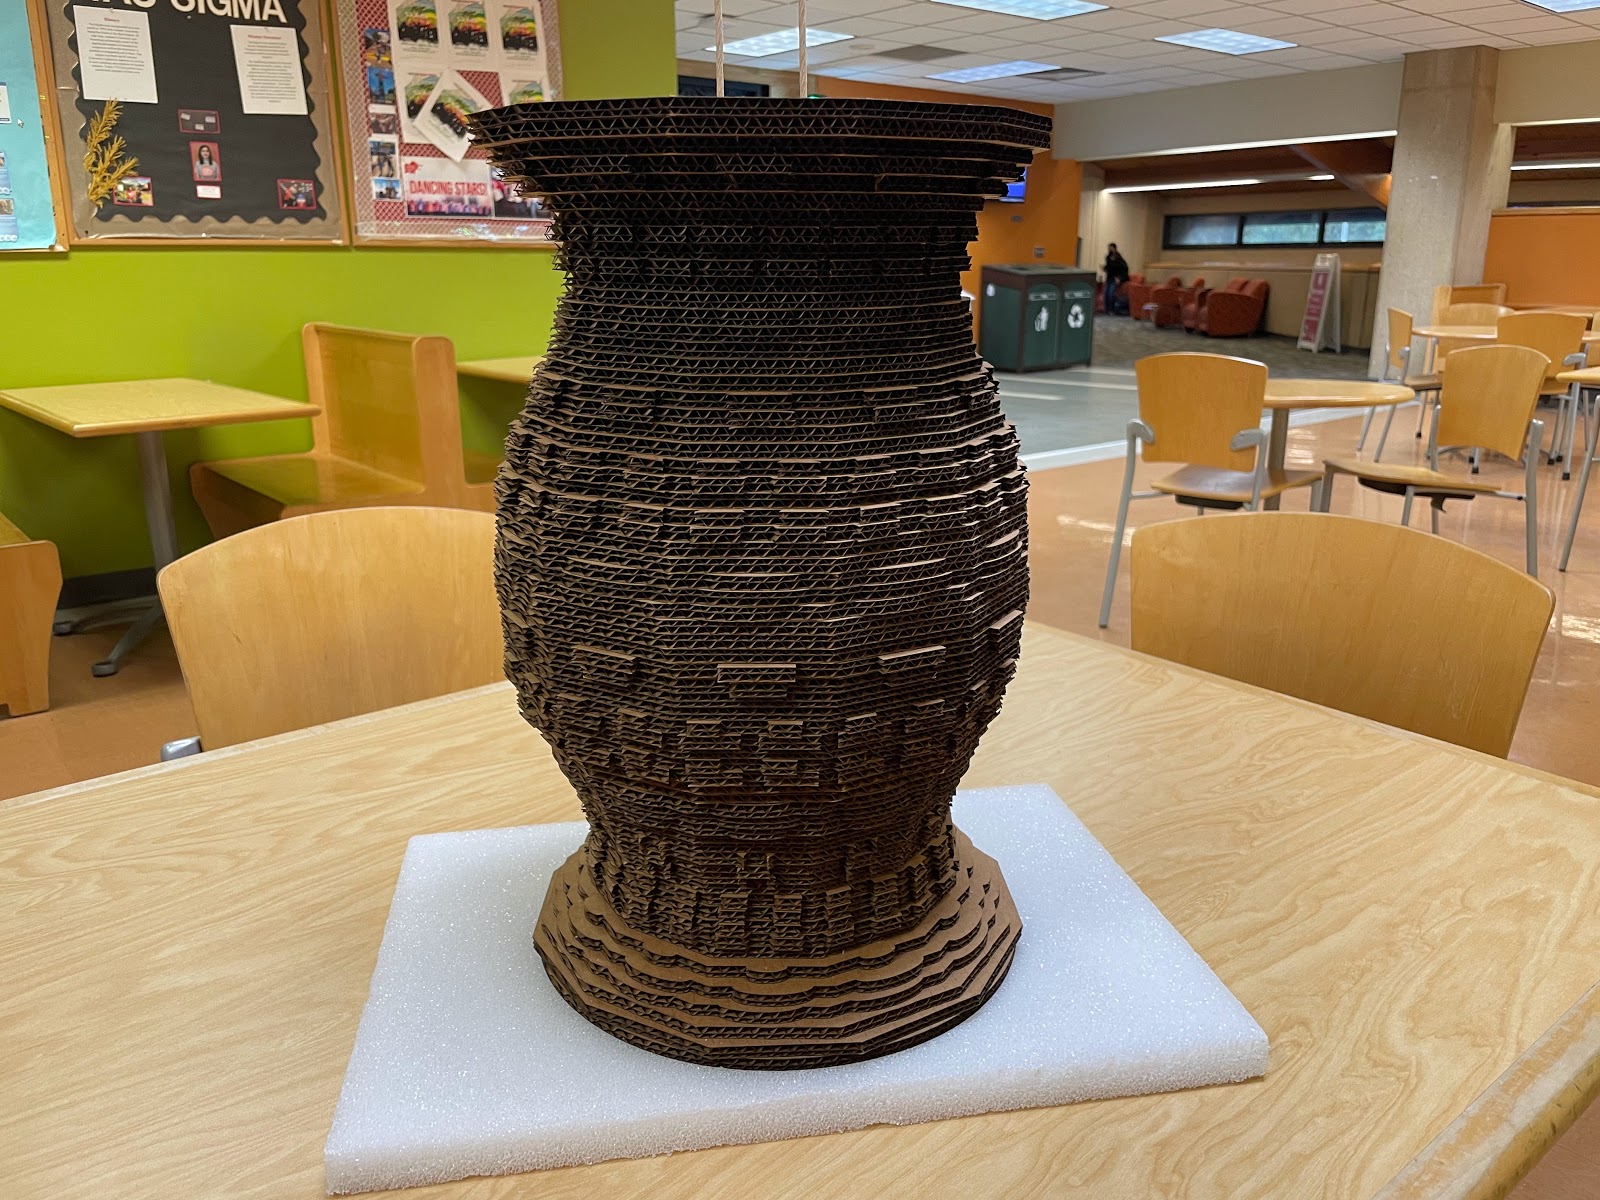

Laser-cut Product:


I am fairly pleased with the appearance of the fully assembled ornament, especially considering that it was my first time having something laser-cut. Although, it was not without its fair share of hurdles. When collecting the laser-cut slices, I was informed that small details along the edges caused the cardboard to catch fire a few times, requiring them to restart from a new sheet. Additionally, because these details are so small and numerous, the spiral pattern is lost in the noise, giving off a pinecone-ish appearance instead. Knowing what I know now, If I were to redo this project, I would make the ridges deeper, further apart, and much less numerous so as to preserve the twisting pattern.


Maria Quintanilla: Week 11 Serial Slicing

Design Intent
    With this project I focused on exploring surface population to create a concise and interesting sculpture. I wanted to have as much liberty with the design as possible while still having the final design work well and allow me to edit the layers properly.
Modeling Techniques
Most of the process after applying the surface population was in Grasshopper editing the details of the design such as the size range and randomization. I also tested different seeds as the results were much more different than expected. The base shape is a twisting poly-surface with soft edges while the population object is made up of a conglomerate of rectangles with different dimensions. This contrast was intentional and I believe it adds more interest to the final shape as well as to the way the surface population was generated. Different angles showcase either very organized lines or seemingly indiscernible and messy shapes which I also found to be very alluring. I will likely display this piece from a wall so that the top view is the main perspective enjoyed by the audience.
Material Choices
The final material for this project will be cardboard. I believe the added texture of the grain will add to the final composition in a way that enhances the contrast between orderly shapes and messy angles. In a future project showcasing the surface population technique I would like to be more purposeful with this organizational contrast in the sense of using each perspective to my full advantage to better showcase the piece one way or the other.

Saniyah Zaheer: Week 10 Lamp


Reference


Sketches

Inspiration

When I first saw this assignment I was reminded of stained glass windows. They had a similar effect in that they had a negative space cut out of a surface that created a design. Said space allowed light to filter through. So I looked at examples of stained glass windows to figure out how to replicate the use of negative space in my own work. When coming up with a design I looked for concepts that had a theme of 4 so that I could have 4 different sides for my lamp. After searching for a while I came upon the 4 seasons. I looked for the main symbols for each of the different seasons and used them to inspire my design. I still wanted to have some unity in my designs so I made sure they all had some sort of radial effect.


Ghosted


Naked Edges


Orthographic

Process

I started my project by drawing out my design with the Curve tool as well as other generic shapes as needed. The Mirror and Array tool also came in handy creating the repetitive design that so many of my panels sported. ExtrudeCrv was my best friend in creating this piece. After drawing out my design with the Curve line tool, I used ExtrudeCrv to make them 3D. In order to have my line work displayed properly in keyshot, I used the Pipe tool in order to make the lines solids and then BooleanDifferenced them out of the wood. 


Keyshot Close Up


Keyshot Environment


Keyshot Orthographic


Physical Orthographic


Physical Close Up


Physical Environment

Materials

My design includes 4 different seasons, which means 4 different color schemes. If I painted each of the outside panels according to the seasons, it would be too busy for my liking. Therefore, I decided to add a colored inner lining according to the season, thereby changing the color of the light the lamp emits. In Rhino I added different surfaces behind each of the sides and in Keyshot I assigned translucent plastic to it and changed the color. I wanted to keep the wood authentic to give my lamp a vintage vibe. Therefore I chose a generic Ash Wood material and then adjusted the color a little bit. 

When I got around to putting together my physical lamp, most of the process turned out like what I wanted in Keyshot. I used construction paper as liners on the inside of my lamp to create the different colors. This had a really nice subdued effect for the light. However, the top of the lamp was emitting too much light and it overshadowed the more subdued light coming out from the sight. To fix this I first put parchment paper on the top, but the light was still too bright. Next, I tried some black construction paper, and the light effect was much better. However, it didn’t really match with the color of the light wood I had. So, I painted the lamp with different layers of black, white, and brown. This allowed me to still have a sort of dark wood effect and match with the paper on top of my lamp.