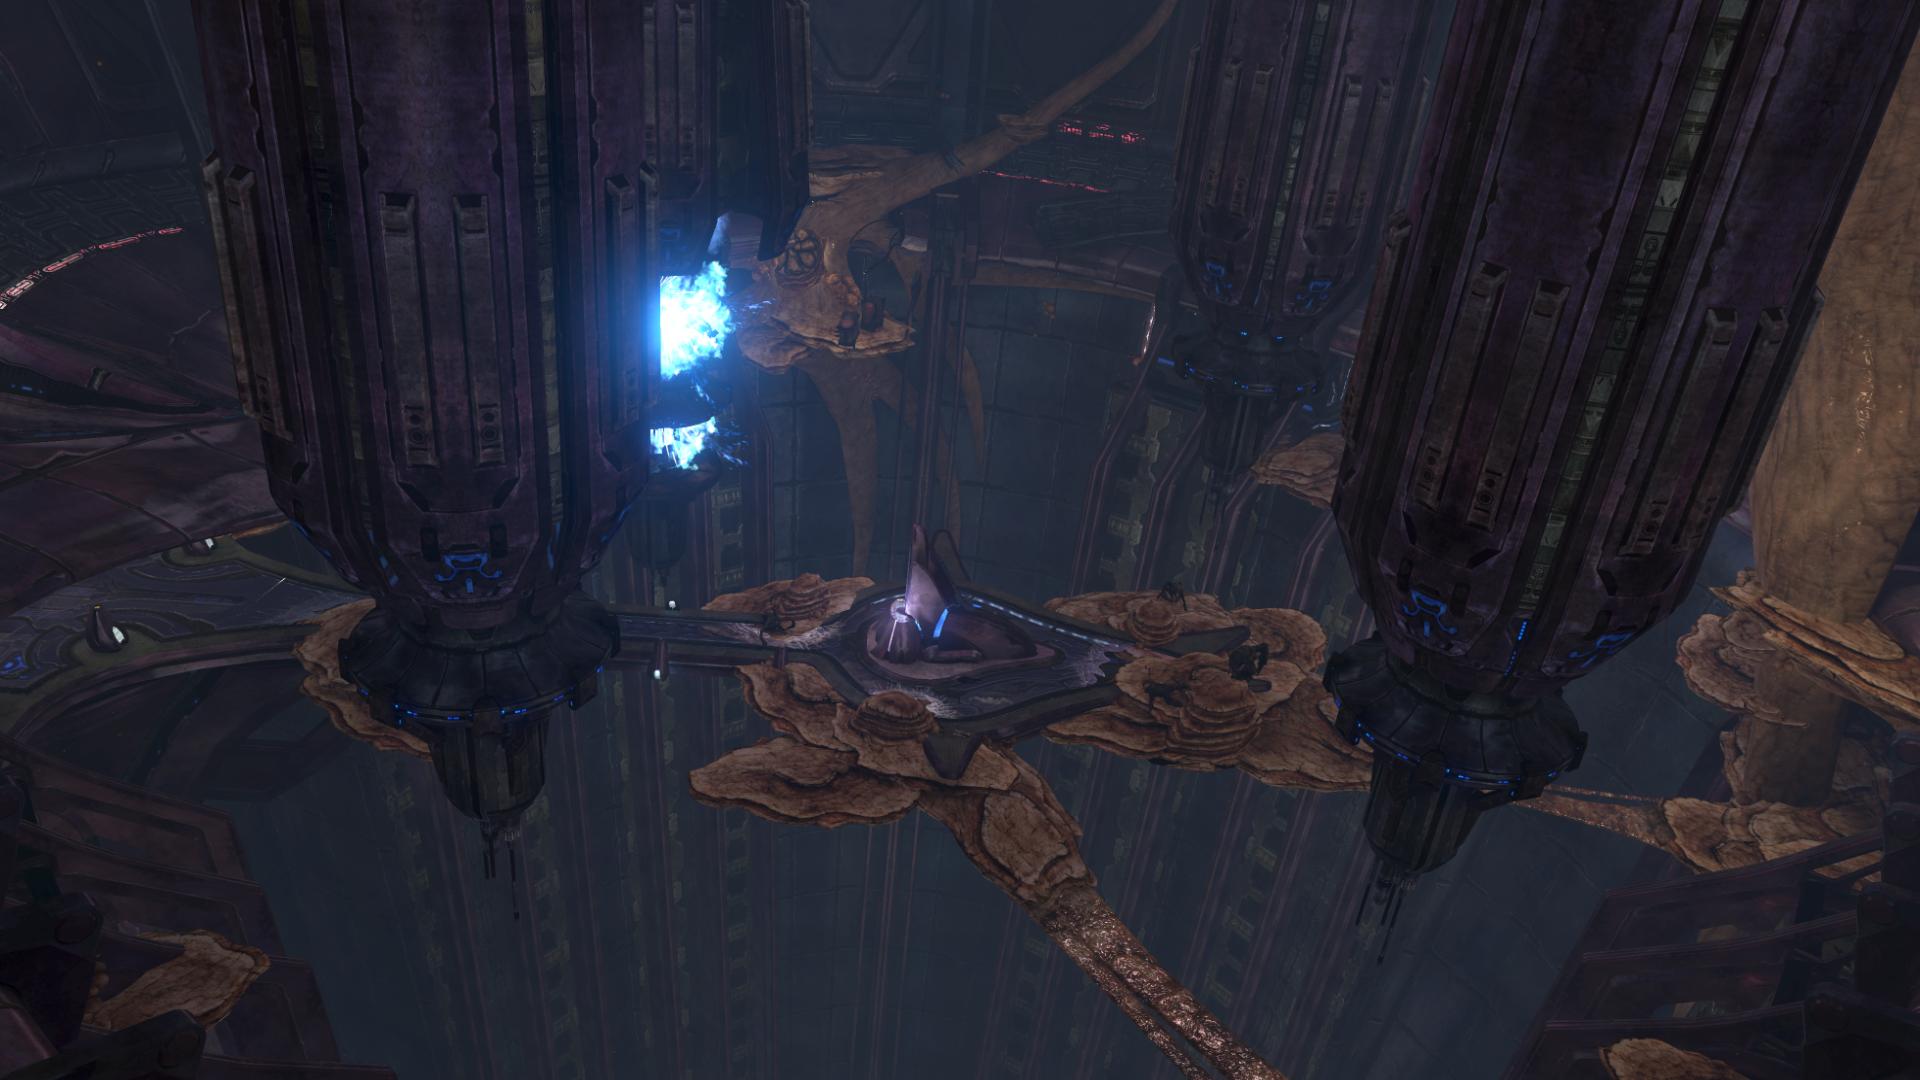
Monday, September 18, 2017

Conrad, Michael: Castle Fall 2017

concept
I appreciate the roundness of the features of Antoni Gaudi.  Ultra modern simplicity was imbribed into the sculptural space that could serve as an expansive living space.
Image result for antoni gaudi works

technique
Using the polyline tool, I lofted a wall structure to make a facade.  Then, I incorporated a central space that could serve as a courtyard.  I added a slanted partition to the larger of the vessel rooms.  There are two paraboloids on the surface to offset the loneliness of the ingoing cylinder and to serve as decorative elements.


material
Urban concrete texture best matched the theme of the concept because of its rigidity and absoluteness of form.  

Elizabeth Garvey: Castle Fall 2017

Concept
I was inspired by the turrets and many roofs of the Neuschwanstein Castle in Bavaria Germany. I initially wanted to make a castle, which  mimicked similar elements of the actual castle it was made of. I ended up not doing this however and instead chose to experiment with the texture materials


Techniques
I initially constructed the model in Rhino, using basic shapes that would resemble a castle. at this point I was not entirely sure how I wanted the materials to look. After finishing the model I

imported it into Keyshot and started playing around with the textures. This was actually a lot of fun for me, and I went through many iterations of the model.


Materials
Initially the real castle Neuschwanstein itself was built using brick and light colored limestone, and iron as it was built to the finest specifications of its day. The materials I used in keyshot when I  rendered the model were a rough grey metal, hexagon slate for the orbs, and a wavy glass which looked like wateri initially wanted the orbs on the top of the castle to have light pass through them and initially I put a texture that made it look a little more opaque, but in the end I went with the solid hexagonal mesh for contrast, because it is just so different from the metal in the rest of the castle.

Sunday, September 17, 2017

Matthew Durham: Castle Fall 2017

Concept
      My initial idea came from a mixture of ancient Greek origins and art from Disney's Hercules and God of Wars mount Olympus. I wanted the design to have similar elements however while at the same time the throne being its own separate entity. 

Techniques: 
     All my design where based on a circular shape which where just repeated among the castle. For all bases of the circular pavilions I used a cylinder with truncated cones attached to the bottom to give it the tapered look. The throne is made of rectangles that are combined to give it, it's shape. That was then copied and scaled smaller to make the chairs for the smaller pavilions. once I had both the throne pavilion and the smaller circular made I brought out the smaller pavilion and did a polar array and used that to make the other two. After everything was correct I used the circular tool to make the circles, which where then used with the Curve Boolean to make the circle shapes. 

Materials:


    For colors I wanted to stick with materials that where warm inviting and peaceful. For materials I selected granite for the pavilions to give it the feel of everlasting, like it was built to last. The pillars I used porcelain for the fragility of such belief as well. The throne and chairs where made of marble for the same reason as the pavilions. 

Leo Haddad: Castle Fall 2017

Concept:


Image result for Halo 3 finding cortana energy base

The concept of my castle is based on an energy base from a level in Halo 3. I drew inspiration from the energy pillars and walkways that connect them. I really like how mysterious this design is in the way that everything is sort of precarious and it is uneasy to navigate the landscape. Drawing out the plans was relatively easy and consisted of mainly ideas for the pillars and how they would be connected to one another.

Techniques:


Ghosted Image


Layered Image


To fulfill the intended purpose of this castle, the techniques used were very objective. The pillars would have to be connected in a symmetrical fashion, and so a lot snaps were used in the creating process. The castle is composed of mainly round shapes, giving it a sleek look and an intimidating feel for those who would imagine themselves navigating this precipice of a castle. The Pillars have "energy" rings around them that signify their importance as the powerhouse of whatever this civilization/base is.


Materials:


To give this castle the intended power base look, I gave it very modern and futuristic touches that would imply some kind of technology that allows a simple design like this to power multiple cities or even a whole society. The pillars are made of blue gem material, as gems are perceived to hold energy. The connecting pieces are made of metal, which although is conductive is not directly linked to the pillars (energy passes through them in an insulated cable inside).


Valeria Cavazos: Castle Fall 2017


Concept:

                  The concept for my castle was to create a sandcastle on the beach and using objects that could be found scattered in the sand. The design for the castle was also created to fit a king, in this case a small crab, the King Crab. There was a general idea of how to make the castle but details were added and created as the castle was created, such as the glass pieces and the drawbridge.

Techniques:
ghosted image
ghosted image
ghosted image with Keyshot layer assignment

                  The sandcastle was created using mostly rectangles and flattened circles, such as the base and the main structure of the castle. Sitting on the center of the castle was created using the truncated cone tool along with the small details bordering the castle, alternating from the truncated cone and a regular cone, then copied and pasted an entire row of the alternating cones and pasted on the remaining three sides of the castle. I made the windows of the castle through the MakeHole command and curve tool, made the draw bridge using the cylinder and torus tool, and the scattered glass pieces placed onto the walls of the castle was created using the line tool and scaling it to an appropriate size for the walls. I made the crab statue by using the sphere tool, copy and pasting and scaling it until the claws and eyes were appropriate sizes to the body, then added small cones to represent claws. Once the main details were placed, I added scattered truncated pyramids around the castle to create small mounds of sand and made two triangle pieces on either side of castle, using the triangle tool and twist command to create a deformed shape to represent a shard of a bottles neck.

Materials:


                  I wanted to create a sandcastle with the objects found on the beach but some materials were not available in Keyshot, so some changes had the be made. There was no sand material available so the actual sandcastle illusion had to be made with, disturbingly, human skin material. The glass pieces placed around the castle were created with basic glass colors such as red, orange, and clear to create a variety in the pieces, while the two giant glass pieces used a scratched and waved glass material. The draw bridge used a variety of wood materials, such as ash wood and old plank wood, in order to keep the theme of items that can be found throughout the beach. The flat circular objects on the pillars of the castle were originally going to be sand dollars but there was no materials that could be used as a replacement, so they became miscellaneous objects such as using the bubble material and rose gold material. The giant crab sitting in the center of the castle was going to be an actual crab but while playing with the metals to find a material, I came across the rusted metal material and decided that it would be best to have a statue in honor of the king that has been worn down over time from the sea.

Sarah Pinto: Castle Fall 2017

Concept


My original idea derived from a brick model of a castle. This is what inspired the body of the design. I chose brick because I believe that it gives off a home-like appearance as there is a great abundance of brick houses. I believe that people associate brick with stability and comfort and that is why I chose it to be the majority of my castle's material.

Techniques


I created my castle by beginning with the pillars. In order to create the pillars, I used the cylinder tool and then proceeded to add the platform by creating a rectangular prism to sit atop the cylinders. I then used the cone tool to create four cones, one for each pillar. To make my castle look more prominent, I added a large pyramid on top of the platform. After the pyramid had been added, I decided to give my castle some more color and character by adding spheres on top of each of the five points. I then proceeded to add the tall green cones to make the castle look truly royal, in the sense that the large cones would have a threatening effect to others. Lastly, by using the cube effect once again, I was able to create a staircase that leads up to the platform.

Materials


The base of my castle was designed with brick materials in order to provide a stable structure and appear to be sturdy. I accessorized my castle with emerald, copper and marble in order to give off a more extravagant and royal look. Although my design was not identical to the castle that inspired me, I found my design to be a fun twist on a classic brick castle with more color than the typical brick design. The base of the castle provided the comfort and stability associated with brick, yet the emerald, marble and copper contributed to the aesthetic of the design as well.


Thanvi Bogurampeta: Castle Fall 2017

Concept
The initial concept for the castle project is actually from "Alice in Wonderland". The castle standing is a very minimal dual toned castle with a checkered print surrounding it. This sturdy yet elegant structure is not only eye catching but also brings a sense of happiness whenever you come across it. I was personally drawn to the checkered pattern and incorporated that into my design. Alice in Wonderland has been an all time favorite for me growing up as a child.


Techniques 


The techniques that I applied were using the shape tools to make multiple solid shapes. As I made the three cylinder and cone structures on the side, I used the mirror tool to replicate the same thing on the other side. I then used the BooleanUnion tool to categorize which objects belonged together. Once I had a basic idea of what I wanted the castle to look like I used the Grouping tool to bring the whole structure together and move it around to place it on top of what I initially created to be a grass plain.


Materials


I was going for a more monochromatic tone, so rather than playing with different colors I worked around playing with different textures of the black and white spectrum. I tied in the checkered pattern from the grass to the body of the castle designed. The castle is an impractical design but a fun play on the Alice in Wonderland castle.

Hannah Barnes: Castle Fall 2017

Concept
My original idea for the castle was an underwater ocean cave with seashell themes. This is what inspired the spires. I also tried to recreate the uneven surface of water-carved stone. My design developed to feature a throne room of a castle rather than the whole thing. As I began working with materials, I realized my design didn't create enough contrast, so I went back and added gemstones to create more of a castle of an underground mining civilization.
Modeling Techniques
I worked with a mixture of primitive-based modeling and polygonal-based modeling. For the stone platforms, I drew out the shape of the stone platform using the polyline tool then extruded it up. For the spire, I used the polyline tool to create a crooked vertical line, added a circle at the top, then used the sweep1 tool. The only other complex shapes were the gems, which were created using a box, cut-off pyramid, and a pyramid.
Materials
Though I originally planned for this to be a stone structure, I couldn't find a natural looking stone material that worked well for this. Instead, I used marble, which added a high-class feel to the throne room. For the gems, I used red gemstone materials, which added an ominous feel. I also used red glass for the spherical lights lining the bottom layer. The spires are also made of gemstone, and the throne is a white marble. The large gem behind the throne is gold to add contrast.


RaiLei Giard : Castle Fall 2017

Concept


The initial concept for my castle is based off of an actual castle in East Sussex, UK. It's a medieval castle known as Bodiam castle. Medieval castles are sturdy, beautiful, and well structured making an interesting and fun project. I personally enjoy such things as renaissance fairs and medieval festivals. My castle also has a strong resemblance to the medieval times restaurant which is a favorite dining place for events within my family.

Techniques


My techniques mostly consisted of making each shape using the different shape tools. From there I used copy to mirror the exact same shape on the other side to not only make sure my castle was even on both sides, but completely Symmetrical as well. From there I used a sizing tool to keep things in line and a measure tool to put things in line with each other or the other shapes. Then I joined the shapes to complete the castle.

Materials


I wanted the castle to look more sleek and have some different textures than an actual medieval castle would, without losing the realism completely. I used several different stones, as well as glass and wood to obtain this goal. All materials were used to build actual castles, It just wasn't in the same way or areas that I placed them. A good example would be that the glass is used as a section to the roof in my castle, but would actually have been a window or furnishing.

Taylor Volquardsen: Week 1 Castle


Concept: I like the aesthetic of sleek, futuristic-looking houses with lots of white and marble and ceramic interspersed with gardens, so I wanted my castle to reflect that. When I started thinking of ideas for what I wanted to do, I remembered the movie Oblivion with Tom Cruise and immediately knew I wanted to make my castle float like the house in the movie. In the end, I kind of combined ideas: the floating home from Oblivion, the rounded, swooping shapes of the Space Needle, and based the garden around these images I found on the internet.

Ghosted Image

Ghosted Image with Command Line

Ghosted Image with Layer Assignment

Modeling: I’ve taken some modeling classes, so I decided to use Maya to make my castle model and import it to Rhino. I admit it was a bit of a challenge remembering to keep it simple and keep in mind that I would have to start modeling for 3D printing which couldn’t get all of the small details unless I made it bigger, which would be expensive. That was probably the biggest challenge changing my mindset away from what I learned as a modeling student. I decided to try sticking to primitive shapes and worked from there, keeping it simple cylinders and tweaking them to get the basic idea of what I want. 


Rendered Castle - Bird's Eye View

Rendered Castle - Pedestrian View

Materials: Like I mentioned above, I like the aesthetic of futuristic looking buildings, so lots of marble and glass and white ceramic with wood and plant accents. I wanted the main base to be a shiny white surface, with parts of the buildings made of wood to add a bit of a pop of color, with a lush but controlled garden to, again, add color with the fountains made out of maybe marble or some kind of natural stone. I couldn't get it exactly how I wanted, like I would've put bark on the tree trunks and tried to imitate some kind of leaf texture on the trees, but the idea is there.