Sunday, November 30, 2014

The-Phong "James" Pham: Pepakura


Chris Jordan Project 7: Geometric Folding

Utilizing the truncated cuboctahedron from the database I have made a cubotahedron dice


______________________________________________________________________________
Sheet layout for the dice
_____________________________________________________________________________
Photos of the dice in both unfolded and folded forms. Cotton batting was stuffed into the interior before said poly was closed to provide the white coloring to the dots and to give softness to counter action the hardness of the mat board.

Sara DeShong-Baker Project 7: Geometric Unfolding

(week 14)
SHAPE:
I chose a standing pentagrammic pyramid; thought it may make a fun tree topper for the holidays.

DESIGN CONVERSION & LAYOUT:


FINAL PRODUCT:
I gave the front face a bit of gold spray paint.


Wednesday, November 26, 2014

Sean Lenox: Project 6 - Lamp

Week 11:

The design for my waffle lamp was inspired by dice and numbers - my original idea was to come up with some kind of numerical notation with rectangles and circles and create an alien die of sorts. I felt that such details would ultimately be lost in the waffle process, however, so I settled for a simpler circle/rectangle pattern inscribed on each side. I'm considering leaving one of the radial slices out to give the lamp a "front" where more light shines through.

I created boxes and spheres and used the Difference command to cut indentations into the box.I also used the difference command to cut the cylinder out of the middle.


Week 15:

Here are some photos of the assembled waffle lamp.


Blake Artesi - Assignment 6 - Lamp (Serial Waffle)

For my lamp (serial waffle) shape, I decided to go with a more symmetrical design and so as I looked for inspiration, I came across a design of a space station from an older Star Wars game called Knights of the Old Republic.  The space station is known as the Star Forge.
The above image came from: http://www.moddb.com/mods/ultimate-empire-at-war/images/the-star-forge
I took the general design of just a big ball in the middle as the center point and got the following design.


I made the ball in the middle more hollow than the rest of the shape.  I hope to be able to fit the lamp (actual light source) into the middle ball area.


Displaying IMG_1072.JPG


Kristin Loud Project 6 Lamp

Project 6 Lamp

I created a model of a wing in Rhino. The concepts stems from left/right wing politics. Depending on what side of the wing the viewer is standing on a right or left wing can be perceived.


Wednesday, November 19, 2014

Kristine Dickson: Week 10 Waffle Structure

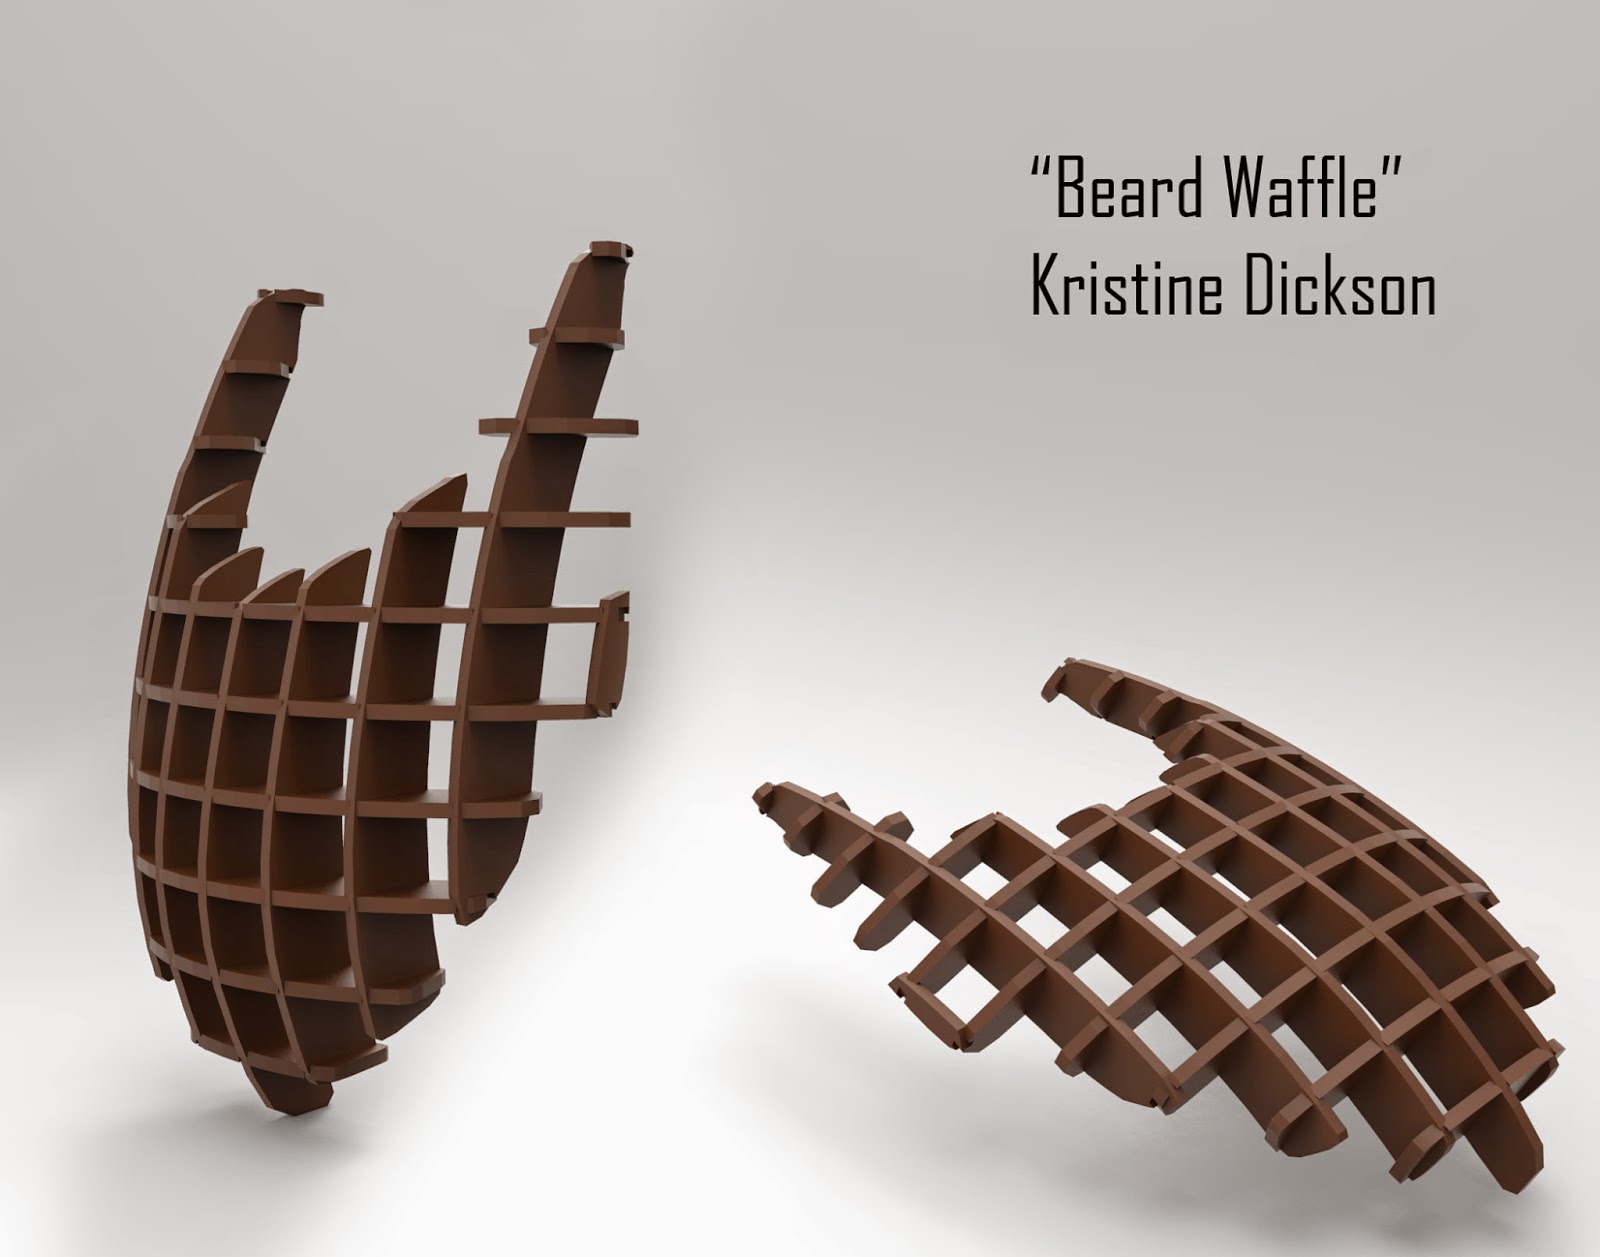
For my waffle structure, I decided to make a beard. I wanted to make something that people could interact and have fun with. The piece itself is scaled to fit a person's face and is lightweight, cut with plywood underlayment. Part of what is interesting about the Waffle Beard is that anyone can come around, pick it up, and take a picture with it. Take a picture of their friends' wearing it. It becomes a point of conversation and attention. The audience becomes part of the exhibit. I think it would be neat to see my waffle structure on a variety of people's faces, with a variety of expressions and scenarios.

My reference image for the model.

Key shot renders: I used a matte plastic material in dark brown.


Found a generic manikin face to show the scale of the beard.


My First Beard


Tuesday, November 18, 2014

Blake Artesi - Assignment 5 - Week 10 - Waffle


When I tried thinking of a shape to make for the waffle structure, I tried to think of a building that could have something put on the side.  First few things I thought of were places like pet/animal hospitals (veterinarian offices) or an animal shelter, so I tried to make something that somewhat resembles the shape of some generic animal.  After going through and adding new shapes to it, I ended up with a shape that almost reminds me of the sphinx but not all that much.  The design was also based off the shape of a slot I was going to use for my slots project for this same class.
http://en.wikipedia.org/wiki/Sphinx


Displaying IMG_1071.JPG


Monday, November 17, 2014

Ed Whetstone: Project 5, Waffles (Ripple Clock)

This post has all content for Assignment 4, serial form for laser cutting.

See all updates below the fold!


Sowmya Rajendran: Project 6: Lamp

___________________________________________________________
Week 11:

For the lamp project, I took my waffle model and edited the basic shape just a bit by elongating the structure and Boolean Unioning some more spheres into the model as well. I wanted to keep some of the characteristics of the lotus flower, but also infuse the layered elements from a beehive structure, similar to the one pictured below.


Source
Final Model


First, I made a bounding box around the model to use as a guide to create the radial waffles. Then, I switched to the top view and used the section command and OSNAP (end, near) to slice the model equally. I then used the contour command to slice the lamp model horizontally to create the other waffles needed for support. Using the planar curve command, I then converted the curves into surfaces.

Model sliced radially and horizontally.

Afterwards, I used the intersection and pipe command to create the ribs.  I used the unroll script to create the layout for laser cutting. After properly laying out the section pieces, I had to create the hole for the snap-in lamp socket cord. I used the circle curve tool to create a 1'' hole on the bottom most section piece. Then I created some rectangles and duplicated those around the curve using the array polar command. Another curve was added around the 1'' hole and then the curve boolean tool was used to eliminate the extra pieces. This in turn yielded a hole where a light bulb could be easily fitted within.  


___________________________________________________________
Week 12:

I had to prepare my model with a light bulb and a wire for rendering. I downloaded a free light bulb model from Archive3D and created the wire extension by using the Control Point Curve tool  and the Pipe tool.

Layers all set up and ready for rendering!

I used a Clear Rough Plastic material with a pinkish tint for the outer shell, a Rubber material for the wire, a Warm Area Light (Lumen setting) for the bulb, and an Anodized Metal material for the screw cap.


Here is a rendering of the lamp conceptualized in an interior space.

___________________________________________________________
Week 13:
Finally got my parts cut out this week! I had to take some of the pieces out so that I could put in the light bulb. It's much more functional now! The lamp can function as either a hanging lamp or table lamp.