Monday, March 30, 2020

William Goudreau: Rendering in Passes

Concept:

For this assignment I intentionally went into it without an end goal. I wanted to play around with the render layers and see how each one influenced the final image, and then see if I could alter the layers to create a unique image.

Process:
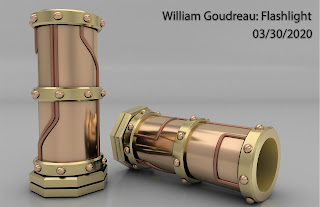
I began by re-rendering my flashlight model using render layers this time around. I used the realistic product render as my starting point to determine how to merge all the layers for an accurate result. I then experimented with the different types of layer merging and found one that had an interesting effect on the image's saturation. I then isolated the effect to the object itself and added a gradient by masking the object with the alpha channel layer. 

Materials:
The materials I chose were based on my original flashlight model. The second image's materials are the same as the first, but altered to be darker and more saturated. 
William Goudreau: Flashlight

Concept:

My flashlight sleeve was inspired by the steampunk genre and the reference image below. I wanted to create a design that had a visual weight to it and could stand on its own.


Process:
For this project I spent a lot of time measuring out the led flashlight that my sleeve would encase before modeling. Once I had the measurements I needed, I modeled it using Rhino. I used Rhino's measurement tools to make sure the dimensions were correct, and made use of the curve, pipe, arrayPolar, and chanfer commands. 


Materials:
The materials I chose were based on my reference image and other steampunk style media. I chose bronze for the main body and rivitos of the object. For the pipes I used copper and for the fittings I chose gold. These materials work well together and give the object a very metallic appearance, which gives it the visual weight I had hoped to achieve.


3D Print:
I printed my flashlight sleeve on an FDM printer using black PLA, since that is what I had available. I decided to print the object split down the center in two halves, in order to save material. The gold bands seen above overhang at 90 degrees. If I had printed it vertically It would have doubled the print time and material usage in support for those overhangs. Instead I was able to print it without support by splitting it, and gluing it together at the end. Going forward I plan to paint the object to look like the renders above. 


Sunday, March 29, 2020

Marvin Robinson LED Flashlight


Concept: For my concept I based my flash light off of the Drangonblood tree found in the Shara Desert.


Process: My Process involve using boolean with curves, adding 2D primitive shapes added and subtracted to create a flared tree like cross section. After I used the revolved to create the basic shape. Next I added some uniqueness by adding several torus in array and boolean subtracted an array of holes at the top flare section to allow light to pass through. Finishing the piece I topped the sleeve off with spike-like shapes to simulate a tree top and incorporated a grip texture.


Materials: Green paper shaders were used for the to give the feeling of a leaf texture. I used a bit texture and to give my model a finished bark or tree look.

Saturday, March 28, 2020

Nikki Chauhan: Render in Passes

Concept: I wanted to use my hammer project because I thought it could be used to create new distinct images.

Process: I used different Photoshop layers to composite the images and create a new look for my render. Using color balance adjustment layers I was able to change the color of the handle and . I was also able to change the color of the grip using this method. I also used the Hue and Saturation to add different coloration and saturation to change the look of my hammer. I also used blending modes and opacity to change the way the layers interact with each other.

Thursday, March 19, 2020

Nikki Chauhan: Hammer

Concept: My hammer is based on a squeaky clown hammer toy.


Process: I created a rectangular prism and a sphere which I elongated and used Boolean union to create the basic shape for the handle portion of this hammer. I then duplicated the pieces 3 times and slightly stretched each piece, a little bigger than the previous and then after that I joined all of the pieces together. I then created a star with the polygon tool and used the ArrayCrv tool to evenly distribute them around the wider parts of each piece. I used the cylinder tool and torus tools to create the center top piece and then created the outer portions with curves and revolves.


Materials: I used tools that would be used if this was the real thing so the handle is plain plastic, the decoration on it being flat design, the top plastic as a cloudy plastic and the ends being a rubber plastic material.


Saturday, March 14, 2020

Nikki Chauhan: Flashlight


Concept: For my flashlight, I wanted to create a bit of an abstract rose look with thorns.


Process: My process consisted of using the template and started by creating the curves that are the design of the thorns and the base thorn/stand design using the curves:interpolate tool to draw out the shapes I wanted. I used the revolve tool to revolve each piece by the amount I wanted and then capped the individual pieces. I then used ArrayPolar to evenly distribute copies of the pieces around the base cylinder. I then created the top piece and the other petal pieces using the same process and used the join command to make sure everything was together.

Materials: I chose to use Metallic Paint for the Petal/Rose pieces to give it a bit of a shine while also leaving it in a durable material. I did the thorn pieces and the base piece in Cloudy plastic which gives it a nice shine and reflects light beautifully. The central cylindrical piece was done in simple plastic to give it a basic finish and not overwhelm the rest of the piece.


Monday, March 9, 2020

Bayang Flores: Render Passes

CONCEPT
My model is a continuation of my 3D printing model project. I wanted to see what it would look like if I further played with the materials and textures and how I could highlight them. Using different render passes made it so I could add more detail to the model rather than a single pass on Keyshot. 
PROCESS
For the process, I just played around with the passes on Photoshop that were demonstrated in class. I wanted to go for something more translucent rather than an opaque material and added more detail in the textures.


MATERIALS
I used a rough glass material on KeyShot and played with the diffuse and reflective layers to make it look more iridescent. I feel like this is a more artistic interpretation of my model if it were to be created in real life, as I'm not sure the lifespan of a glass model would be as practical as that of a metal one. 

Rendering in progress

Concept

My new view of my rocket hammer on the ground. I tried enhancing it with sand on a beach and a more graphic novel look in the second picture.


Carlos Franco: Week Nine Rendering in Passes


 Week Nine: Psychedelic Warhammer


Concept


Nothing crazy here. Wanted to let abstraction take over and freestyle my way to something colorful.

Process


I wanted to give the hammer an interesting specular relationship with color, so I added several odd-colored passes and used Photoshop layer styles such as linear dodge, multiply, and color.

Materials


Materials used in KeyShot imitate a fluid, iridescent look. Infrared material and flat layers bring out the odd-colored highlights. Specular and diffuse give the object its reflective, mercury-like material.


Andrew Psencik: Rendering in Passes

Concept:

With my 2 views I wanted to improve upon my original render of my hammer project. I then wanted to shift the approach and create a more abstract design of the hammer.


Render Passes

Marvin Robinson: Rendering in Passes


Vee Valavil : Week 10 Render In Passes


Vee Valavil : Week 10 Render In Passes


Concept:

My First Image depicts the flashlight with a purple background.
The second image depicts the flashlight on top of wooden table against a bright yellow wall.


Techniques:
The flashlight is on in both images and have beams of light reflecting out of it.
I have used reflection passes and added environments to both rendered flashlight images.

Materials used:
The flashlight is made of a violet colored plastic material and has raised worded texts that are wrapped around.

Jack Purcell: Render Passes

Concept
I felt my flashlight project could best be used to create two distinct images from one object and renderpass.
Process
Using the different Photoshop layers and blending modes I was able to composite the images. Using color balance adjustment layers I was able to change the color of the light emitted by the flashlight. I was also able to change the color of the grip using this method. Brightness and contrast adjustment layers also let me change the look and feel of the lighting.
Materials
The materials are the same used in my flashlight rendering all changes were made in Photoshop using the aforementioned methods.

Jack Purcell: Project 4 Flashlight

Concept
I wanted my flashlight to look like a lightsaber. I used to have a toy lightsaber that you could swing out and it would extend like a telescoping rod. I found there's a sword like that you can 3d print. I wanted to add this feature to my lightsaber base for my flashlight.

 Process
I used scaled curves to create the individual sections of the blade. I used loft and the planar surface commands to create the nurbs surfaces and the join command to turn them into a polysurface. I created the base using lofts and booleans to create the top and bottom accents and the helix and pipe commands to create the grip section.
Materials
Being a lightsaber I wanted the base to be metal a combination of gunmetal and brushed titanium. I wanted the grip to be made out of wound leather. The blade portion was made of a frosted glass to diffuse the light of the flashlight.


Cameron Steele: Render Passes

Rendering In Passes: