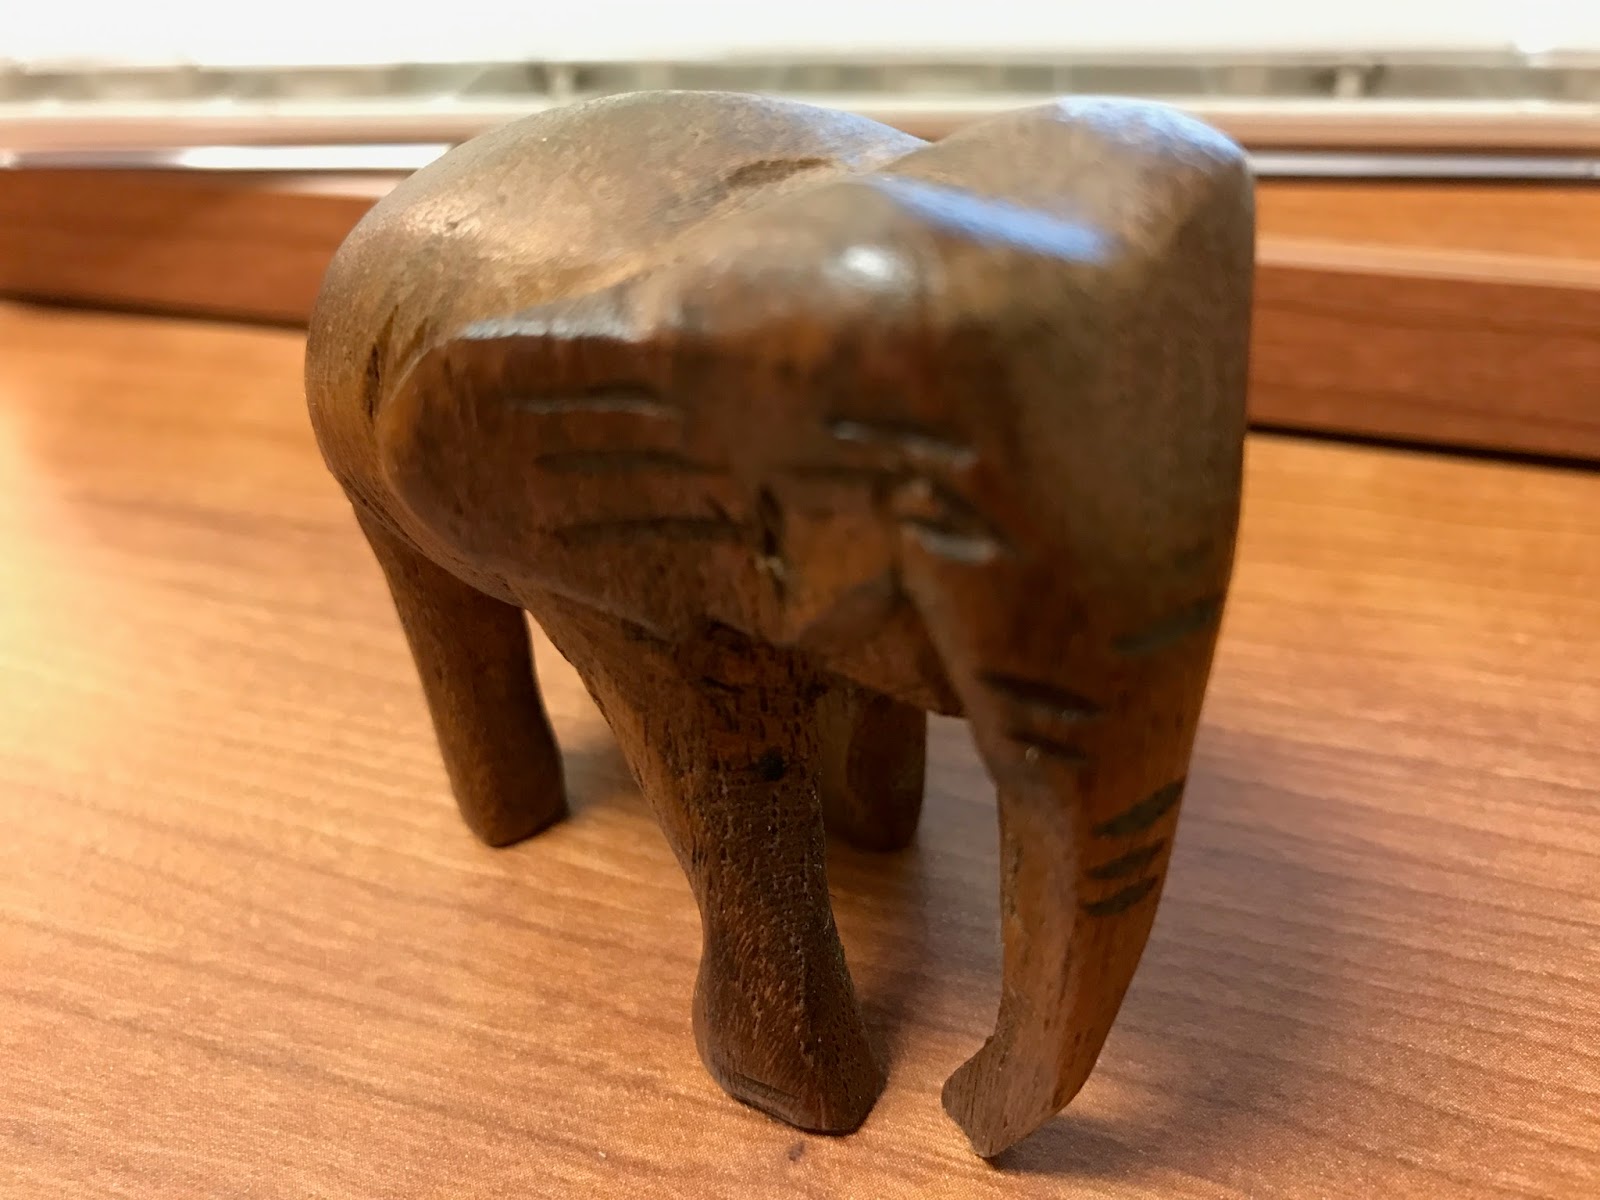
Monday, March 27, 2017

Jose Diaz - Laser Engraving


For my laser engraving I wanted to combine a couple of designs that I really like to work with. Which consist of a deer theme and an Asian coin theme. I wanted to put these two things together in a way that was visually appealing without looking like they were competing with each other.

I used Illustrator to create my design to making sure to the image was completely made up of vectors. First I made half the coin just using basic shapes line circles and rectangles to create most of the design.  Once that was done I mirrored the image to create a whole and merged them together. Then on a different layer I created the deer image. With that image done I placed the deer on top of the round design and removed the inside elements so that the deer image was empty. After that the image was taken into Rhino so it could be engraved.


The final piece ended up becoming a key-ring holder. It’s made from ¾ inch birch plywood that was not stained but sealed with a poly in order to highlight the laser engraving without making it disappear had I used a darker stain. Then I added hooks in a staggered fashion in order to provide a place to put up your keys. Lastly I stained the edges of the plywood a dark brown in order to give it more visual interest.

Sunday, March 26, 2017

Sarah Roberson: Serial Slice

Concept:

For my concept for this piece, I was recommended by a friend to do a Knight straight out of the chess game. The picture above is the one that I really liked. I really liked how the curves of the drawing we sharp and almost menacing. This is what drew me to the drawing above.


Modeling Techniques:

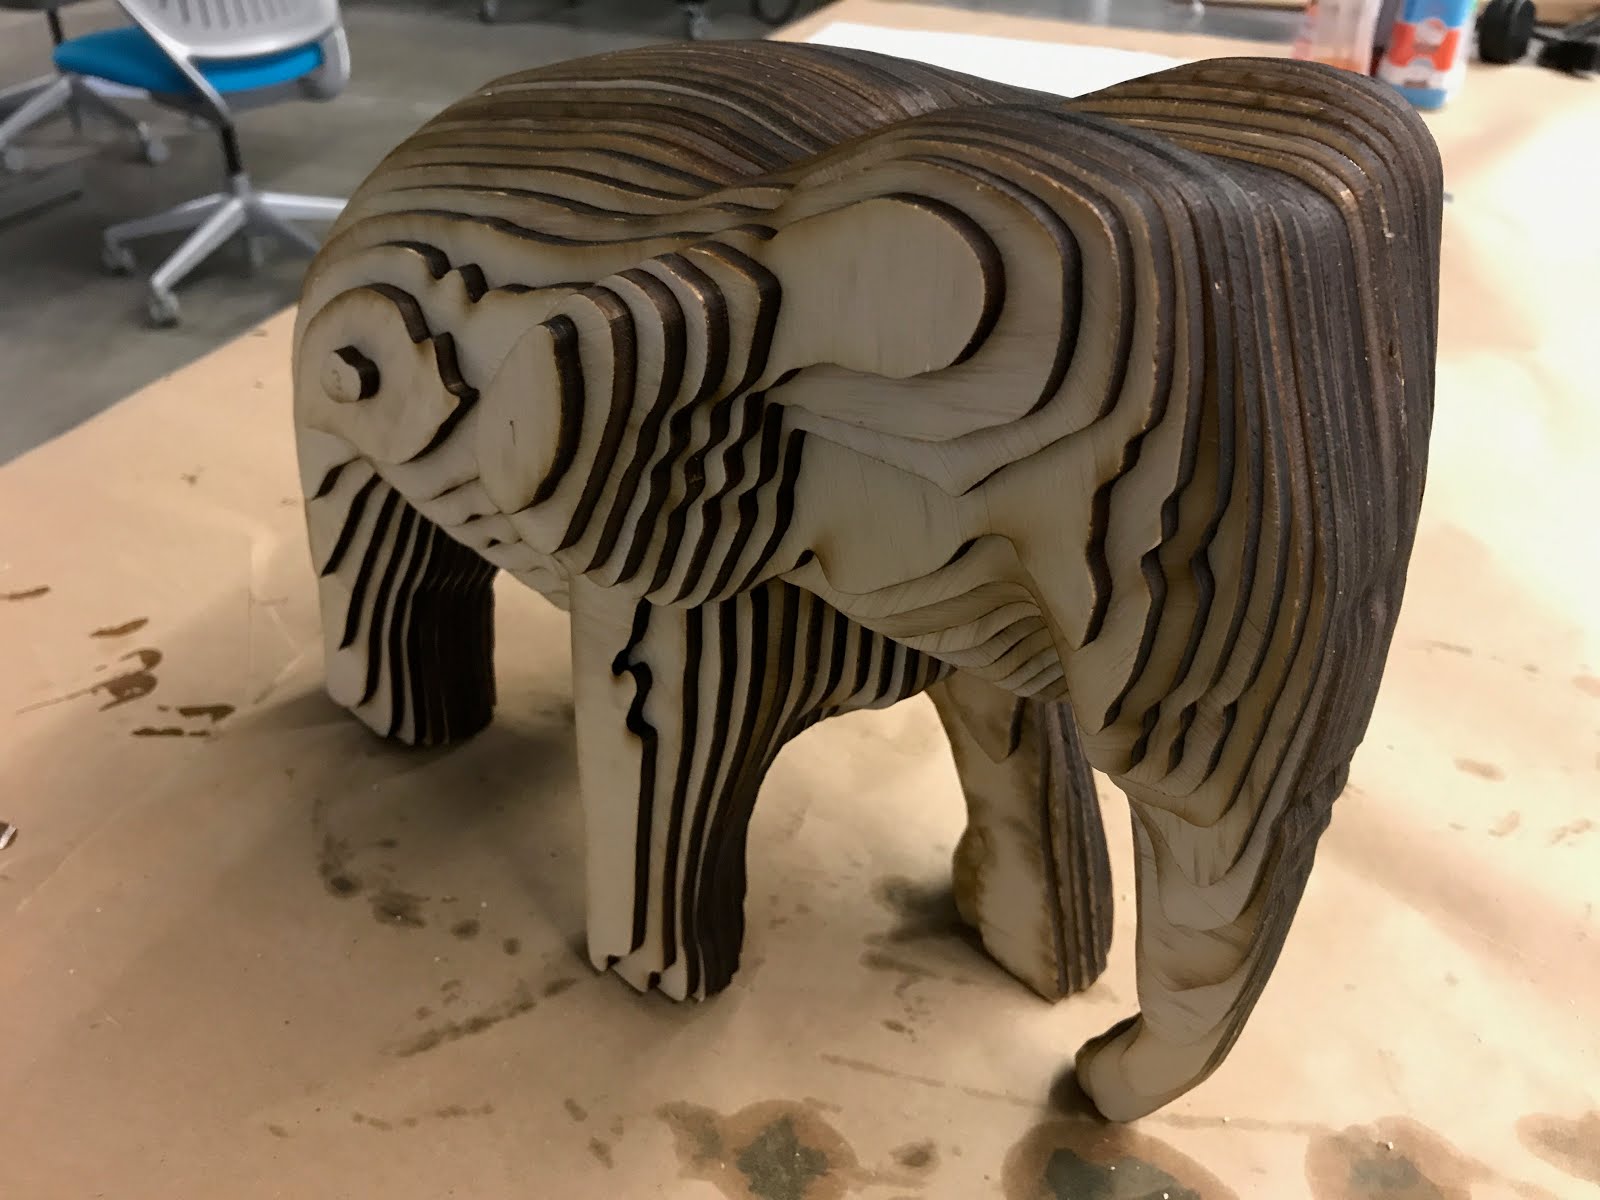
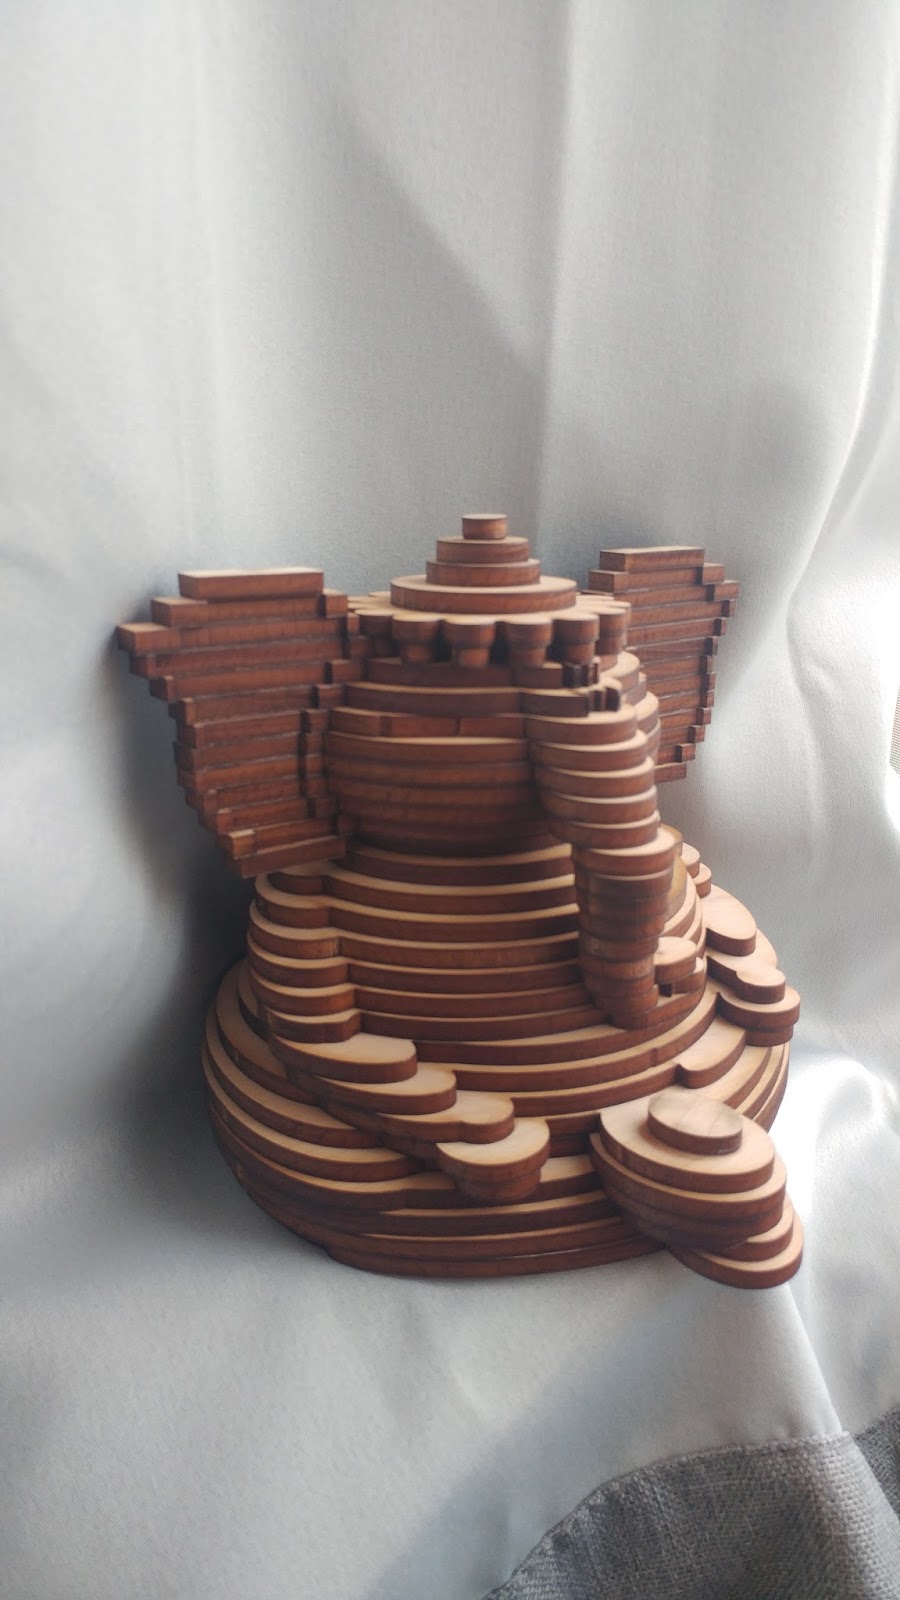
I modeled this in many different ways as to try and figure out the best way to get as much detail as possible out of my model. I first though, began by taking the concept picture at the top of this post and drew and initial shape with it. After I completed the initial shape, I trimmed off the hair on both the back of the neck and the forehead as well as the base on the bottom. I then revolved the base so it had organic movement to it rather than be blocky. I then extruded out the top piece and it gave it the shape on the top ghosted image. I then had a friend who helped me learn how to contour it to where there was one face on the side rather than several. This created a flat plane to be able to do some cool design work on it. To achieve the design on the side, I had a friend help me place an image traced version of my concept picture over the top and move it around to create different depths. This was just the inside portions of the picture rather than the whole thing. I then used the contours to move the different shapes across the model. I extruded the top and fitted it into the base by creating a tab that would allow me to set the piece inside without having to put dowel rods inside of it.


When I laid out my design after contouring it, I used a piece of wood that had already been used for another laser cutting project. So I had to scale it down several times to make sure I had enough room to lay out the entire design.


I also did two different versions of layers for Keyshot. The one on the top, was to create the look of one solid object but using two different materials, the other idea was to interlay several materials. I wanted it to look more interesting than just two material choices.


Material Choices:

For the materials inside of Keyshot, I used wood textures exclusively. Since my model was cut out of wood, I wanted to emulate that inside of Keyshot to mirror the idea of the materials I was actually going to use. For the lighter wood, I used the Ash material underneath the wood, then I used a heavy grain wood texture for the dark base. For the version where I have multiple different kinds of layers in the model, I once again used the ash wood but then this time, I used one of the Black Walnut textures, because I wanted to contrast the lightness of the Ash, with the darkness of the walnut wood colors. 

In the actual model, how I put it all together, was I used 1/8th of an inch dowel rod, 200 grit sand paper and Loctite Super Glue to put it all together. I didn't glue the top to the bottom because I wanted it to be able to come free so that whoever looks at it can see the entire thing rather than one piece.

To finish the actual model, I sprayed it with a semi-gloss sealant to make the wood grain pop even when it was sealed.

(Top In Pieces)


(Bottom In Pieces)


(Bottom Being Put On The Dowel Rods)


(Top All Together)


(Trial Run On It Together Entirely)


(After I Glued It Together)


Kyle Walker: Week 10 Serial Slice


Inspiration and Influences
The inspiration for this was to make a headphone stand in the shape of a spade so that I could more easily store my headphone without damaging them.
Modeling techniques
I first started out with a sphere and resurfaced it to add more points to it, then I adjusted the points to the shape I needed. After I made the main part I made a pipe cylinder and use a boolean command to subtract them from the main piece and made the sides of the spade more into required shape. I also add a cylinder and flat topped cone to make a base for the main piece and then booleaned them together.
Material and lighting

Lisa Brasier: Flashlight


3D printed and sanded flashlight

 
First, I painted the entire flashlight black. Then I went over it with an assortment of metallic acrylic paints. The purple lines going around the flashlight didn't print so I glued rubber string on in its place. Last, I went over the whole thing with a gloss varnish.


Wednesday, March 22, 2017

Jeremiah Baker - Elephant Serial Slice

render 01

render 02

original model

extruded contours with dowel placement

material assignments for key shot

engrave layout

contours in 3D space


finished model

finished model

original object

Concept:
         I decided to use a model that I had 3D scanned from last semester for this project. For my previous project, I made a low poly concept that I thought looked really cool, and this would give a similar effect. The original scan was of a small hand carved elephant from Thailand. I thought it would look really cool to scale it up by 300% and see what it looked like and what detail would be preserved. It seems to have worked really well.

Modeling Techniques:
        For the contouring, I started with all 3D objects. I placed the scan file into the workspace and scaled it to fit my wants, and then contoured it in multiple directions to see which one would look the coolest. I decided to go with contours in the x direction. I then placed dowels in multiple spots to make sure I would be able to line all the layers up correctly. After this, I couldn't do much until I decided on material. I had some plywood lying around, so I used my caliper to get its exact width and contoured again to that size, this time contouring the dowels as well. While doing this, I went ahead and put the dowel contours and model contours on different layers to make it easier for later with color assignments.
        After this, I turned the model sideways to make the contours parallel to the base plane, and began separating them out. I laid them all out in a grid without rotating or anything first, so I could number the layers and delete the dowel holes I didn't want to get cut out. Once the numbers were in place, I began working the puzzle and laying everything out, trying to be as efficient as I could with my materials. (It's tough; there's got to be a program that can do this for me) I also used the outline engrave technique Prof. Scott discussed in class on the layers that weren't large enough to have a dowel through. I also mirrored one half of the elephant so that both sides of the finished model would show the nice side of the laser cut wood instead of the stains from the laser bed. I ended up fitting everything on 3 and a half sheets, which wasn't bad, because I had the materials for it already.

Materials Used:
         After I got all of the pieces cut out (which was really cool to watch btw), I did a couple test fits to make sure everything looked ok. Turns out I bought the wrong size dowels, which made fitting everything together correctly a bit more labor intensive, but everything still fit together. I was a bit impatient to get started, so I ended up not using the dowels at all, just lining up the holes by eye. I used locktite professional glue to stick everything together, and I completely agree with Prof. Scott. It's great. I didn't have to wait more than 30sec for any of the layers to stick together before I could stop pressing them together. I highly recommend investing in some. I then applied a wood stain to the model to bring out the grain and darken the color a bit.

Anisha Chaudhary: Week 10 Serial Slice


Concept:
My serial slice is a statue of the Hindu God Ganesha. He is represented as a man with an elephant head and human body. Ganesha is represented in Indian art in a variety of ways. He is usually seen with a mouse at his side or an offering in his palm. He usually has a symbol on his forehead, this symbol varies depending from what region of India is depicting him. I like a lot of modern representations of Ganesha. They mostly try to capture his trunk and large belly. I didn't realize how many different depictions of Ganesha my family has in our house until I started this project. My favorite depiction is a small plastic version, where there is only his trunk, belly, ears, and a symbol on the forehead represented.
I decided to make this since many artists tend to make their own representation of Ganesha. I also wanted something I could use to decorate my home.

Modeling:
I did my best to use very basic geometry to represent Ganesha. I used two large spheres for his belly and chest, ellipses for the arms, legs, and feet, and curves for the ears and trunk. I like how I manipulated the trunk, by creating a pipe and then changing the size of it so it gradually gets smaller at the tip of the trunk.
I realized that this piece may be very bulky. Currently, I am working on laying it out on a 24" x 48" rectangle. I may have to use more than one sheet of wood. My piece is about 12" tall. I am also nervous about the floating pieces I have in the serial slice. I will have to follow what Professor Scott said about labeling, where I label chunks by having a layer as "01" and "01a" if they are at the same height. I chose to do a horizontal contour so that It would be easier for me to visualize.

Materials:
I am excited to actually get this laser cut, even though I know it will be difficult to piece together. There is not a hole for the Dowel presently, but before I layout my 24"x48" sheet, I will add them. I bought two panels of Cherry plywood offline from Home depot. After I have actually implemented and completed the set up of this project, I am thinking of ways I can add to the wood. I am thinking of adding moss to the wood, or maybe painting over the wood with a stain. I think it would be cool to wrap it in vines to make it look like a piece that belongs in nature. I will have to research how I can preserve this piece very well.


Before I submitted this piece for Laser cutting, I realized that I had a different thickness when I contoured compared to my plywood. I redid the layout so it looks like the layout below.


I made the piece about 7 inches tall in the end. It is a small and chubby Ganesh, and I love the way it turned out when putting it together. I did make a few manual mistakes when assembling this piece together. I did not plan out the trunk like Professor Scott had told me to, so there is a portion of the trunk that sticks out much more than the rest. I also mixed up some loose ear pieces. Luckily these pieces are symmetrical, but it does look odd in the way I placed them. Overall I'm very happy with the way my serial slicing came out and I think it looks beautiful with the type of wood that I got.