Monday, November 30, 2015

Dong Lak (Derek) Han - Sewol Ferry 2

I am working with Sewol Ferry accident which took away 304 people's lives from their family.

My goal in this project is making video that is projection mapping on my pepakura Sewol Ferry
in order to consolation the family who lost their family through this accident and making people memorize this accident.


models


Polygon Model


For laser cutting


Laser cutting


model


model


model


 I was so sad because model has a problem which is the shape of direction and size. Direction was opposite and I need more smaller model than this. So I will try again until I am satisfied.

Dong Lak (Derek) Han - A tear of Sewol Ferry - Pepakura


Through this project I want to make people think about Sewol Ferry Accident which is occurred in Korea.  


The sinking of MV Sewol occurred on the morning of 16 April 2014 in Korea.
304 passengers and crew members died in the disaster.
Most of them was high school student.
Sad thing in this accident is that although all people inside of boat could be rescued after accident happended, Korean Goverment didn't try to rescue them at all. 


the moment Before the boat sink

simulation 

Side view - shape of boat before sink


Top view - shape of a tear
I modeled a boat with "Loft" and made it mesh and adjust.


in Pepakura


For Laser Cutting


Assembly - side view


Assembly - front view


Projection mapping test


I figure out that the projector I use is small and my 50 inches high model is too big. 
So I made smaller and slightly different model.

Savage - Dice Rolling Box


It occurs to me that I had images dated to the 6th of November but forgot to make this post until now (as yesterday a friend expressed interest in buying one based off of the dry-assembled version I had out).
This is a dice rolling box for board games and pen & paper roleplaying games. Dice go in the top, tumble down the inside flaps, and roll out into the drawer at the bottom. This fairly rolls the dice without the possibility of cheating. Unfortunately, I made the flaps a bit long and haven't cut them down yet, so dice get stuck between them, as you can see below.

The images on the front and back were inspired by heroic fantasy, as games like Dungeons & Dragons are where dice rolling boxes are primarily used. The front shows a knight fighting a dragon, with depth given by the drawer in its extended position. The rear shows the fire left by the dragon's breath. The other sides show five of the different kinds of dice used in D&D, displaying the purpose of the box.


The decals on the sides were drawn (admittedly poorly) on paper and scanned. After this, I used Inkscape's bitmap trace and converted that to an Illustrator file [using Illustrator's bitmap trace, I couldn't generate curves] for import into Rhino. Once in Rhino, I drew over the scan curves again using Rhino's curves to get a lower-detail version suitable for laser engraving.
Update 2015-12-14:
Had the box re-cut to actually allow dice to roll (whoops). Unfortunately, the stain came out far darker than I would have liked on the MDF, but the designs are still somewhat distinguishable. Pretty decent for a second prototype, needs some more engineering work done since dice tend to get stuck on the last (less steep) rolling panel.

Monday, November 23, 2015

Sean Korzeniewksi 3-D Scan


Concept:

The concept behind this project was to scan in a small object, simplify it, and then create an abstract representation of a character. This particular character is one I created for use in various role playing games as well as stories. This representation of my character is meant to serve as a fundamental basis of his form. 

Techniques:

Of course I used the 3-D scanner and scan studio to first scan in my object, which was unfortunately rather difficult since my source object was very small. I then used the mesh data to create my character in rhino, drastically reduced the poly count and converted to a NURBS object.

Materials:

Unfortunately I do not have access to Keyshot outside of the school computer labs, and since I mainly worked on this at home I didn't have a chance to use the materials I would like. With the simplified poly data I decided it would be interesting to make my character appear to be hewn from stone. As this is an abstract representation of a fictional character I thought it would be fitting to make him appear "petrified".

Tuesday, November 17, 2015

Julio Romero: Week 12 3D Scan

I did my 3d scan project with the help of Cesar Zapata. We decided to use a small turtle I had in my home. I chose to add spikes to mine to contrast from the original's complete smoothness.

We used scan studio to scan the object by first painting it white and adding red markers. We first scanned it sitting normally, and then scanned it on its side to get the hollow underside. After all of the scans were completed, we aligned each of the meshes together, merged them, and filled in the holes that popped up. Overall, the scanning process took probably around an hour and a half.

After the scan was finished, I first took the file into Rhino and lowered the poly count to a more manageable amount. Then I took it into Maya because I'm more familiar with its layout. To add the spikes  I deleted a large amount of vertices in certain areas to get a flat surface, and I then extruded the faces inward once, and then extruded those faces away from the surface and scaled them to a point, merging those vertices together.

In Keyshot I put a clear, green plastic material on my model to mimic the actual turtle. I adjusted the settings of the material a little to get it how I wanted, and then changed the model's position a bit because it was floating slightly off of the ground. I used a red background to make the green model really stand out.

I really enjoyed learning how to scan objects, but I did run into some problems. I hadn't used Scan Studio before, so learning the layout was a bit challenging. I had trouble zooming out at first because scrolling in Scan Studio was inverted from what I was used to, and sometimes I would rotate the camera so much I would get lost. The program crased once, and it also seemed like it would freeze right after filling the holes

Monday, November 16, 2015

Darrius Williams box maker


For this project I wanted to use images I've drawn by hand as a base for my cut and engraved lines. the original drawings come from when I worked at UTD's comet caller center as basically a telemarketer for students.while the other line based design was sacred geometry.

I started the process by getting several shots of the original image and bringing it into Photoshop. it was full color so i had to desaturate it and get it to 3 basic colors of white,black and grey. after that i used a few filters to get a style I liked to add with the original grey scales. after that I imported the images into illustrator and used live trace. added the to the raster layer and sent the for cutting.

In the end im mostly happy with it. I still need to learn more about illustrator because their was more i wanted to do with the images i had and i didn't quit get the effect i wanted in the wood.

Saturday, November 14, 2015

Will McKiernan Box

For this box project, I wanted to create a cool, original design to engrave into my box to make it unique. I really like designs that incorporate things from nature, such as trees and leaves, and made an effort to include both of those in my design. I wanted it to be slightly ironic in its symmetry however, because nothing in nature is perfect.
First, I used Boxmaker.com to create a template for a 4in x 5in x 4in box. I created the tree and leaf designs with the pen tool in illustrator to make them symmetrical, and then used the array function in rhino to create the grid of perpendicular lines in the back of the design. I used the trim tool to cut out the lines from the circle, the tree, and the leaves, as well as from the outside of the box. then I placed the design onto the template. I also cut lines along the top to create a 1 in lid.

                                                
I decided to use MDF to make my box because it engraves well. I was very pleased with how the pieces came out. At first I was a little upset with the burn marks but now I embrace them as a nice characteristic of the box. I attached hinges to the box so that the lid can open and close. The hope is that my box will not only be nice to look at, but functional as well.


A.K. Marder: Choose your own path

Sort of unrelated to ATEC6351 but utilized the same technology.

The Process:

For this assignment I was responsible for creating the props for a video project we were doing.  Using Photoshop, Illustrator and Rhino I was able to laser cut my cut outs.  I outlined each cut out using sharpie.  Then it was time for acrylic paint!


 Cat for scale


The Concept:

Our synthesis focuses on the two articles “A Conceptual Model for Video Games Interactive Media” and “First Steps Towards a Unified Theory for Interactive Digital Narrative.” Video games focuses on creating a model to categorically store video games based on a set of given parameters. For the game we choose Mario, it’s a classic game that almost anyone would recognize. The article even discusses using Mario saying, “Super Mario Bros. is a highly recognized game that has editions available for multiple platforms, including but not limited to Nintendo, Super Nintendo, Nintendo GameBoy, and Wii. The Game entity type allows these different editions of a video game to be associated under what consumers will readily recognize to be a single entity, namely, the same game. There are discussed other ways to break up games into different categories as well. Using a game type for instance is the next logical choice, in today’s age both Battlefield and Call of Duty have similar qualities in how one plays them.”

The way we tell stories is always changing. Not too long ago they made “choose your own adventure” books where the reader would be able to make certain decisions that change the way characters behaved in books leading to multiple possible outcomes. With the advancement of technology, film seemed like the next logical choice to apply this kind of narrative freedom to. We therefore combined the organizing of video games with the Digital Narrative article to create an interactive narrative video. The viewer’s goal is to find Mario from Super Mario Brothers in order to store them in the UTD game library.

Choose Your Own Adventure:


Hope you enjoy playing as much as we enjoyed creating it!

Friday, November 13, 2015

Julio Romero: Week 10 Box


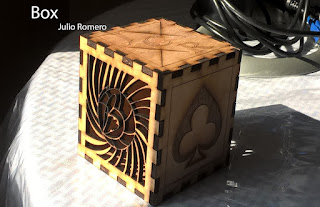
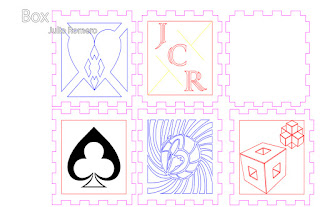
I wanted my box to be something personal, so I chose to design the different faces with things that I had previously done, both in this class and other classes. I also plan on using it to hold my smaller projects. I made each side 4 inches in length so that no one face would hold more importance over the others.

I got the outlines of the sides from box maker and took them into illustrator, making them exterior cuts. The heart/diamond and clover/spade faces I copied from my laser scanning assignment and modified to reduce the size of the holes and the time needed to engrave. I used my menger sponge Rhino file and used the make2D command to make the lines for the third side, postioning the camera so that the lines of both objects would point to a single vertex on each of them. The fourth side I designed based on a charcoal drawing I made in a different class, which I imported into illustrator and traced over using the pen tool to create inner cuts. For the top I used a logo I made in a design class I took in high school, using shallow and deep engraves.

I really like how my box came out, especially the two inside cuts because of how the light can shine through them. I'm also really amazed at how well made each face is and how they fit each other perfectly. I plan on only gluing the two non-inside cuts faces to the bottom in case I want to do something extra with the two other sides.

Thursday, November 12, 2015

Cesar Zapata: Laser Engraving


  This is the first laser engraving assignment I ever did and was actually pretty fascinated by it!
Foremost I wanted to discover how the design would ultimately turn out so I could learn from it and improve on the next laser engraving project. The concept of my design is a brand of a video game that my brother and I love to play together and chose my favorite brand of clothing from the game's world. Its brand really intrigued me in how simply elegant it was with the eel intertwined with the I.

The method this was done was I found the image online at a reasonable size, then traced over it in Illustrator. I then exported the file into Rhino and color coded the lines according to the laser color guide and dropped it off into the Fablab dropbox.

The materials I used was a 2x4 plank of Birchwood bought from HomeDepot and was not a very comfortable task transporting said plank to the Fablab. However I believe it would benefit me in the long run as I still retain a vast space left over after this project for other assignments.