Showing posts with label digital fabrication. Show all posts

Saturday, February 29, 2020

Twinkle Shah: Hammer Model


Concept
For this project, I tried a different approach and decided to do some brainstorming on paper before working in Rhino. I did some sketching, and found a reference of a walking stick that gave me some inspiration for the shape and form of the 3rd hammer I sketched below. This is ultimately the one I chose because I found the shape unique, ergonomic, sleek, and minimalistic. 
Ideation Sketches

Victorian Walking Stick - Inspiration for form of the hammer


Rhino Model with Layers

Rhino Model Ghosted Painted Black

Rendered Hammer Model

Rendered Hammer Model - Perspective Shot


Process
To make the hammer model transform from a sketch to a 3D model, I started out by perfecting a curve for the head, and a curve for the handle, and then piped the two with flat caps. I then joined the 2 and then worked on trimming the 2 ends of the pipe for the head into a shape that would be suitable for hammering. Next, I extracted a subcurve from the curve I used for the pipe, and then moved it closer to the edge where the pink silicone part would be on the handle. I then duplicated the handle and then trimmed out the pink piece from the duplicate, and then capped that with an extrusion from the subcurve, and then joined the 2 pieces back together. I repeated this for the top of the hammer as well. Next I added some chamfers at the bottom of the handle, and at the 2 sides of the hammer head. 

Then it was time for rendering. After I assigned my materials and set up my environment and lighting, I took the images into Photoshop and gave more shading and highlights to the pink silicone parts, because I could not get it to look realistic enough in Keyshot. I used the dodging and burning tools in Photoshop and dropped the opacity of those adjusted layers, and changed the mode to soft light. I think the result was much more realistic looking than the 2D plastic look from before. I also toned down some of the highlights on the metal because they looked too dramatic next to the silicone's.

Materials
I wanted to keep the materials simple and straightforward, so I stuck to only 2 materials: a silicone/rubber type material, and a silver metal. For the silicone, I used a Axalta painted plastic, and added some more dimension to it with the dodging and burning tools in Photoshop to make it appear more realistic and more like silicone. The metal is a Zinc with a radial brushed texture, which I think turned out to compliment the form of this hammer well.

Wednesday, October 11, 2017

Elias Perez - 3D Printing

Concept:
    The focus I was trying to make with this model was to create a small figure to lighten up my desk at home and I recently found a love for adventure based video games and decided to follow the classic trope of the hero who pulls the sword from the legendary stone. I was inspired by many different swords from franchises that I adore such as the Legend of Zelda's Master Sword, Zabuza's Executioner Blade from Naruto, as well as a traditional British Sword. I used the Master Sword as reference for the hilt using the spiraling shapes that stack on top of each other for the main design, I was focused on creating a dull like blade to give a sense of use and heavy weight alongside the brutal idea of a large slab of metal on a handle coming for you.

Master Sword Hilt (Reference)

Executioner's Blade(Reference)

British Sword(Reference)

Techniques:

    The techniques used for the creation of the model included the use of the Snapping Tools to the grid as well as the center of objects, Rotating, BooleanUnion, Linear Dimensions, Analyzing of Edges, and Scale commands. When building the model I would make sure to snap the beginning shape to the grid so as to make an even circle for the cylinder's base as I knew I would be making multiple and different sized shapes and stacking them on one another and then combining them with the use of BooleanUnion to create the hilt. The use layers were meant not to separate the objects but rather to be used to hide them when I needed to use the center snap tool to create an evenly stacked object and truly choose the center of the object that I needed. Rotating played a big part as I began working with the sword upwards and then rotated it 180 degrees and then angled it to my liking so that I could work on the hilt, and the handle of the sword as well as get the ominous angle of the sword being embedded in stone. The stone was made to serve as my platform and base for the object as well so that it will stand up on its own on my desk. The Dimensions of the object are about an inch off of the requirements but I found that it was a necessary amount considering the sword is just generally long and the base high, I scaled it down from it's original size to meet these requirements. 

Ghosted Image of layers and the Final Grouping

Showing the Analysis of the Edges

Measurements: 
    The required measurements for this object were meant to be 4 in. width, 5 in. length, and 6 in. height however I exceeded these each by 1 in. as I saw it necessary to get the length of the executioner blade as long as it could be as that is part of the menacing factor. The hilt adds length as well as the base so I treated each as separate objects. I edited the dimensions of the world as it began in millimeters and then used the Linear Dimension from the Dimensions drop down box to show the measurements on the grid plane. 
Measurements of Model(Different Color Used for Emphasis of Text)
Materials:
    The materials I hope to use are just a nice wood that can be painted as I wanted to paint the model by hand as well as be able to engrave into it physically with a human touch rather than have the printer do all the work. I plan on carving an insignia into the rock so as to create a sense of a kingdom elsewhere or show importance of the blade. I am going to carve into the handle of the blade so that it is not entirely just a rounded cylinder so that I may later wrap a ribbon into the crevices of the cut to create a more realistic feel of a grip to the blade. 
    

Valeria Cavazos - 3D Printing

Concept:
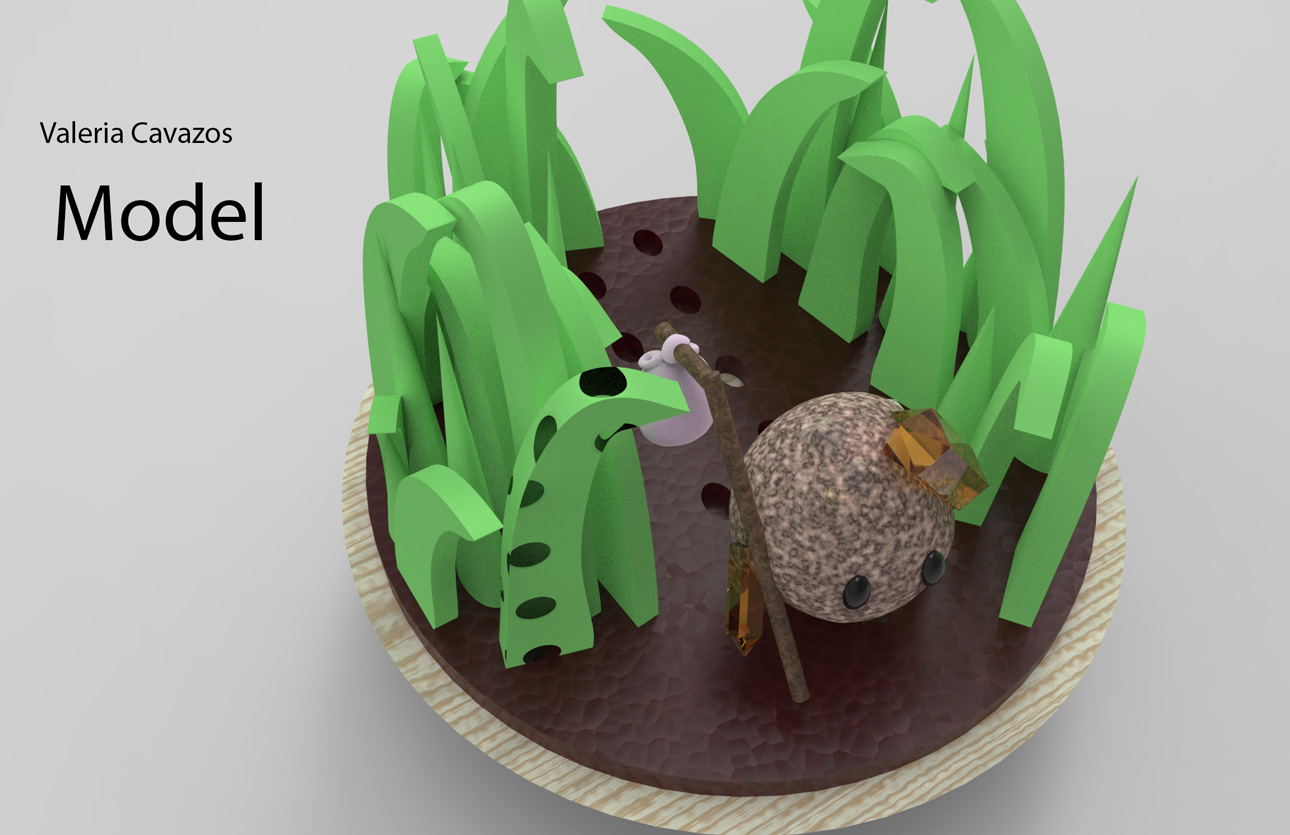
    My concept was based on a character I designed for a children's book as a Graphic Design project. This rock is one out of five and as the leader of the group, I chose to make a scene depicting him walking through the some grass with his mini hobo bag. 

Techniques:
    I first started with the base and the tried different styles before choosing the one in the picture in order to keep it simple yet show that it is a base. It was made with a truncated cone and a extruded circle to simulate dirt. The grass was drawn with the Curve tool to get two different styles, extruded both, and placed around the rock, along with a thin triangle. The actual was was created using a circle and adding small triangular pieces to make the rock look less smooth and more ragged. The gems on the rock were made with a hexagon from the Shape Tool and tracing the shape with a line tool in order to create a triangle for the points of the gems. After making one, I just copied, pasted, and scaled four more for the limbs. 
ghosted image
ghosted image with Keyshot layering assignment

measurements

Material:
    The bases material was made to look like wood and the base that simulates dirt was made with a leather material. The rock was made using a granite rock but I changed the colors in order to get a grainy appearance but not get lost in the material and the gem was a yellow gem. The grass was a result of playing with a miscellaneous material, Matte White, in order to get an organic look but not cartoonish or too fake. Metal was also too shiny to get the organic look of the grass but the front blade of grass with holes is actual metal colored green with properties such as the roughness and the Material Type. 


Final Product:


Sunday, September 17, 2017

Matthew Durham: Castle Fall 2017

Concept
      My initial idea came from a mixture of ancient Greek origins and art from Disney's Hercules and God of Wars mount Olympus. I wanted the design to have similar elements however while at the same time the throne being its own separate entity. 

Techniques: 
     All my design where based on a circular shape which where just repeated among the castle. For all bases of the circular pavilions I used a cylinder with truncated cones attached to the bottom to give it the tapered look. The throne is made of rectangles that are combined to give it, it's shape. That was then copied and scaled smaller to make the chairs for the smaller pavilions. once I had both the throne pavilion and the smaller circular made I brought out the smaller pavilion and did a polar array and used that to make the other two. After everything was correct I used the circular tool to make the circles, which where then used with the Curve Boolean to make the circle shapes. 

Materials:


    For colors I wanted to stick with materials that where warm inviting and peaceful. For materials I selected granite for the pavilions to give it the feel of everlasting, like it was built to last. The pillars I used porcelain for the fragility of such belief as well. The throne and chairs where made of marble for the same reason as the pavilions. 

Monday, December 5, 2016

Corrina Spurlin: 3D Scanned Object

Concept Image

Prototype

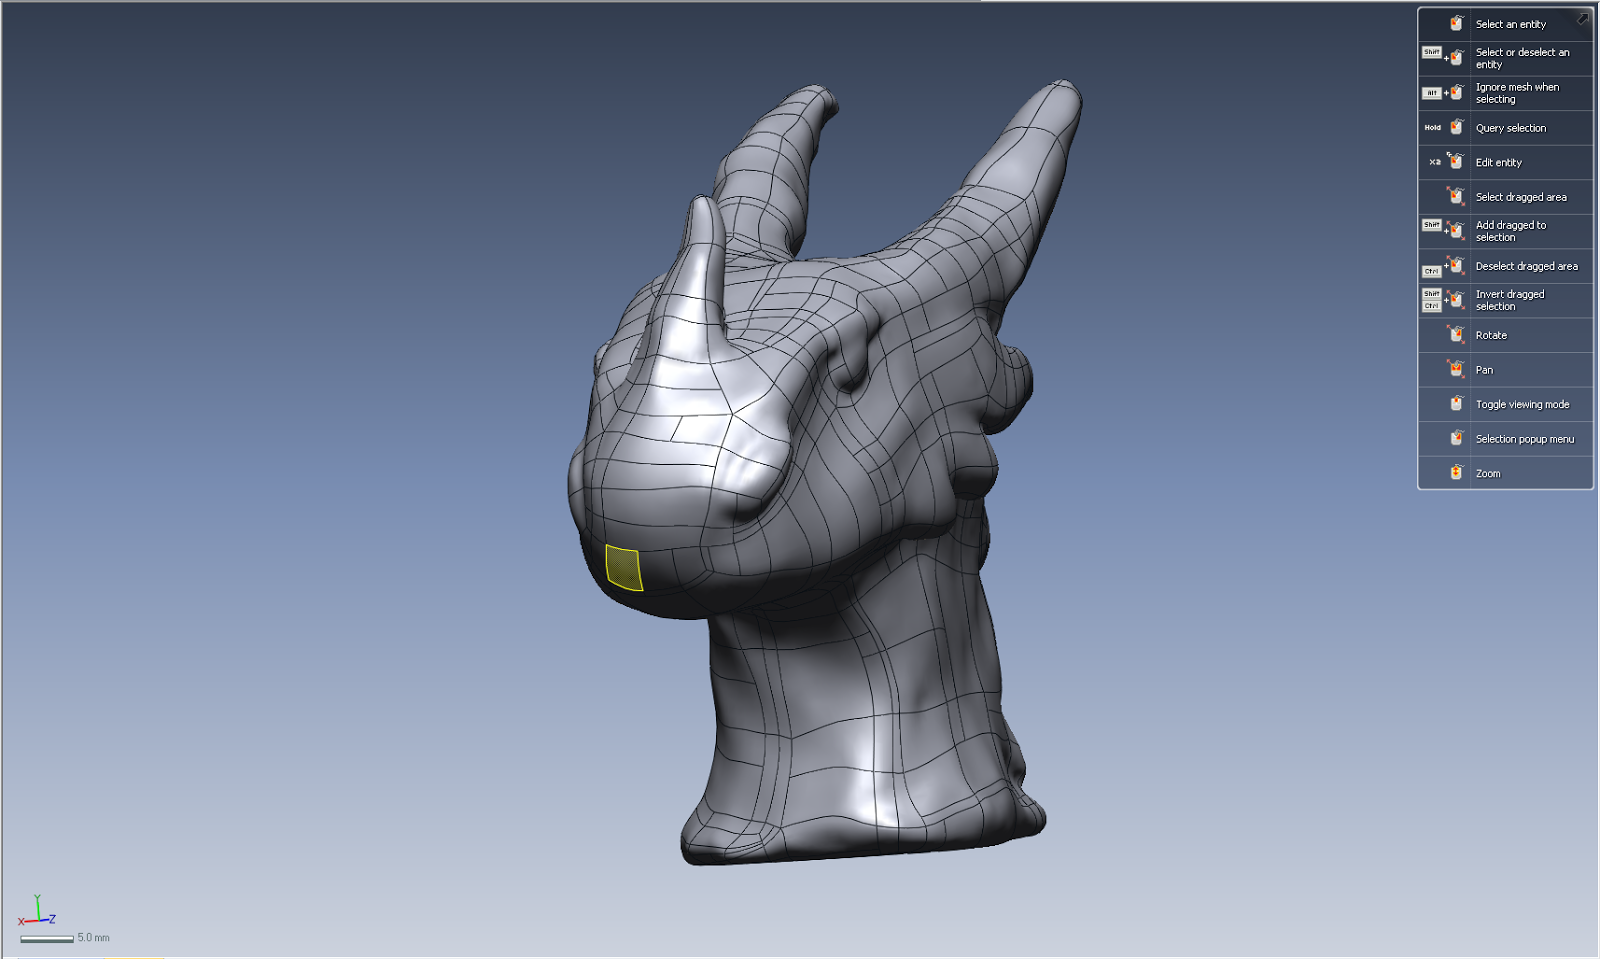
Rhino import


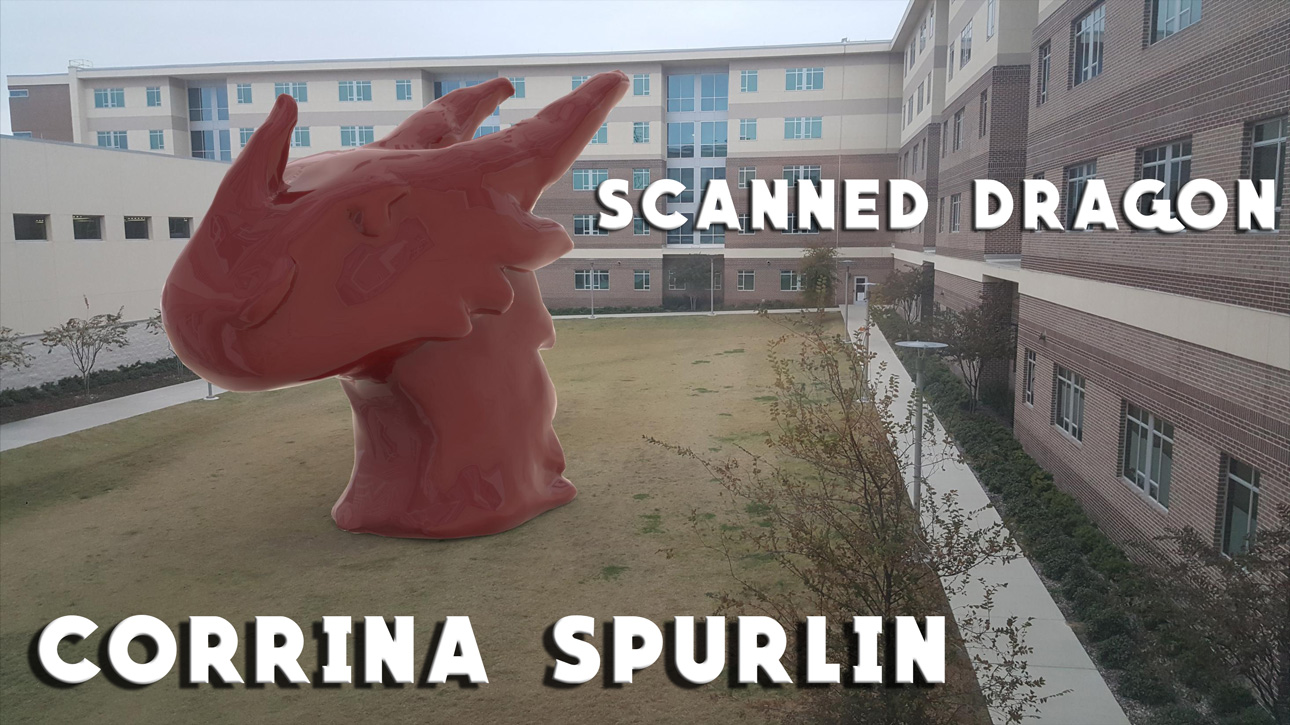
Final Keyshot


Concept:
I worked on this project in collaboration with Sarah Roberson, with the same object. The object was based of the drawing, which is a representation of Starscream from Transformers. 

Techniques:
The main technique I applied was specific editing for the Keyshot visual. I adjusted the lighting and imaging so that the final model reflected what was around while matching the scenery. The image used is of an open field behind Residence Hall West. 

Materials:
The material used to create the object was clay. It was sculpted then set. Materials from Keyshot were applied to change the object's look.

Sunday, December 4, 2016

Michael Crow: Week 16 - 3D Scan

Concept: For this Project I worked with Melanie Estes. She created a candle overnight with fast drying clay, using small beads and animal sculptures, she created a relief into the wet clay of the candle base  and placed a candle int he top.


Modeling Techniques: Once it dried we scanned the sides of the object, in 12 continuous shots at the wide settings with Standard Definition. After the sides we took a single snapshot of the top to mold onto the rest of our models. Moving into alignment mode I cut out all the background scanned material and we merged the families using the tips of the fins on the dolphins, waves, and Fish Fins. this created a model with .01 deference, a very good result. This allowed us to move onto the smoothing using sandpaper and eventually an overall smooth. from there we were able to make sure there were no holes in the model, and create other , lower poly versions. Going form 1.2 million polys to only several hundred in our Polygonal model.


Materials:While the original Candle holder was made from fast drying clay. I imagined it as a mass produced little under the sea kind of room decoration for little kids. So the materials I went with for it were soft plastics and rubber. I made the candle  a blue color that would both allow for maximum visibility of the relief texture, while also maintaining the theme of the sea.


Keyshot - In Keyshot I imported the model in multiple times and aligned them all up to the grid, using show grid under the camera settings. Making sure my camera was in the proper 11 x 17 ratio I went through thee different lighting environments till I found one that mimicked the street post lamp and night sky as well as I could. making sure that each one had the right gloss, texture,and was casting proper shadows I did a number of renders so that i could composite it to the best single image in Photoshop possible including a clown render for each object, a color Render and a shadow render.


Monday, October 3, 2016

Duck

This is my quick duck model. I used the program Rhino 5 and modeled using curves and alternating their points, I conducted the trims of the edges along with joining. The model itself is bland but very simplistic which is what I was going for, trying to define the shape enough so that it would be a smooth surface.

Friday, September 9, 2016

Jeremiah Baker: Week 2 Duck

ghosted painted black

ghosted with keyshot material assignments


Concept: I pretty much just followed the tutorial to the letter to get this one put together. I'm not very practiced at organic modeling, so it was difficult enough managing that.

Modeling Techniques: I used two circles for the body and the head. Control point editing helped a lot in making the modeling process easier, though I did struggle with selecting the right points. I used curves, projection, and split in order to cut off the beak and make the holes for the neck and head to join. I used surface blend to join the neck and head. For the eyes, I created a distorted sphere, used curve>project>split to separate the pupil, and then aligned it to the head. Then I used mirror to make another one on the other side.

Materials Used in Concept: I just tried out a lot of different materials for this one until I found one I liked. The Axalta materials stood out to me, so I used those and modified the colors a bit to go with the coloring I wanted for the body and head of the duck. I also used an environment with more interesting lighting because of the very reflective quality of the Axalta materials.

Jeremiah Baker: Week 1 Castle

ghosted painted black

ghosted with keyshot material assignments


Concept: This concept was not really inspired by anything, (besides the dome, which was inspired from Arcadia from Doctor Who) but was instead just a result of me making random patterns. The symmetry and repetition throughout the design are intended to create a structured and organized feel to the piece. The dome creates a sense of everything working together, but also suggests a menacing and claustrophobic atmosphere. The repetition of spheres creates a city-like model, getting larger and larger towards the center. When approaching the center, the towers get higher, creating a sense of progress. The bridges also create a sense of connection between the many different pieces and the ability to progress.

Modeling Techniques: The snap to grid feature was incredibly useful in the modeling of this castle. It allowed everything to stay perfectly in line with everything else. To create the dome, I created 2 spheres, one smaller than the other, and used a boolean difference command to make it hollow. The mirror command was also very useful in duplicating the squares and especially the bridges to symmetrical positions.

Materials Used in Concept: I used the darker Axalta materials in order to create a sort of menacing and structured feel of the square buildings and the bridges between them. The gold Axalta finish in the middle represents the peak of progress, a light in the middle of the dark. The dome had to be glass because otherwise we wouldn't be able to see anything inside, but it also gives the idea of the ability to see the outside world from inside. Also, the mirror-like quality of the black Axalta gives a really cool effect on the central cone. Because of the reflections, it can be seen from pretty much any angle even though the cone itself is usually hidden behind one of the central towers.

Monday, September 5, 2016

Sarah Roberson: Week 1 Castle


Ghosted Painted Black


Ghosted with Keyshot Material Assignment


Concept
The concept design was a mixture of a pyramid, Jabba's Palace (From Star Wars), and Bowser's Castle. I picked Bowser's castle, to begin with. I really liked the simplicity of the design. The aesthetic of how symmetrical each picture I found of the castle it was. This design is represented in the walls of the castle. Then the inspiration for the red middle spire came from a Pyramid. Though my pyramid is more circle than square, I tried to capture how pyramids form a point at the top, but make it rounder like castles are. Then the rings for the top tower came from Jabba's Palace. I really wanted it to look like it had layers much like balconies to it and when I placed it on the model it reminded me of it.

Modeling Techniques
Most of the techniques that I employed were extruding, copy and paste, scale and rotate tools. I switched a lot between perspective and top views because it helped me to center each shape. I designed the walls first and then created the inside so that gave me and helped me figure out the size that I needed to make the interior shapes.

 Materials Used in Concept
How my material choices reflect my concept is that yellow and red are very indicative of Bowser since he shoots fire. I kind of wanted to reflect that in my concept because I really dislike fire and it's a way for me to help overcome that fear. I also really like the colors yellow, red and black together. To me, they are visually appealing and help you focus on the main center of the spire which is my pyramid shape. Most of the material choices that I used inside Keyshot were glass. Both frosted as well as transparent. I really liked how the glass looked inside Keyshot so I wanted to be able to use them in a way that lets the colors in my design blend well together.