Showing posts with label fall 2017. Show all posts

Monday, November 27, 2017

Durham Matthew Week 11 - Laser engraving

Concept:

   For my design I wanted to make a skate board deck that would capture one of my friends personalities while combining the two things she loves. Her dog and anything that deals with skating. Normal i would add the reference photo of her and her dog however her and her family expressed their wishes of it not being shown but where fine with the me being able to show the drawing I did instead.

Technique:

   For the technique all I did was draw from a reference photo in Photoshop a picture of her dog. I wanted to keep the drawing simplified. While in the background i have a bohemian esque pattern, that was also drawn in Photoshop. They where then combined and imported into Adobe Illustrator to make the vector and raster lines for it.

Materials: 
   For my board I used a 38 and 1/2 long board deck. I didn't want to add any paint to the board so i could keep it very minimal, because that is also her style. She likes the looks and feel of organic things. So I felt like just the darker wood from the raster engraving would be enough. 

Update: I applied a stain so the recessed part would be a little bit darker.

Link to skateboard deck on Amazon

Sunday, November 19, 2017

Taylor Volquardsen : Week 11 : Laser Engraving


Tiny Plants

Background Influence

Concept:
My design was heavily influenced by the video in the link above. The video combined with lots and lots of plants pretty much sums up my aesthetic, so I wanted that to come through in my engraving. Just the skull with the plants on the board felt empty though, so I added a graphic art background to help fill in the space behind them.

Design in Adobe Illustrator

After Engraving

Techniques:
I wanted a slightly jagged feel, so I hand traced all of my pieces in my design using a heavy stroke with the pen tool in Adobe Illustrator. It's composed entirely of straight lines, even when it looks curved. When I got it back from the machine shop on campus, I used a medium-sized brush to fill in the large engraved parts of the board with wood stain, then used a much smaller detail brush and a towel to fill in the smaller lines of the design. I used the towel to brush away any stain that got outside of the grooves and clean the board. After the stain dried, I added a coat of clear gloss polyurethane to seal everything.

Stained Engraving

Materials:
8.5 in Moose blank skateboard deck
Varathane Kona wood stain
Minwax clear gloss polyurethane

Tuesday, October 31, 2017

David Rake Week 10: Cardboard Ball

Concept:
    I had started working on this costume prior to this Halloween as I have wanted to build it for over a year but was deciding on wether or not to do full dress up attire or not. I decided to make the mask and a more casual clothing arrangement for the character Cayde-6 from the game Destiny.


Techniques: 
    Using an already built model that I rebuilt in Rhino to fix some errors in the model I 3D printed it. I Sealed the mask and Painted 2-3 coats on each piece of the desired colors. I later went back and painted on diluted black acrylic and wiped it off to weather it. The Mask was printed in four separate pieces which with minimal sanding was able to slot together and glue in place. As for the clothes I bought a gray hoodie, jeans, and yellow converse. On the gray hoodie I first painted on a white spade, a signifying symbol of the character. Later on I marked some red insignia on the side of the hood and made a line down the left arm. No changes were made to the pants. On the shoes on the outward facing side of both shoes a gray circle was painted along with a white spade on top.


Materials:
    3d Printed with PLA, 6 total colors of acrylic used between the mask and other clothes. Underneath the mask is a see-through mesh with velcro attached to it, the hoodie, and the mask to keep them all in place. Cotton Hoodie, Denim Jeans, and Converse Shoes.

Monday, October 30, 2017

Hannah Barnes: Week 10 Cardboard Ball

Concept:


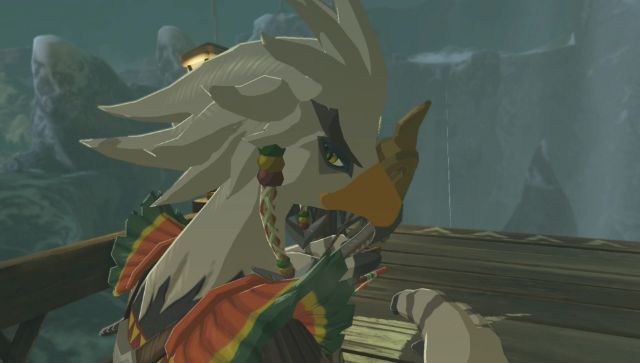
For my costume, I wanted to create a bird mask emulating a species from The Legend of Zelda, known as the Rito. I decided to create the upper half of the birds face with only the top part of the beak, then I added thick feathers protruding from the back of the mask, as seen in the Rito reference picture. Originally, I wanted to leave the cardboard white then add colored cardboard for decoration on the mask. After some complications building the mask however, I decided to paint the mask and turn it into a hat instead.

Technique:


I modeled the mask in Maya. I wanted it to be simple to build, so I tried to limit the amount of polygons I used, which created a blocky look. I translated this to Pepakura to slice the mask into vector shapes. This took several tries to get right, but once I did, I imported the vector file into Rhino where I prepped the laser engraving file.


I got the mask engraved on eflute cardboard. The mask turned out to be too small, so I decided to turn it into a hat. I attempted to assemble the pieces using Locktite super glue, but this turned out poorly. Many of the connecting flaps on the cardboard were too small, and the super glue didn't have much to stick to when I connected the pieces. I also didn't realize that if you mess up on gluing the first time, you can't try and reglue the pieces together. I didn't have any hot glue, so I instead used tape to hold the hat together.

Lastly, I created a simple cardboard band that wraps around my head to secure the hat in place.

Materials:


I used eflute cardboard for this project since the hat was so small and had many pieces that were close together. I painted the hat with red and gold acrylic to add some color and make it feel more cohesive. I'm not pleased with the way the hat turned out, but if I had the chance to do it again, I would use colored cardboard instead of paint. Hopefully, that would give the hat more of a intriguing, stylized feel as opposed to feeling like a kid's mask.


Taylor Volquardsen: Week 10 Cardboard Ball

Concept:
My original idea was to create a boar's skull. I had seen things like longhorn skulls and elephant heads, but not a boar. The idea for a boar, in particular, came from the movie Princess Mononoke. I thought it would be fun to work with the tusks.

Technique:
I originally pulled a few different models from the digital databank. I had the idea of taking one of the animal skulls and modifying it to look like a boar's. I decided that I didn't have the time to do the sort of work that would have required, so instead, I took the cat skull model, lowered the polycount, and reworked the wireframe into something that would be easier to cut in Pepakura. As I started putting together the cardboard pieces of the skull, I realized some of the pieces came out smaller than I thought they would, making them hard to manipulate and I had some trouble getting some of the pieces to fit right. In the end, I ended up editing the design some and removed the complicated eye socket structure to aid in construction.

Materials:
Cardboard, and eventually sealant and acrylic paint

Wednesday, October 11, 2017

Elias Perez - 3D Printing

Concept:
    The focus I was trying to make with this model was to create a small figure to lighten up my desk at home and I recently found a love for adventure based video games and decided to follow the classic trope of the hero who pulls the sword from the legendary stone. I was inspired by many different swords from franchises that I adore such as the Legend of Zelda's Master Sword, Zabuza's Executioner Blade from Naruto, as well as a traditional British Sword. I used the Master Sword as reference for the hilt using the spiraling shapes that stack on top of each other for the main design, I was focused on creating a dull like blade to give a sense of use and heavy weight alongside the brutal idea of a large slab of metal on a handle coming for you.

Master Sword Hilt (Reference)

Executioner's Blade(Reference)

British Sword(Reference)

Techniques:

    The techniques used for the creation of the model included the use of the Snapping Tools to the grid as well as the center of objects, Rotating, BooleanUnion, Linear Dimensions, Analyzing of Edges, and Scale commands. When building the model I would make sure to snap the beginning shape to the grid so as to make an even circle for the cylinder's base as I knew I would be making multiple and different sized shapes and stacking them on one another and then combining them with the use of BooleanUnion to create the hilt. The use layers were meant not to separate the objects but rather to be used to hide them when I needed to use the center snap tool to create an evenly stacked object and truly choose the center of the object that I needed. Rotating played a big part as I began working with the sword upwards and then rotated it 180 degrees and then angled it to my liking so that I could work on the hilt, and the handle of the sword as well as get the ominous angle of the sword being embedded in stone. The stone was made to serve as my platform and base for the object as well so that it will stand up on its own on my desk. The Dimensions of the object are about an inch off of the requirements but I found that it was a necessary amount considering the sword is just generally long and the base high, I scaled it down from it's original size to meet these requirements. 

Ghosted Image of layers and the Final Grouping

Showing the Analysis of the Edges

Measurements: 
    The required measurements for this object were meant to be 4 in. width, 5 in. length, and 6 in. height however I exceeded these each by 1 in. as I saw it necessary to get the length of the executioner blade as long as it could be as that is part of the menacing factor. The hilt adds length as well as the base so I treated each as separate objects. I edited the dimensions of the world as it began in millimeters and then used the Linear Dimension from the Dimensions drop down box to show the measurements on the grid plane. 
Measurements of Model(Different Color Used for Emphasis of Text)
Materials:
    The materials I hope to use are just a nice wood that can be painted as I wanted to paint the model by hand as well as be able to engrave into it physically with a human touch rather than have the printer do all the work. I plan on carving an insignia into the rock so as to create a sense of a kingdom elsewhere or show importance of the blade. I am going to carve into the handle of the blade so that it is not entirely just a rounded cylinder so that I may later wrap a ribbon into the crevices of the cut to create a more realistic feel of a grip to the blade. 
    

Valeria Cavazos - 3D Printing

Concept:
    My concept was based on a character I designed for a children's book as a Graphic Design project. This rock is one out of five and as the leader of the group, I chose to make a scene depicting him walking through the some grass with his mini hobo bag. 

Techniques:
    I first started with the base and the tried different styles before choosing the one in the picture in order to keep it simple yet show that it is a base. It was made with a truncated cone and a extruded circle to simulate dirt. The grass was drawn with the Curve tool to get two different styles, extruded both, and placed around the rock, along with a thin triangle. The actual was was created using a circle and adding small triangular pieces to make the rock look less smooth and more ragged. The gems on the rock were made with a hexagon from the Shape Tool and tracing the shape with a line tool in order to create a triangle for the points of the gems. After making one, I just copied, pasted, and scaled four more for the limbs. 
ghosted image
ghosted image with Keyshot layering assignment

measurements

Material:
    The bases material was made to look like wood and the base that simulates dirt was made with a leather material. The rock was made using a granite rock but I changed the colors in order to get a grainy appearance but not get lost in the material and the gem was a yellow gem. The grass was a result of playing with a miscellaneous material, Matte White, in order to get an organic look but not cartoonish or too fake. Metal was also too shiny to get the organic look of the grass but the front blade of grass with holes is actual metal colored green with properties such as the roughness and the Material Type. 


Final Product:


Monday, October 9, 2017

Taylor Volquardsen - Week 8 - 3D Printing


Concept:
I don't have much room in my house anymore. I've taken so many art classes and have so many projects laying around that I wanted to be sure anything I made was something that I could use. I have a small indoor garden going on downstairs, so I decided to make a little planter pot. It was something small enough to fit in my house and also something I would use, so the plan was perfect.


Technique:
The shape of a basic planter pot is pretty simple, so I kept the modeling simple as well. It's one shape, made from a single sphere that I divided up and extruded to get the shape I wanted. The interior is a basic cylinder shape-instead of following the shape of the outside-to make planting and printing easy.


Material:
It took a while to find out what kind of material I wanted, having to take into consideration both cost and look. I originally wanted to do it in some form of wood or wood-looking material, but that was pretty expensive. I got lucky and found out the cheapest material for me to use on Shapeways was also one that I wanted to use. I decided on a Gloss Celadon Green Porcelain, a ceramic type in a nice seafoam green color.

My model is currently being printed at Shapeways. It should be ready for shipping by October 27.


Sunday, September 17, 2017

Hannah Barnes: Castle Fall 2017

Concept
My original idea for the castle was an underwater ocean cave with seashell themes. This is what inspired the spires. I also tried to recreate the uneven surface of water-carved stone. My design developed to feature a throne room of a castle rather than the whole thing. As I began working with materials, I realized my design didn't create enough contrast, so I went back and added gemstones to create more of a castle of an underground mining civilization.
Modeling Techniques
I worked with a mixture of primitive-based modeling and polygonal-based modeling. For the stone platforms, I drew out the shape of the stone platform using the polyline tool then extruded it up. For the spire, I used the polyline tool to create a crooked vertical line, added a circle at the top, then used the sweep1 tool. The only other complex shapes were the gems, which were created using a box, cut-off pyramid, and a pyramid.
Materials
Though I originally planned for this to be a stone structure, I couldn't find a natural looking stone material that worked well for this. Instead, I used marble, which added a high-class feel to the throne room. For the gems, I used red gemstone materials, which added an ominous feel. I also used red glass for the spherical lights lining the bottom layer. The spires are also made of gemstone, and the throne is a white marble. The large gem behind the throne is gold to add contrast.