Showing posts with label Spring2017. Show all posts

Sunday, April 30, 2017

Jason Doze: Week 16 Pepakura


Original Mask, Reduced Poly Mask


 Obj File
 
Pepakura Unfold

Shot 1


Shot 2


Concept:  I knew I wanted to make a mask that I could hang on the wall and that was pretty large.  I created a female head in Fuse and tweaked the geometry to give the mask huge eyes and tiny little horns.  I wanted the mask to look somewhat alien with prominent eyes and a faint mouth.

Materials:  I used cardboard and taped of the perforations with 1/4" masking tape.  I printed some thicker cardboard to create a backing of the mask to support it and have a place to hang it from.  I first used some hammerite paint to prime and seal the mask and then used ceiling texturet to give it depth and cover the layers of tape underneath.

Technique:  I created the mask in Fuse and tweaked the geometry a bit before importing into maya.  After reducing the geometry in maya, I move to rhino to get the polygon count to exactly 300.  After printing the mask I did and offset curve to create a backing for the mask to print in cardboard. 

Saturday, April 29, 2017

Brandon Wehenkel: Waffle Lamp


Ghosted Black


Ghosted Colored


 Ghosted Black and Colored


Concept:
My initial idea was to create a lamp with a lid that also doubled as a frame for my engraved object.  However, with the numerous times, I restarted and changed my idea I had to ditch the idea of a frame for the lamp.  So I made a separate object which I talk further about in my engraving blog post.

I was inspired by Quinn Baldacci's rocket lamp with the lid.  I thought that was an ingenious idea to create a cavity for the light bulb while also keeping a design seamless and uninterrupted by large holes.  I created two designs that integrated the lid aesthetic. First was recreating the idea from Quinn Balacci's rocket and second was the bell shape inspired from Taiwanese Buddhist Temples known as a Pagoda.  I used an actual A-Frame design for the body of the lamp.

I saw the pyramid shape in Tamara Brennan's pyramid lamp and DISENO Y MANUFACTURA DIGITAL CAD/CAM's clear (acrylic) hanging lamp.  Their waffle style was what I wanted to replicate: using the corners as the rib for the horizontal cuts, plus the hanging lamp was gorgeous.  I would have enjoyed incorporating chains into the project, but I made a decision to make the lamps static on a flat surface instead.  I didn't have to worry about gravity and all the annoying small holes for the chain links.

I also was planning on using two materials for this project, so I also needed to figure out which ribs and which cuts were going to be what material.  Unfortunately, acrylic sheets are not cut to a traditional thickness measurement that matched wood sheets, so I had to be precise about where my inset slots were going to be.


Laser Cut Sheets


Modeling Technique:
I used polyline a majority of the time to create unique shapes.  I used curves to create an A-frame which I then polar arrayed 10x to get the style I wanted with a the flat triangle/ asymmetrical rectangle, I Boolean Unioned, Boolean Differenced, Boolean 2 objects multiple times.  I used project to slice the lids and the base.  I alt tapped to duplicate shapes.  I used spiral, twist, and pipe to create the light bulb inside as well as Interpolate Curve.  I used revolve to create the lid.

I had a hard time deciding which style I wanted.  I was going to make a frame for my engraved tile that was built into the lamp, but it just looked ugly.  I spent a lot of time deleting and revising my ideas.  The three styles were mostly from manipulating array polar and boolean 2objects.  I really wanted to incorporate an A-frame style into the design with a pyramid.  I ditched the pyramid idea because it covered up a lot of the triangles that were created from the polar array also I used contour multiple times with many failures with that pyramid shape.  Contour was used after I figured out which design to work with.  I have two materials, so I alternated the lid and the base as wood for a size difference of .1875 inches apart.  And the middle part which I call the torso is .220 inches apart.  I hope that small difference in thickness won't matter.  I felt like I might have messed up somewhere in deciding where to cut due to the size difference.

I used surface --> planar curves as well as extrudeCrv several times in the contour and section process.  I messed up a lot and needed very precise measurements when creating the complex waffle structure.  I followed the tutorial, as well as the class discussions.  I used Orient for the piped ribs.  I used split to cut them.  Again I might have messed up somewhere, so I'm hoping the print works.  This design is very abstract to me, and It has become an ordeal for me when I can't quite figure out how the slices will fit.

I also hope the hole I created for the cord works as well.  I didn't like that the cord could just freely sit anywhere through the design, so I had to create a base for the lightbulb to sit in.


 Keyshot 1 w/ Reference


 Keyshot 2


Materials:
In Keyshot:
I used glass for the vertical pieces and the glass on the lightbulb, I used hard plastic for the lightbulb base and soft plastic for the cord and textured wood for everything else.  I changed the colors of everything except the glass.
I liked the bump on the wood, so I made it slightly more pronounced.  I think originally it's at 0.5, I just bumped it up to 0.6.


 WIP


In real life:
2 - 24" x 48" x .220" sheet of acrylic, $56 each
5 - 24" x 48" x .1875" sheet of MDF.  $7.42 each (didn't end up being .1875 for all of them)
Home depot advertises, Medium Density Fiberboard (Common: 1/4 in. x 2 ft. x 4 ft.; Actual: 0.216 in. x 23.75 in. x 47.75 in.) and even that is still wrong.
Westinghouse Snap-in Candelabra base socket, 6'.
1 LED Lightbulb.
1 bottle of Gorilla Glue
3 bottles of Locktight Super Glue
Tears


Keyshot 3 w/ Cut Sheets


This lamp design was definitely not for beginners.  I had experiences I will never want to reproduce again. MDF is not worth the effort.  It's too fragile, and Home Depot does not cut every 1/4 slab the same.  I had 3 different sizes when I bought 5 boards. Needless to say, none of my slots worked with MDF.  It just broke or became very brittle. I think one vertical piece survived intact.


Lamp 1


 Lamp 2


Lamp 3


Brandon Wehenkel: Granite Tile Engraving


Edit 1


Edit 2


Concept:
I loved the idea of engraving stone.  My sculptor's instinct of mine went crazy hearing that it was possible for this project, so I used one of my old drawings from my beginner's art classes and imported it into curves.   Like many of my other projects in the past, I like to incorporate the human and animal aesthetic, so I designed Bubbah, my gorilla-human character from my scanned object post.

My initial plan was to recreate an old 80s family portrait idea.  Where there is one person, and their face is superimposed and faded behind, off to the back somewhere in the photo.  But it became too muddled.  Too many lines and it didn't quite look how I wanted it.


Ghosted Frame

I wanted to create a waffle frame for this project as well, so the engraved stone wasn't laying flat.  I used an A-Frame design to create the frame.


Detail


The border is designed with this style.

Modeling Technique:
Adobe Illustrator, raster and image trace
Rhino
Photoshop

This cost me a lot.  I have 13,678 curves and 5548 hatches.
I used TWEENCURVES, and that's about it.  I got help from Professor Scott for making curves very quickly, and I used that about 80% of the process.  The other was hatch, copy, paste, move, interpolate curve.  I used picture frame and measured a rough size for my 12x12 tile and just started drawing over the reference plane.  I went into Adobe Illustrator several times to try to import curves, but it looked like garbage.  Just think about how children draw before they know how to, it was just scribbles. Apart from the nose and eyes nothing else was recognizable.  So I had to create the entire design from scratch.  I stayed up till about 4 am for about 5 nights in a row starting my work about 5 pm.  There were a lot of tedious, repetitive moves.

 Frame Laser Cut Sheet with Lamp

I used the same technique as my lamp design for my frame.  I even used some of the same curves. Such as the "A-Frame" curve. I wanted to incorporate an A-Frame design, which I provided a link earlier of what one looks like.  So I used a triangle with a sliced top to make the initial shape.  I sliced the curve a tiny bit more, so the angle the tile sat was similar to a picture frame, where it isn't completely 90degrees.  The frame should slide into the cuts I created; unfortunately, it did not.  Even though I measured 13/32", I should have made the cuts a tiny bit bigger. I used the pipe and orient commands to create the cuts in the planar surfaces.  I used section to create the verticle planes and contour to create the horizontal planes.

Materials:
12" x 12" x 13/32" black granite tile.
2 - 24" x 48" x .1875" sheet of MDF (didn't end up being .1875 for all of them)
Home depot advertises, Medium Density Fiberboard (Common: 1/4 in. x 2 ft. x 4 ft.; Actual: 0.216 in. x 23.75 in. x 47.75 in.) and even that is still wrong.
Gorilla Glue
Locktight Super Glue
Masking Tape
Black Spraypaint


 Building Process


The frame is in the back, and it didn't work out, the materials I bought were too varied in thickness.  I had bought a sheet of MDF 1/4 in size measured it to be .1875 instead.  I went back the next week and got the same material from the same stack on the shelf, and it was a different thickness.  I didn't know this till I was putting the pieces together.  It was also too fibrous and broke with the littlest of pressure. I couldn't get it to fit the tile right either.  I'll need to recreate the design again, and it was my own project within a project, so it wasn't worth the fuss.  My father helped me redesign a new frame from the broken pieces that survived the accident I had.  Its not the prettiest fix but it is very nice in terms of funcionality.  I only wanted something to hold my tile for better viewing pleasure so the image below is to show the alternative for my frame.


 Uncolored Frame


Colored Frame


Based off the cut sheet image, I can see where I went wrong.  I put the horizontal cuts on a different sheet than the verticle cuts.  Because the place I bought the sheets from did not cut all of their sheets exactly the same, I ran into a project destroying issue.  My horizontal sheets could not fit the verticle sheets, and I ended up breaking a bunch of my MDF cuts.  I had to create an entirely new design from my broken pieces.


Engraving


The small details that I shared above did not fully render.  I chose too small of curves together and should have made my curves further apart.  A lot of my detail was wasted to the grain of the stone.  I learned my lesson and will know for my process next time.


Engraving with Frame


Friday, April 28, 2017

Brandon Wehenkel: Pepakura


Ghosted Black


Concept:
We had two ideas.
Idea 1. - Jeremiah and I wanted to create something similar to this.  We experimented with five-sided shape, a six-sided, seven-sided and concluded with a five.  Jeremiah liked the idea of twisting the shape slightly, so we ran with that in the model.  Jeremiah also likes illusions so this concept was perfect for his interests.
Idea 2. - We also wanted to create about 30 squares and hang them from the ceiling in a way that looks like they had exploded from one central space.  The viewer would be able to walk around the space and see it from all sided differently.  This plan was much more ambitious and it would be an amazing task to perform but the process could have taken much longer than two weeks, so we chose to make one shape with many interior perforations instead.

Keyshot 1


Modeling Technique:
Jeremiah sculpted the model with truncated pyramid with five sides.  He then created a stamp that was used to create the interior cutout.  He just duplicated the shape seven times and scaled and moved to create steps.  He also rotated each layer about 10 degrees each.  He used Boolean difference to make cuts both inside and underneath.  The shape was not quite finished when it was initially cut from the inside so I made the decision to slice the shape on the side.  Jeremiah wanted there to be at least 2 large cuts which gave the shape a unique backside.


Keyshot 2


Materials:
In Keyshot:
I used marble for the exterior because I loved the shine the lighting gave on the object.  I had hoped to recreate the same gloss but I didn't find a spray paint that was full gloss, only semi-gloss.  The interior colored sections I used soft plastic for the material because it looked similar to the paint texture.  I did not use a bump map.


In real life:
We used cardboard bought from the fabrication lab.  The blue acrylic paint was applied to the internal cut faces.  We used painters tape to cover up the connection points of the pepakura.


 Gluing


The entire building process was a bit tedious, but we managed to get it finished with only two sessions.  Jeremiah did most of the gluing, and we split taping. I painted and folded pieces.


Interior


We started by painting blue acrylic paint onto the pentagonal faces.  I made sure to label the faces with their corresponding numeric values on the back of the cardboard for easy assembly.  The flaps were much smaller than we had anticipated so instead of waiting for the super glue to tack together, we used hot glue.  The project, for the most part, was a simple task from then on until we put on the exterior faces.  Something didn't translate right from the 3d space to real space.  The thickness of the cardboard wasn't translated in real space so when we assembled the interior cuts, there was a significant gap.  It was too big to force the pieces together, so we chose to create L-pieces cut from scrap cardboard.


 Favorite Angle


After it had been assembled, we covered up the holes with paper and cardboard bits, to save the blue paint from being ruined and spray painted the exterior.  We also attempted to color the gap with white spraypaint.


 Distance


Wednesday, March 22, 2017

Anisha Chaudhary: Week 10 Serial Slice


Concept:
My serial slice is a statue of the Hindu God Ganesha. He is represented as a man with an elephant head and human body. Ganesha is represented in Indian art in a variety of ways. He is usually seen with a mouse at his side or an offering in his palm. He usually has a symbol on his forehead, this symbol varies depending from what region of India is depicting him. I like a lot of modern representations of Ganesha. They mostly try to capture his trunk and large belly. I didn't realize how many different depictions of Ganesha my family has in our house until I started this project. My favorite depiction is a small plastic version, where there is only his trunk, belly, ears, and a symbol on the forehead represented.
I decided to make this since many artists tend to make their own representation of Ganesha. I also wanted something I could use to decorate my home.

Modeling:
I did my best to use very basic geometry to represent Ganesha. I used two large spheres for his belly and chest, ellipses for the arms, legs, and feet, and curves for the ears and trunk. I like how I manipulated the trunk, by creating a pipe and then changing the size of it so it gradually gets smaller at the tip of the trunk.
I realized that this piece may be very bulky. Currently, I am working on laying it out on a 24" x 48" rectangle. I may have to use more than one sheet of wood. My piece is about 12" tall. I am also nervous about the floating pieces I have in the serial slice. I will have to follow what Professor Scott said about labeling, where I label chunks by having a layer as "01" and "01a" if they are at the same height. I chose to do a horizontal contour so that It would be easier for me to visualize.

Materials:
I am excited to actually get this laser cut, even though I know it will be difficult to piece together. There is not a hole for the Dowel presently, but before I layout my 24"x48" sheet, I will add them. I bought two panels of Cherry plywood offline from Home depot. After I have actually implemented and completed the set up of this project, I am thinking of ways I can add to the wood. I am thinking of adding moss to the wood, or maybe painting over the wood with a stain. I think it would be cool to wrap it in vines to make it look like a piece that belongs in nature. I will have to research how I can preserve this piece very well.


Before I submitted this piece for Laser cutting, I realized that I had a different thickness when I contoured compared to my plywood. I redid the layout so it looks like the layout below.


I made the piece about 7 inches tall in the end. It is a small and chubby Ganesh, and I love the way it turned out when putting it together. I did make a few manual mistakes when assembling this piece together. I did not plan out the trunk like Professor Scott had told me to, so there is a portion of the trunk that sticks out much more than the rest. I also mixed up some loose ear pieces. Luckily these pieces are symmetrical, but it does look odd in the way I placed them. Overall I'm very happy with the way my serial slicing came out and I think it looks beautiful with the type of wood that I got.


Monday, March 13, 2017

Brandon Wehenkel: Serial Slice


Close Up (Physical Object)


Ghosted Black 3D Scan (Before)


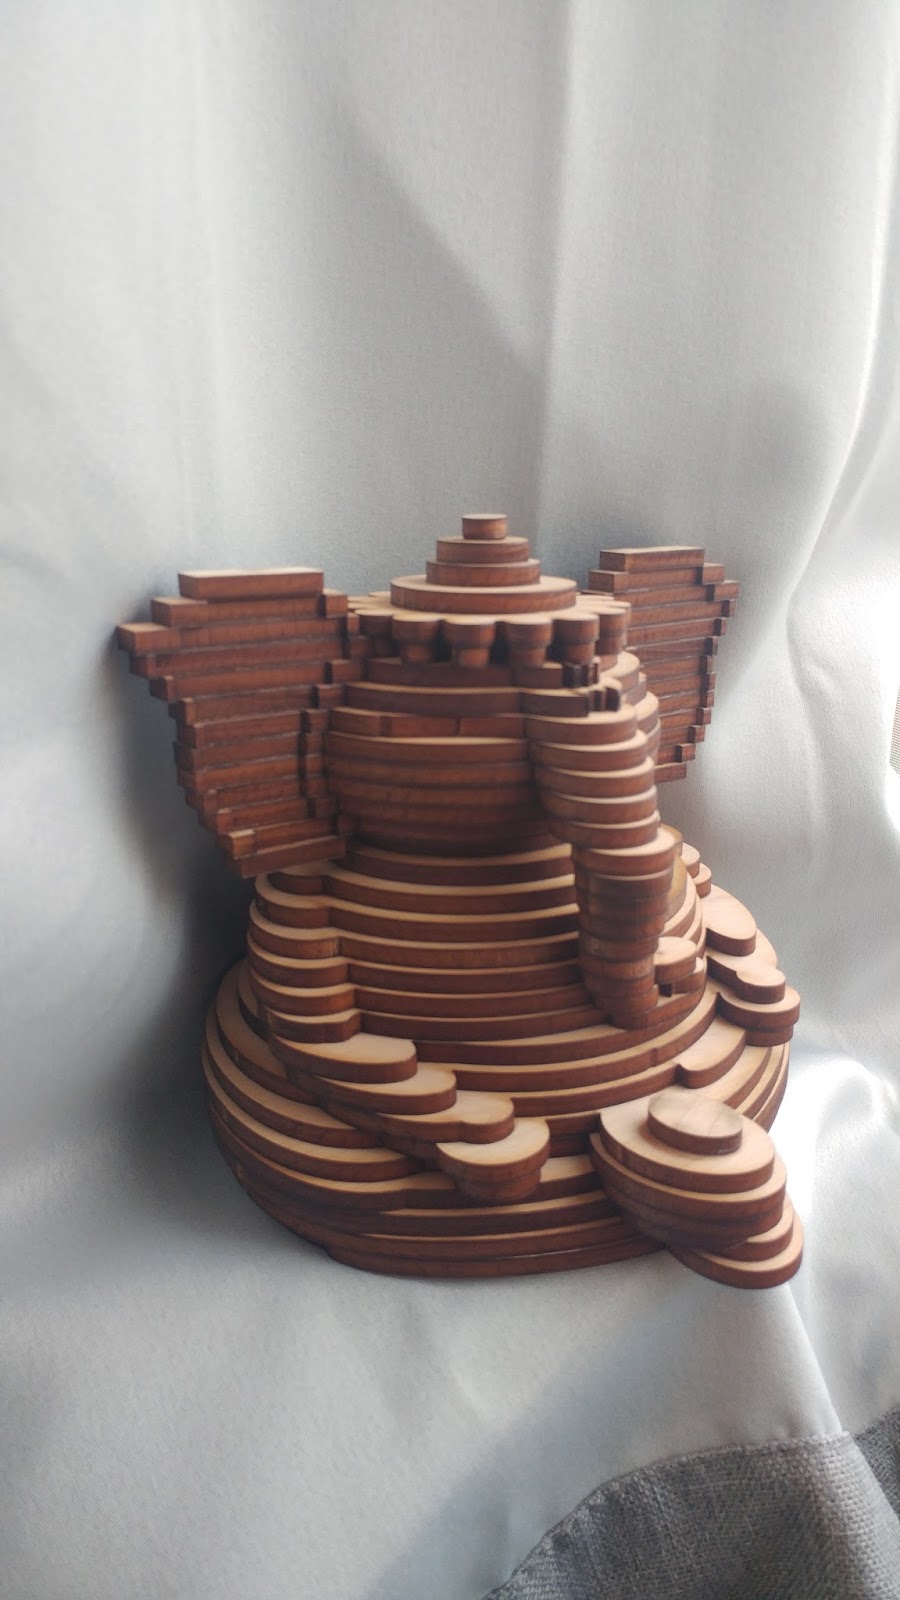
Ghosted Black Serial Slice (After)


Ghosted Black Serial Slice


Concept:
Fall 2016, created a bust of a character of mine with polymer clay then scanned him into digital information.  Because I had several models 6.3M poly, 900k poly, 12k poly, and a 3k poly I thought that maybe this project would be perfect to test the serial slice design with him.  I have a facination of anthropomorpic design so his overall style is designed from several animals:  Gorilla, Chimpanzee, and Human.


Ready To Cut


Modeling Techniques:
How I made the model please refer to my 3D Scanned Object post.
My model started off as 6.3M polys.  I reduced it down to 12,744 polys for this project.  I used Mudbox to do this.  I pressed page down to change the normals map to level 1.  Then I exported as .obj and uploaded it to Maya where I used the cut faces tool to make a nice base for the model.  I used the edge selection tool and the face selection tool to delete any of the excess polys under the line.  Then extruded the mesh to close the hole.  The fill hole command didn't work for me.  I forgot how to manually close it in Maya so I made the hole fairly large so that I could just close it in Rhino with a series of mesh tools.  I used Mesh --> Mesh Edit Tools --> Delete Mesh Faces (to remove several of the weird naked edges around faces); Mesh --> Mesh Repair Tools --> Rebuild Mesh (to eliminate the rest of the naked edges); Unify Normals; Fill All Holes.

I used contour for the serial slicing as seen in the tutorial from class.  I separated each curve by .1875 inches.  The dowels cut are at .25 inches in diameter.  The dowel placement is in a slightly different spot than from the image above.

There are four holes in the model for dowels.  Because my traditional sculpting capabilities aren't perfect the figure isn't symmetrical; remember I used a scanner to make this model so all of that information is also translated. When I put dowels into the shoulders they popped out in bad areas.  I attempted to place the dowels in the most central locations. One of the dowels does not go all the way through while the other pokes out and stops at one of the outer slices.  I did not want it to go through because it would have created an ugly exit. 

I had to use a vice, nuts, and a ratchet strap to press all of the parts together.  I ran into a minor issue with warping so the ratchet strap was useful for pressing the materials together during gluing.


Keyshot Serial Slice (Front)


Materials:
In Keyshot:
I used Soft Maple and mixed mauve with the woods texture to get the color of wood that closely resembles that of Medium-density fiberboard.

In real life:
The wood I purchased is MDF, like I mentioned above, 1/4" 2'x4' sheet which for some reason is actually 3/16" - .1875" at Home Depot.
I found a metal threaded dowel that was 3' long in the parking lot about three months ago.  It is 1/4" in diameter.   I figured I would need it someday since I have 3 various sizes at home of various material types.  I have a few nuts at home that would work for securing the wood together.
I also have plenty of wood glue as well.


 Keyshot Serial Slice (Right)

Keyshot Serial Slice (Back)


Bubbah Natural Light Interior


Comparative


 Bubbah Natural Light Exterior


Bubbah Natural Light Exterior - Backside