Sunday, January 31, 2016

Christopher Clark: Ducky


Concept- For this model, we were tasked with creating an organic model to contrast the exact geometry of the previous flashlight model. I attempted to add more organic objects to the original model to fit with the theme of organic modeling. To do this, I added chicken parts to the rubber duck to portray a duck attempting to dress as a chicken.


Modeling Techniques- As previously stated, I attempted to use organic modeling throughout the whole model. This included using control points and ellipse and generally spherical shape creation as a base for the model and pieces. The top portion, however, was made from extruding a curve. 


Materials- I used a thick looking plastic to attempt to illustrate the rubber base of the duck. Because I wanted to attempt to show that the chicken parts were made of a different material, I used a couple of leather textures for the head parts and wings. This most likely shows best in the close up of the ducks wing, where the texture can be seen relatively easily.


Jonathan Gloria: Week 2 Duck


Concept:  For this duck, I wasn't sure what to do, but I knew I wanted to make it look a little different. I remembered how some ducks have that white ring around its neck. I decided that my duck should look a little like those ducks, but not exactly like them.


Technique: I did a lot for this duck, probably a lot more than my castle and flashlight combined. I used the curves and liens to split the object, to make the neck, beak and tail separate. I also manipulated the spheres more to make the body not as wide.


Materials: For the materials, I wanted to make my duck look like a glass duck. I used a yellow plastic material for the body, and for the neck, tail and beak I used some of the gem materials, so that it wouldn't be too transparent. For every gem, plastic and glass material that I used for the eyes wouldn't work, so I used a chrome polished material on the eyes, so that they wouldn't blend in or be hard to see.


Christopher Clark: Flashlight


Concept- I modeled a flashlight thats powered by a lever that the user must crank to generate power. It would be used in an environment where physical power would be most convienent for the environment, such as an emergency situation. The metal ring also illustrates this.


Modeling Techniques- This model was very simple, teaching techniques on exact precision modeling. I used many Osnaps and Ortho dragging as well as Grid Snaps. This of course paired with standard solid creation, mainly cylinders, and Booleans went into the model.


Materials- Plastic materials were mainly used in this model. I used a rough plastic to portray durability as well as a metal texture on the ring to convey the same message of stability. The lens is of course a glass texture.


Victoria Mayfield: Duck


Concept: My concept for the model was a cute toy rubber ducky. I wanted the whole piece to be seamless except for his giant cute eyes popping out. I also used the online tutorial in order to come up with the concept of my duck. 


Modeling: The tools I used for my duck model include the use of the sphere tool and the ellipsoid tool. I made use of control points, as well as set points in order to shape the duck's body. I also used control points to shape the duck's face and bill. In order to separate the head from the bill I used a curve and the split tool. The blend tool was ideal for combining the head and body geometry seamlessly into one. I wanted the eyes to be somewhat popping out of the head in order to achieve a more toy like appearance. 


Materials: For the materials I wanted to mimic the shiny exterior that a rubber duck toy would have. I used a bright yellow reflective material for the body of the duck. For the bill, I used a more matte orange color in order to contrast from the bright colored rubber body. The eyes are basic white and black matte colors and appear to be lifeless, to go along with the toy theme.

Jonathan Gloria: Week 2 Flashlight


Concept: I wasn't sure what to do at first with the flashlight. I just build what ever it told me in the tutorial, and then added my own stuff at the end so it wouldn't be exactly like the one in the tutorial given to us.


Technique: I used the union and difference tool to make the dents in the flashlight. I also used those tools to make the inside part of the flashlight. I also added other objects to it so it wouldn't look too plain. I also used the split tool to make the dents separate so I could recolor them to other colors for the materials.


Materials: I used the brass brushed material on all the bumps and accessories that are on the flashlight. For the switch I used a leather material, because it made it look more like one of those push to turn on flashlights. For the glass I used a game stone white, to make it look more realistic.

Christopher Clark: Castle


Concept- For my concept, I wanted to combine two seperate realms of design so they would contrast each other. One side would contain harsh, geometric edges and surfaces, while the other opposed it with spherical, rounded, and overall more organic edges. I portrayed this through having the upper and lower sections represent these organic and geometric styles, respectively, while having them connected by the inner tower.


Modeling Techniques- This was an early modeling assignment, though I attempted to use as many modeling techniques as I could. I used ArrayPolar to create the rings of spheres and towers as well as the mini organic pieces around the center of the piece. I also used BooleanDifference for the etched out middle section of the organic half, as well as other standard techniques like BooleanUnion and Rotate.


Materials- I attempted to differentiate the two sections by having different types of materials for each section. The angular sectino consists of rough metals while the spherical section has a reflective, glossy surface. The square ring around the main topper is also metalic to bring a bit of cohesion into the design and to balance out the overall look.


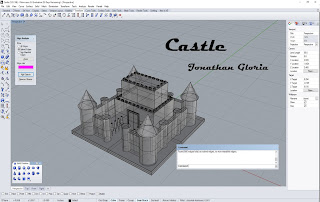
Jonathan Gloria: Week 1 Castle


Concept: I choose to do this castle because I was a little inspired by the old Mario games. From when he would finish a stage and walk into the castle, only to find out that the princess is in another castle. I also thought about adding more stuff around so it wouldn't look so plain.


Technique: The techniques that I did for the castle was mainly used different objects to make my castle. I used union and difference to make the door, and to make the inside castle combined. I also used the copy tool to make copies of most of the shapes, so that I could put them around more easily.


Materials: for the outer walls, I used different colors of paint metallic to give it a shine, I really liked the colors when I selected them. For the trees, I used a lime green paint gloss to make them pop out from the green extreme floor material. I had a tough time picking out materials that I liked for my castle, but I choose the ones that I thought fit it well the most.

Christopher Rickett: Week 2 - Duck


Concept: For this duck model I found myself looking at the rubber duck collection that my roommate has and found that he didn’t have one that looked like a punk duck. I thought it would be fun to create something like that.


Technique:  I used the Select Points Tool to stretch spheres into the basic shapes.  I used curves to split the wings and the beak away from the body and head.  The Blend Surface tool was used to merge the head to the body, as well as connect the wings back to the body to give it a smoother molded shape to the wings.  The Bend tool was used to create angry looking eyebrows.


Materials:  All of the materials used were intended to give it the appearance of a true rubber duck. The Spikes on the head are colored green to best contrast with red of the body. The only material not used in this way was a gold colored nickel material that was applied to the ring that hangs from the tip of the beak.

Christopher Rickett: Week 2 - Flashlight


Concept:  Honestly, I just worked through the tutorial, and expanded on what was there.  I just kept adding to it until it appeared to be something that was fully flesh out. What I ended up with was something that looked like a ruggedized looking flashlight.


Technique:  The techniques that were mostly used to make this model were the different Boolean tools as well as the Polar Array tool. To create the indentions on the grip I used Boolean difference  in tandem with the linear array tool. The Boolean union and difference tools were used in combination to create the on/off switch and outer casing. I also started dabbling with the fillet edge tools such as Chamfer Edge and Blend edge. These tools were used on the end piece that covers the lens to give it a less blocky shape.


Materials:  I stuck to traditional material scheme for my flashlight. For the main shaft of the light, I chose a metal material that has a slight scratched appearance to it.  For the grip around the handle I went with a black mold-tech material because it gave it a rougher look.  There is a clear glass material assigned to lens of the flashlight, and the end covering it  is a black rubber.  As for the button, it is the same rubber as the end, but colored yellow and the case around it is a hard black plastic.

Christopher Rickett: Week 1 - Castle


Concept: The concept for this model was to make a kids style simple castle.  Then I started exploring the Rhino software and found a few tools that created a some cool effects. I took this simple castle, and gave it a more ominous defensive look with spikes that point outwards.


Technique:  the techniques used to create this model include both Boolean union and difference, as well as the Bend tool.  The Boolean tools were used to create the balconies in the castle towers as well as the cut outs in the outer wall section.  The bend tool was used to bend the cones to point outward, and then the polar array tool was used to wrap it around the various parts of the castle.


Materials:  The roof pieces were given a copper metal material and the castle itself is a cream colored stone as it might actually be if it were built in real life. The conical sections that are going up the sides of the castle and exterior wall have a tarnished scratched metal. I feel it gives it a slightly aged  look as well as look as though it has been through battle once or twice.

Victoria Mayfield: Flashlight


Concept: My concept for my flashlight was just to keep it as simple and clean as possible. I didn't want to try to add too much to a straightforward piece of equipment. Since I had never used Rhino before I relied heavily on the online tutorials for the flashlight. 


Modeling: The different techniques I used for the flashlight were the cylinder tool, the truncated cone, and a sphere. These basic geometrical shapes helped me to achieve my clean and simple design. The snap and ortho features also helped me to make sure everything was aligned properly. I used the difference tool in order to create a shell for the inside of the flashlight. As well as adding a flat cylinder inside the lens to emulate a film of glass. 


Materials: I chose these materials because they work well with the basic geometry of the flashlight. The metal geometric pattern on the outside of the model is very busy and moves the eye across the piece. This busyness is especially attractive because of how simple the geometry is. I wanted to stick with basic colors, so I chose the metallic chrome exterior, and a more matte black for the button on top of the flashlight to stay with my straightforward theme. The interior flat cylinder is a basic clear glass, since that piece would have light shining through it. 

Julio Romero: Mouse


When I was beginning to make my mouse I was going to make it look like a little green alien head, but as the shape changed I transitioned to making it look like a rodent mouse instead. I was also planning on creating a small hole in the bottom for a wireless USB, but instead decided to add a cord to match the mouse theme. Though most computer mice have the cable at the front so that it can run behind the computer into the back of the PC, having it in the back of the mouse makes it easier to connect to the front of PCs if  you have to use different computers constantly, such as in public labs or libraries.

The main body used multiple curves to define the shape, which was created using the create surface from curve networks command. the ball is a simple sphere, and to create the hole for it to fit in I used Boolean intersection on the main body. For the buttons I created an ellipse, which I then projected onto the surface of the top, and then extruded in both directions, finishing by Boolean intersecting a hole to fit it in. I used similar steps to make the eyes and whiskers, finishing by cutting the mouse in half and then mirroring it to easily add the changes to the other side. The cable used a curve that I piped, and the USB was a curve I extruded outwards. I finished off by filleting to smooth out all of the edges.

The materials I chose were mostly grays to mimic both computer and living mice. I used reflective materials for the ball and USB to resemble a hard plastic ball and a real USB cable, respectively. The main body and buttons used softer, smooth plastics so as to not be uncomfortable for users.

Julio Romero: Hammer


I wanted to make my hammer look like similar to other hammers while also remaining unique. I designed it after the carpenter's hammer, and also added a hexagonal hole for bolt removal. Though I wanted it to look realistic, I also wanted to make it cartoonish in respect to its proportions.

I created the handle using multiple ellipses and then lofting them into a solid object, and projected a curve onto the center to remove a portion of it. The middle part was a box that a tapered to make shorter on the head side compared to the handle side. The head was created by combining two different parts: the peen and the claw. The peen was a simple curve that I revolved, and the claw was a curve that I extruded. To created the two separate "hooks," I took a box, curved one side, and then did a Boolean operation to remove the middle part; I used a similar process to create the hexagonal hole. I then used the chamfer and fillet commands to remove most of the hard edges.

I separated my hammer into three different objects: the head, the main body, and the handle. The head used a highly reflective metal material to simulate the stainless steel most hammers used for durability. The main body used a duller, hard plastic material to contrast with the head, and the handle had a soft plastic for comfort.