Saturday, May 9, 2020

Liam Melugin: Box Model

Concept:

I wanted to create a box that was something that I could use and find aesthetically pleasing. I also wanted it ti be themed around something that I enjoyed. I decided to go with a game series that I have played throughout my life, being the Legend of Zelda.


Process:

I used one of the provided resources to create a basic box that I then took into rhino. I used the boolean tool to remove the main shape that I wanted. I then added accents to it to add more style to the box. I finally extruded the box to a quarter inch so that it would mimic the final box.


Materials: 

For the main material I looked online on keyshot and found a birch plywood material. I then applied it to the box. I hoped that if I were to make a physical version that I would be able to find a birch plywood because I liked how it looked.


Friday, May 8, 2020

Cameron Ouille Hammer

Concept

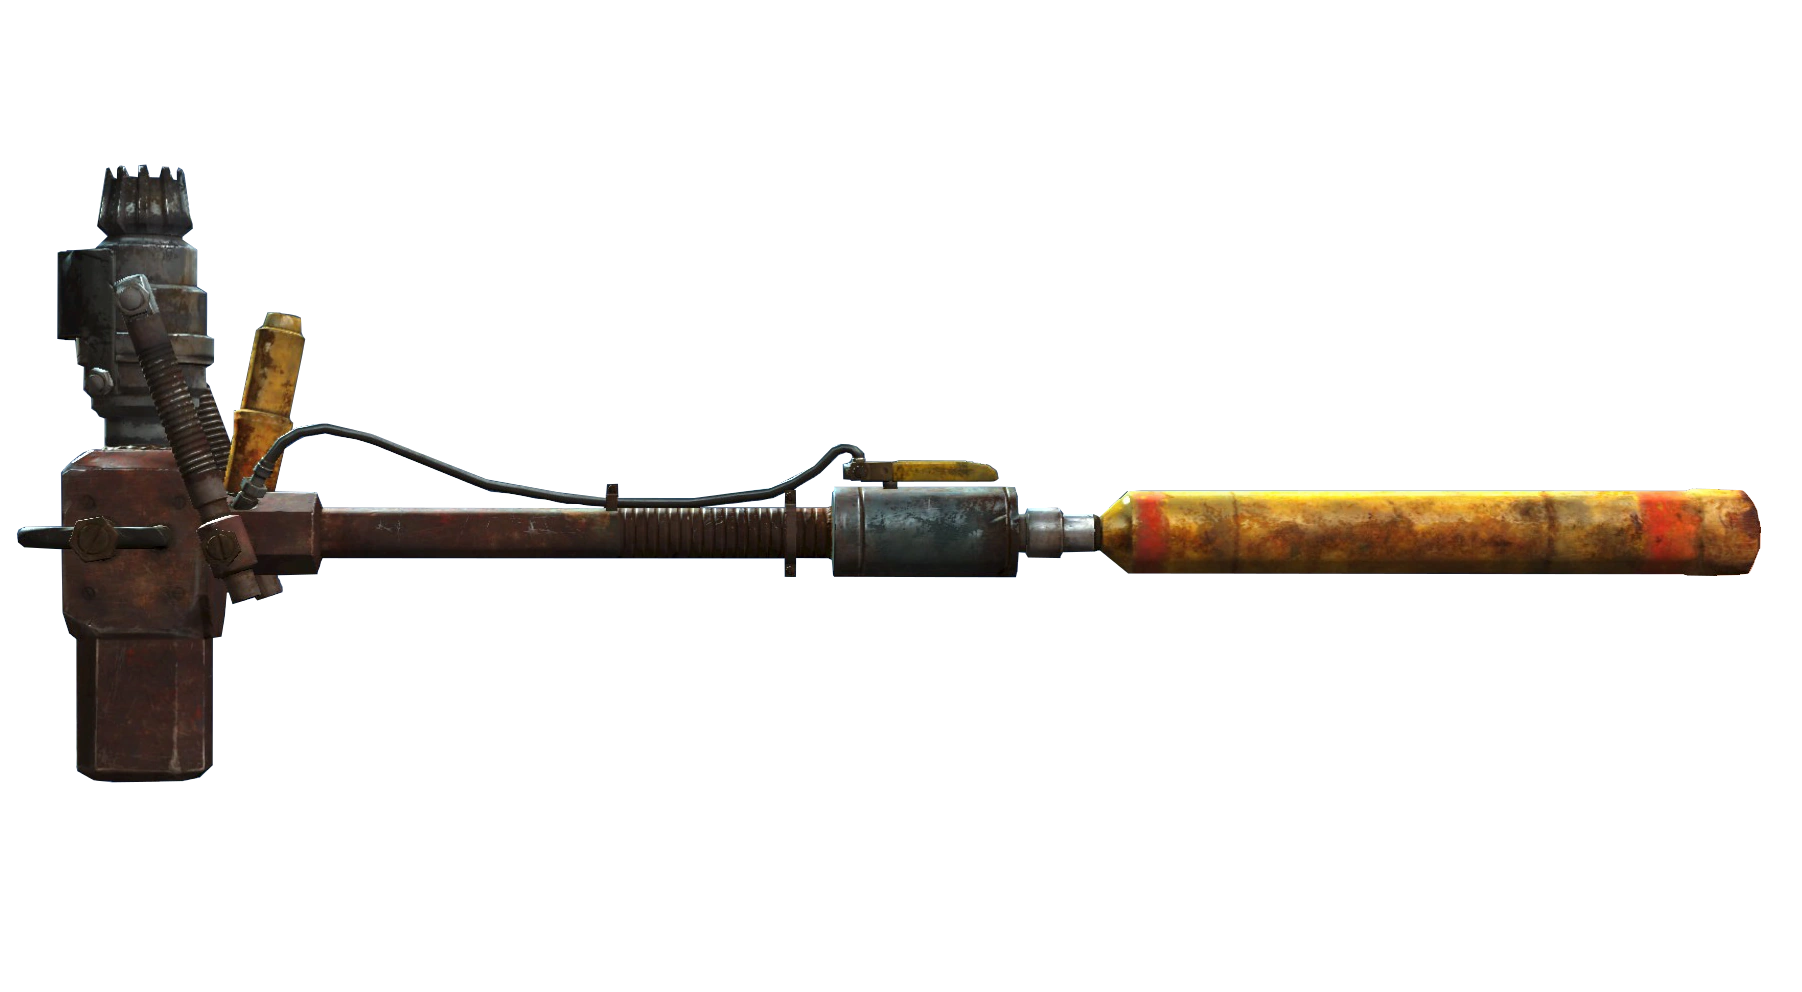
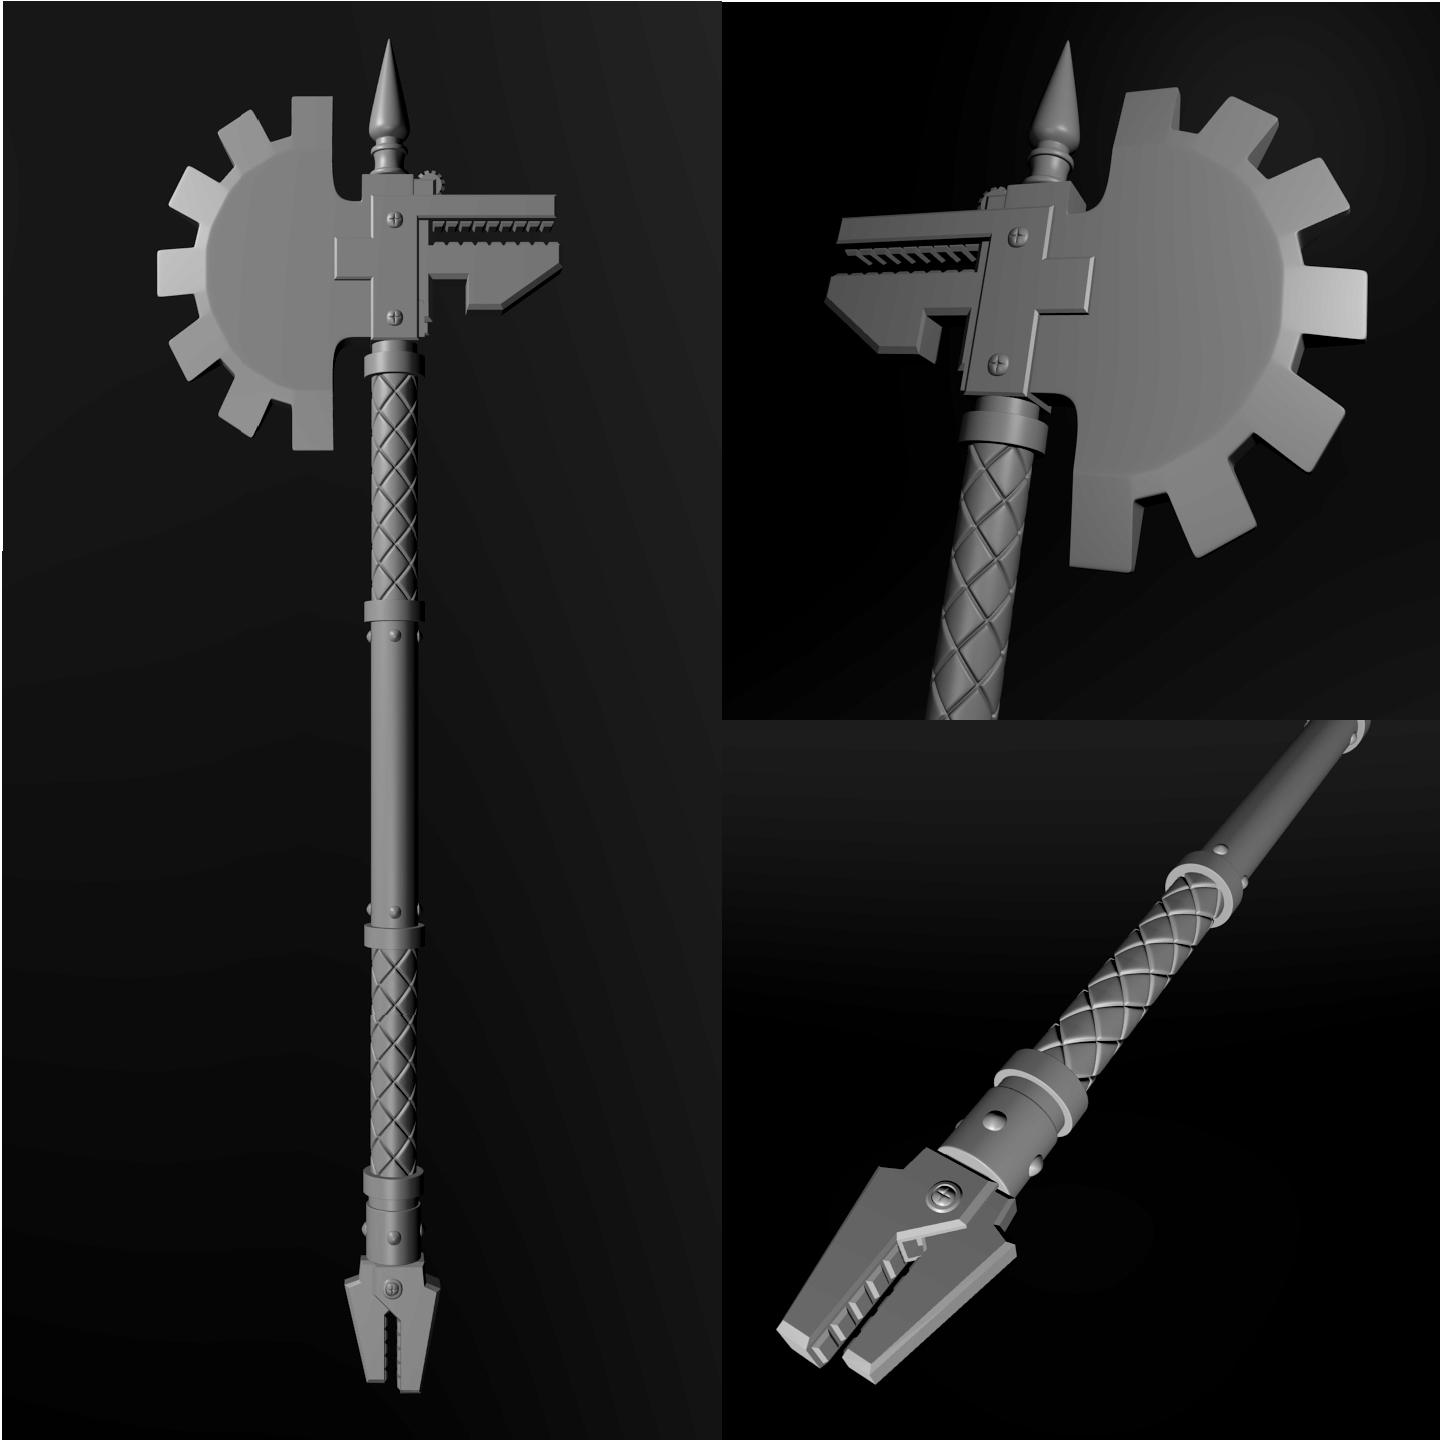
Super sledge (Fallout 4) | Fallout Wiki | FandomI based my concept on the rocket hammer from Fallout 4 and the Omnissiah's Axe from Warhammer 40k.Axe of Omnissiah W.I.P. 01 - Axe of Omnissiah W.I.P. 01 - Gallery ...

Process

I modeled this around the handle 1st, adding the pommel, and eventually the head. I used boolian reduction and the polar array for the fins.

Render

I rendered this hammer with blue cloth, gold rings, sterling steel for the pommel, wood for the shaft, brass for the second body, and darkened steel for the head.


Cameron Ouille Castle

Concept 
My Castle is based on multiple concepts from fictional works. The main inspiration was Howls Moving Castle. and modeled the body and legs from the AT-TE from Star Wars.

Process

My Process began with building the fortifications walls, then I built the center keep and towers to keep them in scale. Once I had the whole castle built I raised it up and built the legs forming out. I utilized the duplication tool to save on much of my time.


Materials

For my final render I kept it relatively simple. The towers and keep are concrete, like traditional buildings. My windows are filled with red glass to draw the eye to them as well as accent with the blue metal walls of the keep. I also kept all of the legs brushed Iron, the darkest of my metals highlighted with polished gold for the leg grips, joints, and windows for the gun ports.


Cameron Ouille Prosthetic


I took inspiration for my work from a mix of Mad Max Fury Road and Twisted Metal.  I wanted this to be a simplified mask that would allow me to show of the best of both.Twisted Metal (With images) | Evil clowns, Scary clowns, Creepy clown The Secret To Mad Max: Fury Road's Absolutely Terrifying Villain ...

                                               Inspiration


Process

I designed the mask 1st, built it up from the 2d design sketch, and then adhered it to the mannequin. I then patch sealed it and added the pipes and nose.

Final Render


Aleena Mir: Rendering in Passes

Process:

I was unaware of how to render in passes so I rendered all of this through Rhino 5.


Materials: 

I used a sapphire material and ruby material. I got the environments from the internet.


Wednesday, May 6, 2020

Vee Valavil Covid 19 Mask


Vee Valavil
Covid 19 Mask 


Concepts

I originally drew up this concept thinking about the masks that myself, civilians, and medical officials created. My design focused on allowing civilians and medicals officials to utilize Bluetooth technology without the risk of spreading COVID-19 via contact with their phone, pager, etc. My inspiration for the mask shown is from the Japanese anime Dragonball Z. The character I focused on specifically was a character named “Cumber”. The character has a full mask that covers the lower half of the face and had circles on the side of the face that I thought could utilize some form of Bluetooth technology built into it. I incorporated various elements into the mask and removed the nose part of the mask straps to allow for an individual to wear glasses, or another eye protection along with the mask. 


Techniques

My method of creating the mask started in cycles. I first started creating the mask and then started creating the shell of the mask.

To create the mask, I first created a circle object and used the scale tool to contour the circle in the front view to contour the shape of the circle the shape of the human face. Next I did a rebuild of the mask structure and tried my best to contour it to the face. I then created a median line and cut the mask in half to using the trim tool. I used the one half of the remaining and started creating a symmetrical design of the mask around the mouth and nose of the face model. I then used the mirror technique utilizing the median line to join each side of the mask together to create the design.


When it came to the shell of the mask, I wanted the mask structure to be solid instead of creating straps. I created the base structure of the straps using curves and joining them together with fillets. I then projected the straps onto the face and created a separate layer for them. I then manipulated the form of the mask to the head. I then create segments for the mask to make sure there were cross sections that would attach to the face. Once all the cross sections were created, I used patch srf and made the multiple sections of the mask. I then use the split tool to then imprint the cross sections into the model and then proceeded to patch them. I also create additional curves that would allow the mask to connect to the base of the mask as you can see at the bridge of the mask. Lastly the offset srf command was used to make the surfaces solid and ensure that they protruded out from the face as expected. Lastly, I took two spheres, sized them to fix the ears, placed them on the mask and trimmed the excess surfaces to create a headphone-like structure over the ears.


Materials

Plastic painted with red and black gloss paint.

Tuesday, May 5, 2020

Marvin Robinson: Lamp


 This lamp was inspired by helical shapes. When I designed this lamp I design it with a regal and rustic look.


I used the helix line tool and used pipping that is 1/3 of a unit measurement. Booleans were used to create a chandler and  I union custom shapes and primitive spheres to create light bulbs.

 Lastly I used metallic materials to keep in line with my regal concept, and rendered my lamp cabin.
I used some color dodging and adjustment layers to give my light bulbs an illusion if luminescence.

Rahul Nair: FlatFab Laser Study

Concept:
I designed my FlatFab model like a made up humanoid aquatic creature. I used a submarine-like design but with 4 limbs and ahead. The final design ended up looking like a video game boss or maybe a giant vehicle.

Process: The base slice is designed to be the torso shape, after which I sliced one of the ribs. I duplicated that rib piece a few times to get the ribcage area right. For the head I created another piece that was sort of shaped like a guitar pick. I duplicated it twice and rotated them on an axis to create the spiral head area. The big fin in the back is another slice, and the arms and legs were created with two pieces and then mirrored over.
Materials: I chose an electric blue color because it has an aquatic design to it and I felt that it matched. It has a tinge of green to it as well so if I were to print it I would search for a teelish plastic.

Imran Shakoor: Render in Passes

Concept: For this concept I wanted to make a fashionable version my RCG glove. I was going for something classy, but I wanted it to have a design on it as well. Lately the artist Keith Harring has inspired me a lot, and his works have a lot patterns so I decided to go with a version of the glove that included his touch.

Process: The process included messing with the levels of each pass because I knew I wanted the zipper to be dark relative to the rest of the glove. Ultimately, I was able to end up with a mostly white and black image, which was good enough for me to overlay the Keith Harring art and get both it and the glove to show nicely. At this point, I had to erase the part of the Keith Harring that showed over the parts that was not the cloth. Lastly, I made a few image adjustments to increase the brightness and changed to background color.

Materials:
I left the materials the same as what I had originally because I thought those were the best to use. All I did was change the color of some of them before I played with the passes.

Imran Shakoor: Reusable Covid Glove (Prosthetic)

Concept: My concept was that I wanted to create a glove that was reuasable but also fashionable. Because pandemics last a long while, constantly using disposable gloves and throwing them away is terrible for the environment. In addition, the effects of the COVID-19 pandemic will probably still be on people's minds when it passes over, and some may still want to wear gloves when they go out in public. That is why I created the CRG. I had some challenges figuring out for a way to be able to re-use it without it getting dirty after putting it back on the second and third time, but eventually I was able to figure it out. I did not get the chance to model the second phase of the CRG because that would take a much longer time and will probably be my summer project. However, in the drawings below I have given the overview of how it works.

Drawings:


Massing Model:
Process: I started by projecting lines onto the arm/wrist area, patching them, and offsetting the surface to create the initial band which is skin tight. I then created a ring that rests on the hand and lofted the shape that you see going from the wrist to the ring. for the zipper, I used a linear array and the flowed along srf to put it on the lofted shape. I created the ring holders with spheres, and boolean differenced various shapes to get the shape I wanted. For the button on the ring,  I interpolated points on the surface, patched them, and offsetSrf them. The chain part in the wrist band was just using rail1 with a circle cross section on curve I interpolated.

Materials: For the materials I used plastics, metals, rubbers and Nylon for the cloth area. The zipper and the chain were made with aluminum as they are metal pieces. The middle area is made of weaved nylon (so it is washable and light), and the magnetic bumps are made of rubber (assuming the magnets are covered) as well as the wrist band itself. The ring, and the button are just made of normal plastic.

Monday, May 4, 2020

Trieu Luu: 3D Print

Concept: For the 3D print assignment I wanted to create a model based on Sauron's fortress from the Lord of the Rings movies. The final model is a combination of the fortress itself and the tower which holds the Eye of Sauron. While not making an exact copy of the tower itself, the goal was to capture the intimidating and sinister feel of it.


Process: Starting in top mod I had an upside-down triangular pyramid, then extruded the faces of it. The three extruded faces on the bottom acted like a tripod keeping the main tower portion from falling over. After using several extrusions to get the general shape of the tower I used several of the remeshing options to change the face layouts of the whole model. I then selected a few of the faces on the side and bottom of the tower to extrude out to create a rocky appearance/texture. Finally the model was brought into Rhino to cleanup some of the edges and faces that would cause problems during fabrication.


Material: The renders of the model used a white plastic material similar to what the actual printed model would look like. Conceptually this tower would be much bigger and made from a rough dark material such as wrought iron or stone.


Trieu Luu: Final Tetris Toybox

Concept: The concept for my box is a toy box to hold toys for little kids such as Lego pieces, building blocks, or other small toys. I got the idea from watching my baby niece and nephew playing with their toys, often they play with the box as much as they play with the toys inside. The sides of the box uses a Tetris blocks design so blocks can fit through them, while the bottom is kept solid to prevent items from falling out.


Process: This project was modeled and rendered in Maya due to my Rhino trial expiring. The box is a simple rectangular box with an open top. I created the seven different Tetris block shapes by scaling and extruding a simple cube. After laying out the blocks in a desired pattern I used a boolean difference to cut the Tetris block shapes out of the sides of the box.


Material: The box would either be made up of a hard plastic material, or a painted wood material. Since the cuts in the sides are big it might affect the structural integrity of the box it should be made from a stronger material. However a metal box may not be the safest thing for children who might throw or hit the box.

Delaney Conroy Box Model

Concept: I wanted to create a box that could be used in multiple ways for camping. The holes in the sides represent constellations, the Big Dipper and Little Dipper on the lid, Orion, Cassiopeia, Canus Major, and Aquarius surrounding. The uses would be to hold supplies, or be placed over a lantern to project constellations in a pentagonal tent.
Techniques: I used a mixture of circles in different sizes to create the constellations.
Materials: Wood seemed like the best material for this piece so that it could be used in everyday life as well as camping.