
Original Creature
Concept:
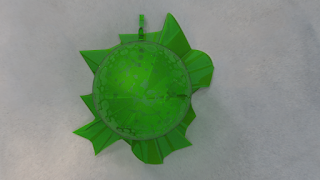
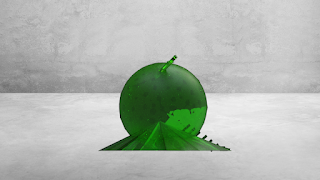
The concept for my original creature was to create a slime blob-like creature. It was inspired by such creatures as seen in many popular fictional media, such as D&D and Slime Rancher. I really enjoyed the concept of this slime creature having bits of weapons and bones inside it forming features for it, so I went with those as well. I ultimately wanted to make it both scary/creepy and cute.


Techniques:
To create my creature in Rhino I used multiple basic tools to keep things simple. For the main body, I create a sphere. The objects inside the creature were made using the polyline tool to draw images, then extract the created object (i.e. the skull, spine, and sword). The bottom part of the creature was made by using curves then lofting them in order to make them 3D.


Finally, I put the finished low poly model into KeyShot. I made the sculpture green, as I felt that fit the best for aesthetics and made it into a see-through material for the same reasons.


Group Creature
We ended up going with Seok's design for our group project, as we really loved his design even from the beginning. We eventually called the creature "Good Boy", a play on it being dog-like. We chose Seok's as it had several aesthetically pleasing design elements. It was elegant, mysterious, and sleek.
We divided the responsibilities of the project between the three of us. Seok would be in charge of the digital side of things; creating the 3D model and the Pepakura design sheet. Andrew would be in charge of most of the post-production end; painting and adding any additional material at the end. I would be in charge of the laser cutting and sharing assembly responsibility with Andrew.
For my end of the group project, I worked a lot on the physical creation of the creature as well as the post-production. I used the file given to me by Seok and checked it over before sending it to the laser cutter at MakerSpace.Lab in Richardson. I was given the pieces of cardboard by Seok and Andrew and switched them out for each piece to be cut. I had to chop up the file for the laser cutter to submit each piece individually. The other edits I made before actually cutting them with the laser was to remove the numberings to cut down on time taken to cut the cardboard and color coordinate the segments to ensure they cut correctly (i.e. outer cuts were different from inner cuts and etchings). After everything was cut, I looked back at the original file to correctly label and number each piece that would need to be attached together in order to ensure they would be built correctly. After this, Andrew and I worked together to put the pieces together to create our creature. We folded each piece the way it was labelled according to Pepakura then used loctite to superglue each piece together. Sometimes we had to use additional materials such as a hot glue gun and extra scrap cardboard in order to better glue the material and hide holes in the sculpture respectively. To attach the creature's body to its base we used gorilla glue to ensure it would attach correctly and strongly. One issue we ran into was that for the dashed and dashed-dotted lines the laser cutter did not cut through the cardboard sufficiently, thus it was more difficult to fold. The solution was that me and Andrew used a box cutter in order to re-create the lines where it would fold, thus making it easier to fold correctly. Otherwise the laser cutter worked very well and was very low-cost to use!


No comments:
Post a Comment