
Concept
My first idea was to make a Sarlacc from Star Wars. However,
one stipulation of the project was to not use copy written material. I thought
of ways to make a creature similar to a Starlacc. The horns and teeth or tentacles
from a Sarlacc were the main inspirations of my original design. One of the
more defining features of a Starlacc is that it lives buried in the ground.
When attempting to design the creature mostly buried in the ground, I decided
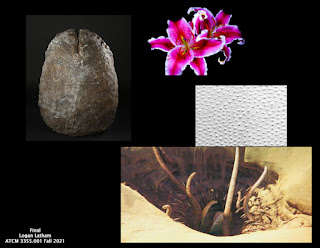
to place it in some sort of container. Then I incorporated an egg and used a
xenomorph egg from the Alien franchise as the reference. A xenomorph egg has
petals when opened, but I wanted my design to be wavier, gnarled, and
exaggerated. While it was difficult to
find an image that I envisioned, I was thinking of wrinkled petals that were
naturally wavy or had become so due to age. The petals were of an exotic or
wilting flower.


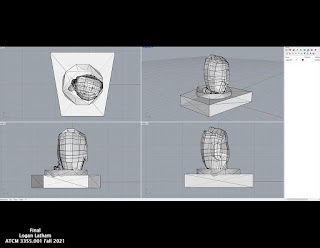
I made a sphere and manipulated the vertices on it to make a
more oblong egg shape and scaled flat the bottom so it would rest flat. I cut
three lines from the top and used the vertices to peel them back to create the
opening petals. I put detail in one tip of one of the petals and then duplicated it
and used merged and combine to attach the detailed tip to each of the other
petals. Each one would then have a more detailed tip. I pulled and pushed
vertices and edges until each one had a unique wave and tip and then used
extrude to fill in the hole that was a flat surface. Then made a cone and
extruded the bottom of the cone multiple times to create a tentacle. I copied
them and gave each a unique pose. Lastly, I added a plane and used soft select
to give it a more wet, dripping feeling as if it was oozing off the side of an
egg.
The final design was based on a half penguin half whale
concept and entitled “I now realize why Steve Buscemi was terrified of his
abominations in Spy Kids 2”. The majority of the group agreed it was the design
they wanted to pursue. This design was the least intricate of the options. We
decided it would be more interesting with the inclusion of a nest as a base
with eggs to go along with it.
We all worked in Pepakura software. We worked as a team on
the laser cutting; however, Aidan did most of the cutting work. We all did some
construction; however, Sheena, did the majority. We all did some post
processing; however, I (Logan) did the majority.
During construction, it was discovered an eye had been
misplaced, messed up, or somehow had never been cut. To work around, I
suggested we give it an eyepatch which was ultimately used. The original design
did not have a large footprint and was top heavy. It was suggested that we
anchor it with a nest and include eggs. I used some paper mache in areas where
seams were more noticeable. I originally
tried to spray paint it white, but the cardboard was absorbing the paint and
making it splotchy. Then I used a paint brush to coat it with primer before
painting additional coats. For the eggs, I tried tape to cover some of the
seams, but it took several layers of wall texture and paint to make it smoother.
The second egg, I used spackle which made the job easier. For the nest, first I
spray painted it white and then covered the ground plane in model glue and
dirt. Then I covered the whole nest in wall texture and then I added sticks in
the middle. I covered with more texture and then placed some yellow-tan
flocking in the middle. I used gap and crack foam filler around the edge of the
nest with plaster and spackle to help smooth out the transition. I covered the
foam, plaster, and spackle, with model glue and covered with artificial snow
and glitter.


No comments:
Post a Comment