Showing posts with label AAbdulkadir F2021 elds205. Show all posts

Sunday, November 28, 2021

Ammer Abdulkadir week#12 Pepekura final project


Concept: The concept of the  design is the following; a deer  head like creature with slender  body of a squid. This creature has no  legs  and the tails are also prehensile like trunk of an elephant. 


Process: 

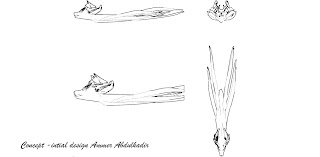
The head of my creature was created on a mobile 3d modeling program called nomad after which I used a program called blender to add or modify the detail of the head. The next step was to create a body for the creature. The neck was created in the rhino program using cylinder command. The second command that was implemented was the bend command. The command that was used was called stretch. 
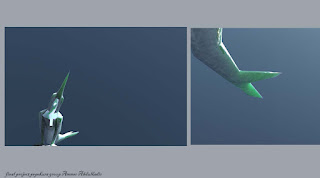
The body was made using a combination of a ellipse, stretch, and scale. The tentacles were made using the tube command and the bend command. The mirror command was used to mirror the arms to the other half.


Materials: 
 In the keyshot the material that was chose was material   human skin with  the 
 light blue shade  as a surface and a yellow hue with a texture all applied in all category.


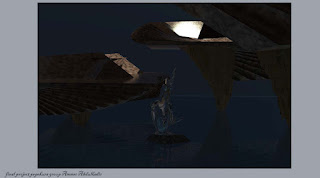
The title of the sculpture is called the Merman of the trinity river. The merman was made by Paris and was chosen because of easily identifiable theme(aquatic), natural posture of the merman, as well as the overall look of the design choices that could be applied to the materials.

.

For the final project, I was responsible for prepping the Pepakura file and getting ready for  the rhino laser formatting. Paris was the person responsible for the model as well as construction in the post production. Xochitl was responsible for laser cutting the piece from the inkscape svg files that she worked on and for the assembly of the model with Paris.  All member of the group  participated in the removal, folding, and for double checking the pieces.


During the process I encountered some issues with the model which resulted in the production of a sum of small pieces. I also tried to cut the pieces in a way that would yield a larger piece. My other attempt included the conversion of  the obj to stl format to use a website called 3dless to reduces polygon faces/detail. The end result would cause the loss of detail to an unacceptable level. With the help of Paris, the model could be reduced to allow for better cuts in the Pepekura program.  The final product piece count was reduced from 170-180 pieces to just   61 parts.  


Sunday, October 24, 2021

Ammer Abdulkadir : Week 6 waffle construction


  • CONCEPT:

  •  The inspiration for project 3 design was a sci-fi rocket engine.  The concept of the design is a opened conned shape chamber engine with a narrow exhaust. The vessel object will act as the core and the reason for the blue exhaust. The rocket engine will include a blub that’s cast light in an upward position.  The vessel object is shown by the following image:


· TECHNIQUES:

·          In order to make my design I used a few tools and the scripts provided. The first step in the solid design process was to use the truncate pyramid command to create the top shape with a desirable height and scale. The next step was to create the inner section, and this was accomplished by using the cylinder command as well as the taper command. The third step was to use the mirror command to copy this shape. In the fourth step,  a boolean2object command  to find/ join the two objects into one. This step was repeated with first object and the newly formed object. The shapes of the holes was made by using the command cylinder and the command torus(duplicated ). The final steps required a combination of the following commands: explode, split/Boolean2object, join..


Materials :  The model using a wood texture as the selected material ( an approximation to MDF wood/ fine grain.  For the vessel object I selected the acrylic  glass ( blue color/gem). The base of the lightbulb was a black color metal/plastic. For the lightbulb I used a glass texture with a blue  hue and a spotlight.


due some missing pieces on the y axis , only the top part of the vessel could be made to match  the renderings 

Sunday, October 3, 2021

AmmerAbdulkadir: week4 project 2 serial slice sculpture


  • CONCEPT:
  •  The inspiration project 2 design was a surveillance camera.  The concept of the design was to create an arm mount for the camera which had an organic shape. The head of camera is able to rotate as the dowel and the hole allows some movement. The shape was also inspired by a tornado as the bottom of the camera mount is smaller than the top part. The serial slice will be in a  horizontal  direction.
  • TECHNIQUES:
  • The sculpture was made in rhino by breaking down the main shapes into smaller pieces in construction   and what appeared to be the basic shape.  Using the truncated pyramid, under the solid tool section a few objects were created. Using the twist command, the neck/ arm of the camera was formed. The rotate command along with the twist was also used to form the lower part of the arm. The scale command was used to a transform it to the desired shape. The head was made by creating a large truanted pyramid and adjusting the end to reach the final shape. The base was made using the rectangle command in combination with the line command, delsubcurv command and the mirror command to create the base’s larger shape. The smaller shape was made by using the scale command, The cylinder weight on the base also required the use of the mirror command. To create an even placement.  The cable was made by using the cylinder command and the bend command to create its shape. Throughout this process the Boolean2objects command was implement when needed.


  • MATERIALS: In Keyshot the cloth weave material was applied and the color was matched by looking up the hex number for carboard. The wood was replicated by using the fine grain and altering the brightness of the wood to make it look like a different wood, the metal weights was colored by selecting the polished aluminum. The lens was made by selecting the green glass. The environment selected to showcase the design was a parking lot and how it would be placed. The lighting was set to product and the denoise setting was enabled.   In the post process the lactite glue was used to bind the layer after the dowel was glue to the cube. The cube was also attached to the larger base. Due the weigh of the camera head I placed some metal cylinder on the base to make it heavier. The mic head’s cap was made by using a garden to tool to bend and cut to it shape.  The cable wire and eye( lens) were attached using the glue.  No color change was needed in the base as it was a good contrast to the cardboard’s dark color.

  •    


Saturday, September 18, 2021

AmmerAbdulkadir :week 3 castle


  • CONCEPTThe inspiration for the castle was based of castle shown below. The roof was the only reference used for the castle as I wanted to make something based off my imagination. The castle is asymmetrical design which features several watchtowers as well as a body of water at its base. The castle’s crown features an abstract shape with an open/glass roof top.


  • TECHNIQUES:
  • The castle was made by adding basics solids (rectangles and cylinders). These solid shapes were exploded and extrude to create the main blocks. This process was repeated until the necessary layers were formed as well as the overall design. The cones roofs were the next step, and it was created by copying it  using the mirror command in conjunction with the rotate command to move the watch tower to its proper location. The crown of the castle was made by taking a truncate pyramid and playing with the twist command to achieve the desired shape. The base was extruded to create a border/depth for the water. The window was made by using a combination of split, explode, curve (for window shape), and arrays. The last step was to label and organize the surfaces into their appropriate layers.


  • MATERIALS: The materials that were selected in keyshot was white ceramic (defuse type), liquid sea, and herringbone wood. The main structure of castle also has a shader applied as well as a bump texture called crackle. The roof’s material was the herringbone wood. The liquid was altered with a color modification. The environment chosen was the sky and sun and its default settings.