Showing posts with label Sowmya. Show all posts

Sunday, December 14, 2014

Sowmya Rajendran & Maryam Khoddami: Project 8: Pepkura Chess Piece

___________________________________________________________
Week 15:

For the Pepkura chess piece project, Maryam and I decided to work on a design for the queen. We did  a little brainstorming and decided we would build either a dragon or phoenix. We finally went with a phoenix, since it's mythological origins and symbolic significance, especially in East Asian culture, are closely related to that of the queen piece. In Chinese mythology, the phoenix is commonly referred to as "Fenghuang". The Empress could only adorn the symbol as it symbolized grace, high virtue and most importantly power, which the Chinese believed was sent from the heavens to the great Empress.  These three characteristics are commonly associated with the regal queen.

he phoenix represented power sent from the heavens to the Empress. - See more at: http://www.mythicalrealm.com/creatures/phoenix.html#sthash.I1qlQfiA.dpuf
Our final model designed in Maya


___________________________________________________________
Week 16:

We got our pieces cut and began assembling this week. It was a bit tedious at first, especially the areas around the wings; the enormity of the top half of the structure made it difficult to assemble since it constantly kept falling apart even after copious amounts of glue. We finally managed to put it together and it came out great! This was a fun project!


Monday, December 1, 2014

Sowmya Rajendran: Project 7: Geometric Unfolding

___________________________________________________________
Week 14:

For the Geometric Unfolding practice assignment, I decided to make a Cubohemioctahedron. I made the cut sheet in Illustrator and exported the layout into Rhino in order to explode the curves and check for overlapping objects. I was able to fit two templates into the 24 x 48 cardboard sheet.

Cut sheet laid out in Rhino
Cardboard template

Here's the final model all folded up!

Monday, November 17, 2014

Sowmya Rajendran: Project 6: Lamp

___________________________________________________________
Week 11:

For the lamp project, I took my waffle model and edited the basic shape just a bit by elongating the structure and Boolean Unioning some more spheres into the model as well. I wanted to keep some of the characteristics of the lotus flower, but also infuse the layered elements from a beehive structure, similar to the one pictured below.


Source
Final Model


First, I made a bounding box around the model to use as a guide to create the radial waffles. Then, I switched to the top view and used the section command and OSNAP (end, near) to slice the model equally. I then used the contour command to slice the lamp model horizontally to create the other waffles needed for support. Using the planar curve command, I then converted the curves into surfaces.

Model sliced radially and horizontally.

Afterwards, I used the intersection and pipe command to create the ribs.  I used the unroll script to create the layout for laser cutting. After properly laying out the section pieces, I had to create the hole for the snap-in lamp socket cord. I used the circle curve tool to create a 1'' hole on the bottom most section piece. Then I created some rectangles and duplicated those around the curve using the array polar command. Another curve was added around the 1'' hole and then the curve boolean tool was used to eliminate the extra pieces. This in turn yielded a hole where a light bulb could be easily fitted within.  


___________________________________________________________
Week 12:

I had to prepare my model with a light bulb and a wire for rendering. I downloaded a free light bulb model from Archive3D and created the wire extension by using the Control Point Curve tool  and the Pipe tool.

Layers all set up and ready for rendering!

I used a Clear Rough Plastic material with a pinkish tint for the outer shell, a Rubber material for the wire, a Warm Area Light (Lumen setting) for the bulb, and an Anodized Metal material for the screw cap.


Here is a rendering of the lamp conceptualized in an interior space.

___________________________________________________________
Week 13:
Finally got my parts cut out this week! I had to take some of the pieces out so that I could put in the light bulb. It's much more functional now! The lamp can function as either a hanging lamp or table lamp.


Sunday, November 2, 2014

Sowmya Rajendran: Project 5: Waffle Structures

___________________________________________________________
Week 10:


For this project, I was planning to use my form model, but then I decided to create something new. In Rhino, I began to experiment with different primitive solids and the Boolean union command to create some interesting shapes. I was aiming to create a flower shape, similar to a lotus flower. I wanted the design to be functional as well, possibly translating into a table or chair piece (plexiglass or some sort of transparent material would be used for the top/seat , so that the overall form can still be visible from afar).

Design Inspiration: Lotus Flower

I started with a basic sphere and used the ArrayPolar command to create smaller spheres around the base and Boolean Unioned those out. I also used a couple of tori around the bottom and used the Boolean Difference command to carve out the rings. I made several different iterations and finally decided to use the model below.

Final Model

I would say translating the model into a waffle structure and creating the layout was the most tedious process. It took me a couple of tries to get it perfect. Like others, I kept receiving an error message when I tried executing the cut my ribs plug-in, but the issue was remedied by simply downloading & reloading the plug-in again. 

The model was flipped.


After cutting the ribs and unrolling the individual pieces, I began grouping the text layer with the outercut layer. I also had to use the extend and CurveBoolean tool to trim off the "un-ribbed" areas. Most of my time was spent creating the layout and making sure everything was properly labelled.

Finished! Time to celebrate with some actual waffles.


I will be adding more renders soon that better conceptualize how this piece would look in an interior environment, specifically as a furniture piece. The material I will be using is plywood with a thickness of 0.178 inches. Hopefully, it can be laser cut this week!

___________________________________________________________
Week 11:

Before I started the rendering process, I had to create a table top for my waffle table piece. In Rhino, I create a circle curve, converted it into a surface, and extruded it straight down. I then began experimenting in Keyshot with different environments, trying to find a background that would work well with the design I had in mind. I finally found a Public Domain image that I thought fit well with my table piece. I imported the image into Keyshot and started playing around with the lighting and the materials on the model itself. Finally, I decided to use a dark wood material for the lotus structure and a simple glass material for the table top. I also wanted to get an idea of how the structure would look with a metal material; therefore, I made a few more renders in which the copper material was utilized.


This week, I finally received my cut waffle sections! I had a little trouble putting together the structure since the ribs were a little too tight and I had forgotten to extend and trim two ribs, but the lab tech helped me out by sanding down those areas (Thanks Ron!). 


___________________________________________________________

Sunday, October 26, 2014

Sowmya Rajendran: Project 4: Slots

___________________________________________________________
Week 8:

 
For design inspiration, specifically when building the main shape of the root module, I looked at  some beautifully ornamented organisms called Diatoms. These tiny things come in all different shapes and sizes. 

Diatoms are classified as either radially or bilaterally symmetrical .
The last variation is separated into three smaller parts.

For the most part, I tried to match the basic shape of the diatom at the bottom right hand side of the image.  I created a basic pentagon shape using the Polygon tool and then created the middle section using the Polyline tool.

For the engraving, I also looked at Mandala designs from Buddhist and Hindu temples for inspiration. I noticed that most of these geometric forms utilized some sort of concentric circular pattern or a layout with a single square and four circles surrounding each edge.


Mandala designs are often symmetrical in nature and symbolize harmony and unity of the universe.
Here's the final layout!


I especially like how the floral pattern turned out with the pentagon modules. I'm  excited to see how the slots will turn out! And lastly for the material, I will be using sheathing plywood, which has a thickness of 5 mm.

___________________________________________________________
Week 9:

Due to the large amount of time it was taking the laser cutter to process the slot files, the layout had to be reformatted. Here's the reformatted layout downsized to 24'' x 24'' with the engravings layer removed.

Ready to be laser cut!
___________________________________________________________
Week 10:

Finally received my laser cut slots this week! I will be assembling my structure in the coming weeks!

___________________________________________________________
Week 11:

I began experimenting with my slot pieces, trying to figure out what to build with these things. My goal was to use as many of the pieces as possible and also try to make a large,round structure in the shape of a wreath (if it was possible with the pieces I had).


Chiori Ito's paper wreaths


This is how my final wreath design turned out!

Sunday, October 5, 2014

Sowmya Rajendran: Project 3: Serial Form

___________________________________________________________
Week 6:

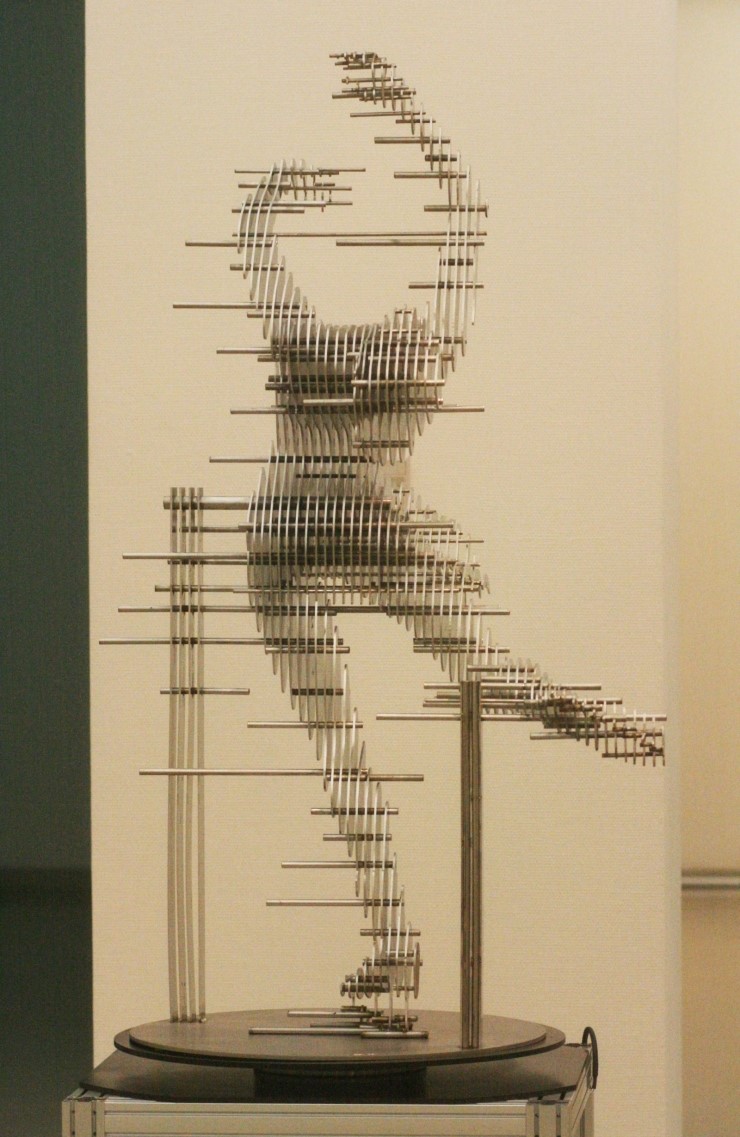
For the laser cutting project, I decided to use my form model I printed out a few weeks ago. I found a Korean sculptor by the name of Park Chan Girl who makes some beautiful figure sculptures using this same method. I love how some areas of the figure disappear when viewed from different perspectives. 


http://elpoderdelasideas.com/wp-content/uploads/parkchan13.jpghttp://media-cache-ak0.pinimg.com/236x/46/78/2b/46782b7087574795cc790e3d4bbb2f58.jpghttp://i245.photobucket.com/albums/gg62/witchyhoy3/000ABC/B7B9C0CCB9E9.jpg
Sculptures by Park Chan Girl

First, I went into Maya and made my figure a solid, imported the model back into Rhino and began setting up the layout for laser cutting. 

Ghosted View of Model

Cut sheets laid out & labelled using horizontal contours
Horizontally Sliced Model
Vertically Sliced Model

I used a grey plastic material, in order for the contours to be easily seen. If this piece were to be translated into a larger sculpture, I would prefer it to be made using metal, so that the piece better interacts with the environment it is placed in.

Monday, September 22, 2014

Sowmya Rajendran: Project 2: Flashlight Sleeve

___________________________________________________________
Week 4:

So last week I followed some of the Rhino tutorials a couple of times in order to get used to the commands and program. It was a bit difficult at first, but I think I'm getting a hang of it. I also started on the flashlight sleeve, but I just have the basic shape down for now. I was a little stuck on what kind of design I wanted, but I finally settled on making a robot character for my flashlight sleeve. I made the base cylinder with the correct dimensions on Rhino first and then imported the template & model into Maya. 

For this week, I'm going to continue working on the main components of the sleeve on Maya and then export the model back into Rhino to add finer details (since there are so many cool commands on Rhino to add details fairly easily and quickly).


___________________________________________________________
Week 5:

Decided to go on a different route this week...Since the last project focused heavily on asymmetry, I thought I'd switch it up a little. I was inspired by the different patterns on the wings of butterflies; their symmetrical nature reminded me so much of the Rorschach inkblot tests. I thought I could fuse both ideas & replicate an inkblot design with a Monarch butterfly pattern for the flashlight sleeve
http://tjmoss.files.wordpress.com/2011/05/rorschach_blot_05-copy.jpg
One of the original Rorschach inkblot tests
http://www.gpnc.org/images/jpegs/animals/monarchf.jpg
Monarch Butterfly

Last week, I thought I would use Maya to model out my flashlight sleeve, but I decided to stick with Rhino, since it had more useful tools for what I wanted to achieve. First, I made the butterfly pattern in Illustrator and imported the paths into Rhino, extruded, and used a handy command called FlowAlongSrf to wrap the design around the flashlight base. I also made some cylinders and placed them around the sleeve to create a symmetrical design and then booleaned those out as well. 

Final design (Ghosted View)
No Naked Edges found. Woot!
___________________________________________________________
Week 6:
Preparing my file for rendering...

Here are the final KeyShot renders! I used a plastic material with a complementary color palette (orange/blue). Orange was used for the interior so that the little hole details could be easily seen. Pretty excited to see how it will print out!


___________________________________________________________
Week 7:

Here is the final model, printed at the tech store! Really like how  the details came out.


___________________________________________________________