Sunday, November 28, 2021

Sheena Meany Week 12 Final Project: Pepakura

Original 3D Model: Pengwhale (Penguin and whale hybrid creature)

Concept


For this project, I knew I wanted to do a hybrid animal since it is much easier to create something with some basis in reality. I was inspired by the photoshopped image of an orca and a penguin which is what became the base for my project. 

Techniques


For my model, I used Maya 2019 to create it due to it being an organic creature. I started my model with a Polygon Cube, extruding it out then using the Smooth command to create the rough shape of the creature. I then used the Extrude command to create the wings and eye shape. For the mouth, I used the Boolean Difference command to cut a hole in the mouth. I only worked on one half of the creature in order to save time, and after finishing one half, used the Symmetry command to mirror it to the other half. After completing the model, I used the Reduce command to "reduce" the polycount level to make it easier for the Pepakura program to run. 

Materials


In order to create the base colors for the texture of the creature, I UV mapped it accordingly so I could texture the creature accordingly to the colors I wanted. I then assigned the creature a plastic texture, in order to emulate the cardboard used in the final Pepakura project. I chose a winter background as both animals live in cold environments, so it would be the most fitting for the creature. 

Final Pepakura Group Project: Pengwhale

    My design was chosen for the final project due to its simplicity and most structurally sound. It is titled "I now realize why Steve Buscemi was terrified of his abominations in Spy Kids 2". Since other designs would not have been able to stand on their own without additional support, mine was chosen on that aspect. Since it was a crossover between a whale and a penguin, there were many other routes of inspiration we could add to the design to elevate it. Ultimately, we decided to give it a nest of sorts with sticks and eggs, and other things you would normally find in a bird's nest. Another is that the design of the creature is inviting to an audience, with an open mouth and round body, giving it an opportunity to attract others to itself. 

    Responsibilities were divided upon ourselves equally, depending on time constraints and our own individual strengths. Logan was primarily in charge of the entire post-production process but helped in other aspects as well during building. He also designed and modeled the nest shape, and prepared it for laser cutting. Aidan assisted in preparing files for laser cutting, as we had several pages to cut for our creature. He also helped organize the project workflow, as well as troubleshooting during the building process of our creature. I assisted in operating the laser cutter and learning how it works, which was something I was not expecting in this class, but more than happy to learn. After all the pieces were printed, I built out a majority of the creature's shape, then we combined efforts to do finishing touches for the general shape until it went to post-production. 

    We endured many difficulties during this project, one being the laser machine on campus being down. Since the laser bed off-campus was a different size, all our pieces had to be cut down piece by piece in order to fit this new laser bed. Another issue was that we had many missing pieces, such as one eye, which went to the post-production department. In doing so, the penguin had a new unique design to it as a "pirate", which brought more attention to the eyepatch itself which was unexpected. 


Anthony Lopez: Week 11 Deck Laser Engraving

CONCEPT

I took my original drawing which was the ASL spelling for “LOVE” and I scanned it with my phone using Adobe Scan. Then I inserted it into Adobe Capture which allowed me to alter the original design into a sophisticated pattern. Inspired by patterns revolving around repeating diamonds or stars I sought to create an elegant pattern that was clean and timeless.


TECHNIQUES

I imported the design into Illustrator and used image trace to get a product I could work with in Rhino. However when I imported that file into rhino the curves it gave me were way too close to each other for the main hexagon shapes. This meant that if I tried to laser cut it the curves would have overlapped with each other and it would not have been pretty. So I used the explode command to try and separate the curves of the hexagon so that instead of a curve and a stroke it would be just the curve. Unfortunately this did not work so I decided that I would trace the shapes manually. 

I then began to trace one hexagon and one star with the line command. Then for the ovals surrounding those two I used the curve command to trace the oval shapes. After that I copy/pasted the set of shapes and used the move tool to move them to the location represented in the original design. I used the hatch command to create the raster of the stars.

MATERIALS

The post processing consisted of painting the stars that were the rasters hatched into the deck. Each was painted different colors and I used acrylic paint.


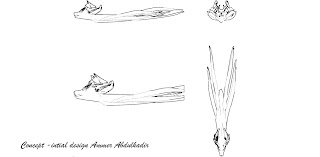
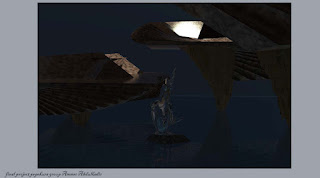
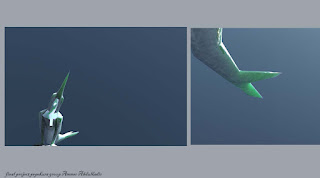
Ammer Abdulkadir week#12 Pepekura final project


Concept: The concept of the  design is the following; a deer  head like creature with slender  body of a squid. This creature has no  legs  and the tails are also prehensile like trunk of an elephant. 


Process: 

The head of my creature was created on a mobile 3d modeling program called nomad after which I used a program called blender to add or modify the detail of the head. The next step was to create a body for the creature. The neck was created in the rhino program using cylinder command. The second command that was implemented was the bend command. The command that was used was called stretch. The body was made using a combination of a ellipse, stretch, and scale. The tentacles were made using the tube command and the bend command. The mirror command was used to mirror the arms to the other half.


Materials: 
 In the keyshot the material that was chose was material   human skin with  the 
 light blue shade  as a surface and a yellow hue with a texture all applied in all category.


The title of the sculpture is called the Merman of the trinity river. The merman was made by Paris and was chosen because of easily identifiable theme(aquatic), natural posture of the merman, as well as the overall look of the design choices that could be applied to the materials.

.

For the final project, I was responsible for prepping the Pepakura file and getting ready for  the rhino laser formatting. Paris was the person responsible for the model as well as construction in the post production. Xochitl was responsible for laser cutting the piece from the inkscape svg files that she worked on and for the assembly of the model with Paris.  All member of the group  participated in the removal, folding, and for double checking the pieces.


During the process I encountered some issues with the model which resulted in the production of a sum of small pieces. I also tried to cut the pieces in a way that would yield a larger piece. My other attempt included the conversion of  the obj to stl format to use a website called 3dless to reduces polygon faces/detail. The end result would cause the loss of detail to an unacceptable level. With the help of Paris, the model could be reduced to allow for better cuts in the Pepekura program.  The final product piece count was reduced from 170-180 pieces to just   61 parts.  


Akhil Mulukutla: Week 10 Skateboard Deck Laser Engraving

Concept:

For this project I decided to take inspiration from the movie Godzilla to create my design. I really like how the Godzilla (2014) movie poster looks so I recreated a version of it in Illustrator in my own style. I also took inspiration from Japanese Ukiyo-e art and the boxed letter technique to add a good bit of flair to the design. I plan to put this on my wall so I made it using a minimalistic style to have it follow my aesthetic.


Techniques:

To begin I used Illustrator to create the initial design. I used Illustrator mainly because I'm a lot more comfortable using the pen tool along with my drawing tablet to create designs. I then saved my design as a PNG with a transparent background. Once I had my design in place, I had to create the skateboard. I used Rhino and created my skateboard mainly using the cube and cylinder tools. Overall, I only used Boolean difference about twice as the shapes I needed were already available.


Material:


Finally, I took my model into Keyshot to render out the materials. For the Deck I used a light brown wood texture and use d a dark silver aluminum for the trucks. Just to be wild, I used a transparent red plastic texture to the wheels. For the engraving itself I used the PNG file and slapped it on the bottom of the deck as a label. I used a dark paint texture for the label to give it a slight sheen. My deck didn't really need any post processing besides a little sanding.


Kristy Yin: Week 12 Final Project - Skateboard Deck Laser Engraving


Concept: 

    From the start, I knew I wanted to gift the skateboard to my brother. To make it more personalized for him I decided to use his Chinese name and to match the Chinese characters that I decided to go with something reminiscent of traditional east Asian paintings. I was inspired by the aesthetic of the black ink paintings with the red sun in the back that gives it a pop of color. I wanted also wanted to include bamboo and some traditional architecture like the Chinese pagoda and bridge. 


Techniques: 
    
    I started off by bringing in my design sketch as a reference picture with 'PictureFrame'. Then for basically all of the design I just simply traced over my reference picture with curved polylines. For the Chinese calligraphy, I imported it from illustrator which made life a lot easier. When creating the board I used 'ExtrudeCrv' on the curves created for the outline and then used 'Bend' to get the curves on the board. For the fill engravings such as the sun and bamboo designs, I made them a 'Hatch' for the laser file and later used 'DupBorder' to get the curves around the hatches as needed. Then once again used 'ExtrudeCrv' on the fill engraving to extrude them as a closed planar curve. Continued on to 'BooleanDifference' the extrusions to create an indent for the fill engravings. To assign materials in Keyshot, I made sure the create a surface with 'PlanarSrf' to sit on top of the indented parts of the design. For the lines to show up in Keyshot I made them into pipes with the 'Pipe' command. The trucks and wheels were made of various solid shapes that were joined together with 'BooleanUnion', the shape for the bottom of the tuck was made with 'FilletSrf'. Due to the use of way too many curves I made sure that there were no duplicates using 'SelDup'. Various other commands such as 'Move', 'Copy', 'Mirror', 'Join', 'Explode' were also used here and there to create the model. 


Materials: 

    The board material assignment in Keyshot was simply oak wood. The fill engravings were assigned red paint. The truck was stainless steel and the wheels were rubber with white coloring. I assigned the line engravings with two different darker wood colors, so it would actually look like darkened engravings based on the intensity/power level of the laser. Then for the environment, I found a nice-looking room and places the skateboard against the wall like I would in my own room. For the lighting, I used interior mode with self shadows and ground shadows to give it depth. In post-processing, I simply cleared off the soot from the burns and smoothed out the larger fill engraving areas with sandpaper, then cleaned it with denatured alcohol before painting it red.