Showing posts with label #castle. Show all posts

Monday, September 12, 2022

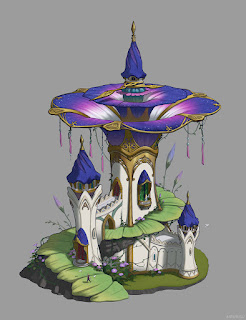
Taylor Champ: Week 1-4 Castle

 Inspiration:

I decided to take inspiration in a piece of concept art for my castle design. The concept is by the artist MEMESU on Artstation, and it can be found here. While I did not end up sticking closely to my source material, the reference had a large impact on the final shape of my castle, which I've affectionately named "Flower Castle."

"Elf House" by MEMESU on Artstation

Process:

Through the process of creating this piece in Rhino, I got to know the software and explored it in more than primitive shapes to get a sense of the capabilities and how to go about creating complex shapes. As a result, I learned a lot about creating surfaces from curves, and the process of creating complex curves, however I still feel as though I've only scratched the surface of Rhino's tools.


Materials:

For my rendering, I felt more equipped to render in a program such as Blender's Cycles, or Maya's Arnold, so I worked with Cycles and created basic materials for my pieces which were largely plastic, gold, and gemstone inspired. In future projects, I may stick with this method, but implement Substance or Quixel for more complex materials, as I liked the image based lighting available in Blender.



Sunday, February 2, 2020

Rochelle Offret: Week 1 Castle

Concept

I thought about what a castle could be, and I knew in my head there were the basic castles that we're all used to seeing in history books, childhood fairy-tales, and movies.  I didn't really want to create something like that yet I wanted to create something that I would have enjoyed as a child and would be aesthetically pleasing to my enjoyment of what I consider to be classic architecture.  So I decided to go with a space castle, that followed along the lines of a stacked coliseum, and made sure to add some of my favorite superhero's tags along the way.  


Techniques
I began by creating the base of the castle using  a tube and then mirrored it.  Then using several custom curves that I combined together I made the base floor with a Superman emblem in the center.  I realized that I would need something to keep the inhabitants of this space castle from falling through the holes of the emblem so I used several cylinders throughout the extruded curves to create a mesh for the floor, then I trimmed them so that they were only filling in the gaps.  I then worked on the pillars and railings to ensure that the lower levels were fortified.  For the top half of the castle I followed the same techniques, on a smaller scale to give it the effect I was looking for.  I also created shields for the barred walls on the upper levels from extruding custom curves, combining them, extruding them, and then used the bend tool to make them conform to the shape of the castle a little bit better.  


Materials

For the walls and columns I used a Titanium texture combined with a blue metallic paint texture.  For the floors I used a waved glass.  On the jets I used a basic anodized metal. I used these materials because I felt like they helped give it a look of majestic and impenetrable fortress. 


Ivy Skross: Project 1 Castle

Concept:

I used gothic German cathedral designs to inspire my castle. They use a lot of towers and spires in their architecture and I wanted to capture that in a more exaggerated way. I wanted my castle to look spikey and a little imposing while also having an elegant silhouette. The overhead view of my castle resembles a cross which was customary of cathedrals built in the gothic style. The dome is a more contemporary idea but still holds a place in the design. 

Perspective View

Techniques:


Blacked Out View

One of the modeling techniques I used was a command called BooleanDifference. This process creates holes in the model that serve as windows and doors. I used it to create the long windows on the side which add to the profile. I also used it to add two doors. I mostly used curves to make the shapes in my model To make the spires, I took truncated cones and pyramids and stacked smaller, cones or pyramids on top to create a layered look. I used control point curves to create the land mass and water that my structure sits on top of.


Ghosted View

Materials:


I wanted the materials of my castle to resemble a model of a castle that could exist in the real world. So the materials needed to hammer in the idea that it is a small scale recreation of something. I used a wood texture on the buildings and towers that looked a little bit like fake bricks giving it a toy-like appearance. For the land, I used a black brushed metal. I really liked the texture of it next to the blue glass that I used for the water. It makes a convincing model base. For the walls, I used a more subtle wood plank texture overtop a slightly different shade of grey than the buildings. It creates a little bit of a contrast between the two layers. The spires serve as my design's color pop. I used a metallic red material that looks great with the way the light hits it. These spires are the focal points of my design so I wanted them to pop.

Side Profile View


Tuesday, January 28, 2020

Nikki Chauhan: Project 1 Castle


Concept: My castle model is based on a natural ice "sculptures" and structures formed by ice in cold caverns as well as a bit of a futuristic look with the round about halls and translucent statement piece at the top of the building. 


Materials: I chose a gem like material for the decorative balls on the outside of the window rooms and the display piece on top, a hard cloudy plastic look for the red hallways, a metallic paint for the towers and a metallic paint for the second floor. I wanted the red hallways to look shiny and reflective from the outside but if you were inside it would be like a one way window.

Process: I wanted this to have a mountain like look so I started with 4 equally spaced octagons and extruded them to a point. After I did that, I used the movement mechanics and spread the pairs of the "icicles" on the x axis. I then created another set of octagons on each icicle and raised them about halfway up and extruded them straight. I then created the central torus and duplicated that higher up and scaled it down to be proportionate to the tip. I then created the bottom two floors of the building with a small rectangular prism for the door and then another octagon for the top decoration. I then used the sphere and the polar array to create the decoration on one of the windows and copied and pasted and mirrored them for the remaining windows.