Sunday, September 12, 2021

John Onomo: Week 3 Castle


Concept
The inspiration behind my model is the Belvedere Palace in Vienna, Austria. I took the main features of the building such as the 4 columns that are at the corners and the basis shape of the castle. The palace has an imposing design that I wanted to replicate in my project.
Techniques
I started with a rectangular box to form the lower base of the building. This was followed with the for columns at the corners. For the columns, I drew the lines on the grid add used extrude to bring them out. using hollow upper columns, I placed spheres to act as the domes for them. After that, I extrude the one of the upper boxes sandwiching the middle building. After one half of the building was done, I started doing the detail work on it. First came the roofs of the palace. I made a rectangle to the stem of the box. I offsetted the line to make the top of the roof and planer curves to closed the empty space. Once done, I did the same for the lower boxes, only offsetting towards the outside to form the overhang. the entrance was traced on the wall and extruded out. The real life palace has statues on the building, to mimic them, I used the triangle shape to make spires.

Materials
First , I was looking for colors the match the ones I used on the layers because it reminded me of Italian villas with the red tile roofs and clay, but something else came to made. I am a fan of Greek architecture and the marbles they used for their building so I decided to put the marbles on the walls of the palace. With the marble, I felt like it look more of church feeling so to move back to the castle/palace feel, I put ruby for the material for the roof. To stand out against the whites and and the reds, I made the spires blue tint glass. 


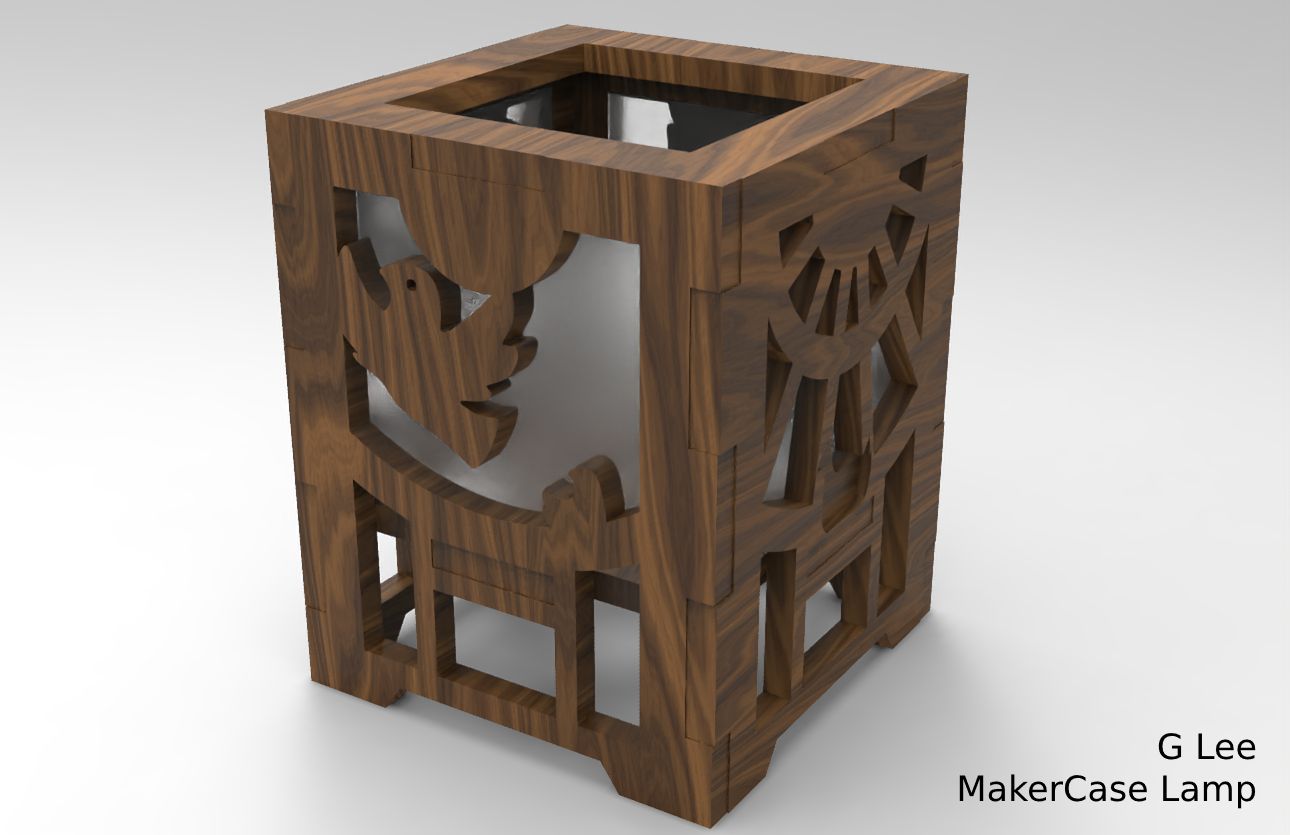
G Lee - Project 1 MakerCase Lamp


Concept:

The stress of college has made me start researching pigeons again. Pigeons are not always very highly regarded animals and tend to be treated rather poorly. Despite that, they've been companions to humans for a very long time and are seen as symbols of peace through doves (which are the same as pigeons). I wanted to try and capture some of that peace and docility for myself in a rather tumultuous time, and looked to stained glass windows for inspiration since religious artists have often turned to these birds as symbols in their art.


Process:

I made a 4"x4"x5" closed box in MakerCase. It's on the short side because the bulbs I saw used for wax warmers were on the smaller side compared to most candelabra base bulbs, and I wanted to make sure the dish would be rather close to the bulb so it could properly warm-up. Then, I created a handful of sketches exploring how best I wanted to try and depict my stained glass feeling and how I would like to simplify the birds for cutting purposes.

The creation of the design itself relied on the polyline, arc, and tools. Offset and O-snap were very useful for this. Curves are extremely limited - essentially to just the hole for the socket, the sun, and the birds - to help add contrast between the hard edges of the "glass" and to these more organic elements. I had to print my box well before I built the actual 3D model itself in Rhino, and this ended up informing my renders: I mimicked what I did to the real item in 3D as well as possible with Keyshot.

Materials:

I used 1/4" 2x2 plywood for the cuts and attached parchment paper inside using glue. The cord is a E12 base socket with an on/off switch. The bulb is just small, incandescent, and has a candelabra base. Some really old Minwax Wood Finish was applied on the wood after sanding.

In KeyShot, I modified some of the base materials to try and match what I had closer. The Walnut texture was darkened and its contrast bumped up to try and represent my stain and a foggy glass texture to represent the parchment paper which helps diffuse the light. 

Cristian Resendiz: Project 1 MakerCase Lamp


Concept: For this project I was having trouble initially coming up with a theme but eventually settled on a Mario Bros theme. I originally had a concept of using various different shaped items on the sides but I wasn't quite liking how it was turning out. Instead I took similar items to use on the sides to make it more uniform and to make it easier to print.


Process: I used the template provided in the instructions as a base and added small additions on as I went. Some small things like the pipe at the bottom and the words on top of each side were easy enough to implement but it was the mushrooms that gave me issues. The shape wasn't quite easy to reproduce in rhino so I created them in Adobe Illustrator. After some trial and error importing them into rhino I was able to get the shape done and applied to each side. One of the things I wasn't able to show in the renders was the engravings. I tried to get them to show but I could not get them to appear on export, perhaps I made a mistake on the layout but regardless it was still an issue.


 Materials: I used Plywood Underlayment 5mm as the main material as recommended. I painted the sides with oil paints to give the appropriate colors for each mushroom. Applied Locate super glue to put it together and put a cord setup with a light bulb inside.

Carly Kight: Project1 Castle

Concept:

When I was brainstorming ideas for my castle, I was inspired by architectural elements from ancient Roman architecture, but also Islamic architecture as well. One of my favorite parts about the Roman architecture side of things is the grooved columns, so I made those into the structural support. I also really like the aesthetic of the pointed dome of the Taj Mahal. However, I also wanted to put a modern twist on these classical concepts, so I added some geometric elements as well.

Modeling techniques:

It was very challenging for me to complete this assignment because I have never had any experience in any 3-D modeling software (or any design software, really) before this semester. I tried my best to learn to use the different tools and commands. For example, I created a 20-sided-star shape and extruded it to make the shape of a column. I also used the ArrayCrv command to make the rest of the columns. The most challenging technique I used for this project was the Loft command, which I used to make the swirls towards the top of the building. It took a great deal of trial-and-error to get the curve solid shaped the way that I wanted it (Control point curves, many ellipses, adjusting seams, and some other shapes).

Materials:

I wanted to combine the classical marble look of ancient Roman/Greek architecture with a more glamorous, modern aesthetic. So, I created many golden accents, and created the curled forms (towards the top) from glass. I wanted the interior wall (behind the columns) to look opening and inviting, so I made it out of a thin, transparent material that resembles the colors of a bubble.


Sheena Meany Project 1: MakerCase Lamp


Concept: 

For my project, I decided to do 4 simple designs of animals, to keep it simple. 


I decided on these four simple designs, with areas for light to shine through for the lamp cutouts themselves

Techniques: Overall, I maintained the simple box shape used for the maker case lamp itself, as I am still inexperienced with the program. I hope with more experience that I can do more complicated models for my projects. Since this was a completely new program for me, it was challenging for me to learn the program while also making sure the design was what I wanted from my original concept and maintain the transition from concept to model. 

Materials: I decided to stay with the rustic wood look for the majority of my lamp, and use acrylic paint for the designs themselves so they can pop out more. In the end, I used a clear varnish to finish off my product. 


Overall, I am satisfied with my final product. I wanted a simple lamp so that it wasn't too overbearing for anyone who was viewing the lamp. I didn't realize how many technical details would go into laser cutting, and I found this project to be a fun learning experience for myself. 

Aleyna Enriquez: Week 1 Castle

 Aleyna Enriquez: Week 1 Castle 

Concept:


I asked my boyfriend if he could have any castle to pick from, fiction or non, what would it be?
He said he would want an Irish castle, I never would have guessed. We normally go for Star Wars or Star Trek, but that got me thinking of a more traditional route. when I think of castle think of a princess style fairy tail. However, this is more on the fantasia style castle.

Techniques:


I started with the landscape, with all my research I noticed that they liked to build on hills and high places near the ocean. The next thing I built was the largest rectangle, also named the Keep. The intention was to make it bigger than the rest of the outer parts. I noticed Irish castles have a lip around the keeps and Towers. I wanted the Keep to sand out so it is the only one with the lip. I used the linear array tool to make the repeated design on the edge. I then made the four towers for a symmetrical look that the achieve in a lot of the architecture reference photos. I used the linear array tool to keep things repetitive. I was not happy keeping it so simple so I added the cylinder tower that is referenced in some photos. I added a door obvious purposes, a castle does need an entrance. if I could add or change things after this I would have added more detail, such as: arrow windows, stairs, bridges, outer curtain walls, and more.


I am really sad that it did not turn out as nicely as I wanted. I went for a wood like material in the keep and entrance. The way it rendered wasn't as I expected, but I am learning with trial and error. I really liked the way my towers turned out, the marble texture gives it more of a modern look. I went for a sand look with the hills, next time I will go for a dirt or grass. Next time I will make sure all the added details are on a sperate layer to make the materials different and not the same. I would have liked to make the door a dark metal. I wasn't going for a traditional look, more like modern with the traditional design. Not going to lie, its not the best. I will stand with what I made, be it good or bad.

Brendan Young: Week 1 Castle

 Concept:

Bodiam Castle

I had chosen this specific castle to model my project off of due to its symmetrical design which I find to be very appealing and because of how it stood more as a fort than to be a castle to show off. This castle unlike many others has no keep, and was built purely as a way to defend against the french during the 100 years war. I also chose this to be my base concept due to how many of the things that people think about in a castle are present in the design. 


Techniques: 


This project required lots of use of O snaps due to the fact it is very symmetrical. I had begun the project first by modeling the corner towers and positioning them. To ensure correct size and allignement I copied and pasted one tower to another and used shift to stay straight when moving. From there The walls and mid towers were added as well in a similar manner. With much of the basic shapes in place I began detailing with heavy use of the booleanDifference tool. Just about every tower top and window was made using this tool. 

Materials:


Finding decent textures and how to apply them and still look good was very challenging. For one after I had found a good texture for the castle, using the render view it looked great. However when in keyshot the textures had melted beyond comprehension and I had to discover that I needed to change the mode to UV mapping. Finding a way to make the water look  like it could actually be water was very difficult as well, and is one part of the project I am not completely satisfied with. Overall though I am happy with how it turned out and the castle looks very close to how I had imagined it.