Showing posts with label Assignment 4. Show all posts

Saturday, April 29, 2017

Brandon Wehenkel: Granite Tile Engraving


Edit 1


Edit 2


Concept:
I loved the idea of engraving stone.  My sculptor's instinct of mine went crazy hearing that it was possible for this project, so I used one of my old drawings from my beginner's art classes and imported it into curves.   Like many of my other projects in the past, I like to incorporate the human and animal aesthetic, so I designed Bubbah, my gorilla-human character from my scanned object post.

My initial plan was to recreate an old 80s family portrait idea.  Where there is one person, and their face is superimposed and faded behind, off to the back somewhere in the photo.  But it became too muddled.  Too many lines and it didn't quite look how I wanted it.


Ghosted Frame

I wanted to create a waffle frame for this project as well, so the engraved stone wasn't laying flat.  I used an A-Frame design to create the frame.


Detail


The border is designed with this style.

Modeling Technique:
Adobe Illustrator, raster and image trace
Rhino
Photoshop

This cost me a lot.  I have 13,678 curves and 5548 hatches.
I used TWEENCURVES, and that's about it.  I got help from Professor Scott for making curves very quickly, and I used that about 80% of the process.  The other was hatch, copy, paste, move, interpolate curve.  I used picture frame and measured a rough size for my 12x12 tile and just started drawing over the reference plane.  I went into Adobe Illustrator several times to try to import curves, but it looked like garbage.  Just think about how children draw before they know how to, it was just scribbles. Apart from the nose and eyes nothing else was recognizable.  So I had to create the entire design from scratch.  I stayed up till about 4 am for about 5 nights in a row starting my work about 5 pm.  There were a lot of tedious, repetitive moves.

 Frame Laser Cut Sheet with Lamp

I used the same technique as my lamp design for my frame.  I even used some of the same curves. Such as the "A-Frame" curve. I wanted to incorporate an A-Frame design, which I provided a link earlier of what one looks like.  So I used a triangle with a sliced top to make the initial shape.  I sliced the curve a tiny bit more, so the angle the tile sat was similar to a picture frame, where it isn't completely 90degrees.  The frame should slide into the cuts I created; unfortunately, it did not.  Even though I measured 13/32", I should have made the cuts a tiny bit bigger. I used the pipe and orient commands to create the cuts in the planar surfaces.  I used section to create the verticle planes and contour to create the horizontal planes.

Materials:
12" x 12" x 13/32" black granite tile.
2 - 24" x 48" x .1875" sheet of MDF (didn't end up being .1875 for all of them)
Home depot advertises, Medium Density Fiberboard (Common: 1/4 in. x 2 ft. x 4 ft.; Actual: 0.216 in. x 23.75 in. x 47.75 in.) and even that is still wrong.
Gorilla Glue
Locktight Super Glue
Masking Tape
Black Spraypaint


 Building Process


The frame is in the back, and it didn't work out, the materials I bought were too varied in thickness.  I had bought a sheet of MDF 1/4 in size measured it to be .1875 instead.  I went back the next week and got the same material from the same stack on the shelf, and it was a different thickness.  I didn't know this till I was putting the pieces together.  It was also too fibrous and broke with the littlest of pressure. I couldn't get it to fit the tile right either.  I'll need to recreate the design again, and it was my own project within a project, so it wasn't worth the fuss.  My father helped me redesign a new frame from the broken pieces that survived the accident I had.  Its not the prettiest fix but it is very nice in terms of funcionality.  I only wanted something to hold my tile for better viewing pleasure so the image below is to show the alternative for my frame.


 Uncolored Frame


Colored Frame


Based off the cut sheet image, I can see where I went wrong.  I put the horizontal cuts on a different sheet than the verticle cuts.  Because the place I bought the sheets from did not cut all of their sheets exactly the same, I ran into a project destroying issue.  My horizontal sheets could not fit the verticle sheets, and I ended up breaking a bunch of my MDF cuts.  I had to create an entirely new design from my broken pieces.


Engraving


The small details that I shared above did not fully render.  I chose too small of curves together and should have made my curves further apart.  A lot of my detail was wasted to the grain of the stone.  I learned my lesson and will know for my process next time.


Engraving with Frame


Monday, October 31, 2016

Brandon Wehenkel: Longboard Engraving


Photoshop Original

Photoshop Final


Rhino example


Concept:

I don't skate.  My brother does.  Since he does I asked him what he wanted on the bottom of his longboard.  When I was younger I got an email while I was away from home that my brother had broken his collar bone while longboarding down a steep hill.  He told me he wanted an omage to his collar bone on his longboard.  Longboard  Inspiration


 X-ray

Predator Organism Radiolaria
Vertebrae seen through an electron microscope


Modeling Techniques:
I uploaded the images to photoshop and photomanipulated the images to the longboard example I gave in the concept.  I used curves and saturation to create a very blown out image.  I used various tools in photoshop: eliptical, rectangular, magic wand, quick selection tool, brush tool, spot healing brush, healing brush, patch tool, eraser, paint bucket, lasso tool, eyedropper.
In Illustrator: Image Tracing, Pen Tool
In Rhino: Scale 1D, Dimension --> Linear Dimension
I ended up ditching the Rhino & Illustrator idea and just manipulating the image in photoshop till I got a very different appearance.  The design wasn't very cooperative with the laser engraver so I ended up enhancing the contrast with the exposure setting.  I adjusted gamma to .26 (almost all the way to the right) and I adjusted the exposure to multiple different spots: I started on a lower adjustment of +1 and I believe I adjusted it to +14 for the final design.  Because of this I lost a significant amount of detail.
I had also used pixelation and greyscale to my advantage to get more detail out of the shadows that I wanted in the X-ray, without the pixelation I would have lost all detail.

Materials:
The longboard is made of pine.  I did a test on Oak because I had an excess of that wood at home.  Its an expensive test, but I didn't want the wood to go to waste.  I ended up not doing a 2nd test and just editing the design five different times to be printed on the pine board.
I used a spray on sealant to clean up the exposed laser engraved areas.  But I didn't want to use paint on with a brush because I fear that I might have some slight clumping in the pixelated area.

Final

Monday, October 27, 2014

Andrew Kelly: Project 4: Slots

Thematic Description
For this project I wanted to make something sharp - no obtuse angles or rounded curves. I want the slotted parts to be used to make structures that prick the sleepy builder.

Here are my initial shapes with reference boxes:

Build Notes
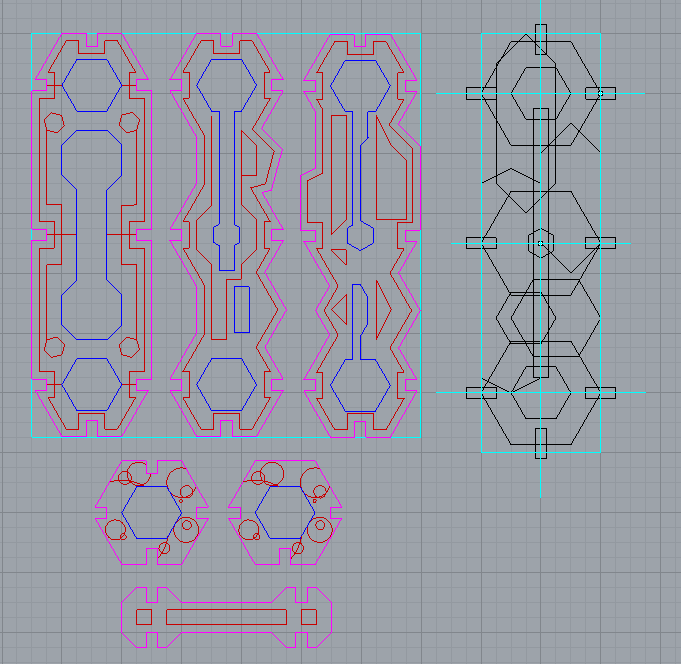
And here is my laid-out sheet of duplicates. I started with an array that was too dense, then moved parts around to get the most out of my material. Even so, there a few small spaces that could have been filled if the material was just one inch larger.

New 24x24 slot layout:

Its Alive! 
Themed and vanilla pictures of the end result:

Sunday, October 26, 2014

Nicolas Vallier: Project 4 Slots

For this project's design, I chose to emulate some of the design cues from Atlantis of the show StarGate Atlantis. 

I used the hexagonal design and cubic look of the buildings and outer piers as the baseline of my design, in order to make the slot parts.


I will be using 3/16 inch thick hardwood underlayment for my material. All of the slot holes are 3/16 inch thick. 

Update 1:
I changed the slot parts to .16 inch thick and got rid of the indention lines. I also cut the printing size on the board in half.


Update 2:

They have been printed out. 


Christopher Chambers - Project 4: Slots


For this assignment I chose to emulate the shapes of 17th-18th century Citadel fortresses, such as the well-known Casale Monferrato and Citadelle de Qu­ébec.

---


---


---

I'll be using 5.0mm (.19 inch) hardwood underlayment, and henceforth gloves for the splinters attained therefrom. The images above were maintained via the public domain.

---

Finally, upon noticing a mistake with the innercut, we come to this:


---

Some finished work! Scorpion constructed by Jenna Nolan, using these parts.


---

And a geometrically linear, doubled structure by myself.


Sean Lenox - Project 4: Slots

Week 9: 


Here are my slots, laid out and ready for laser cutting. When putting these together I couldn't help but think of TV remotes, so I made them chunky rounded rectangles with engraved "buttons". This could be because we've been having tons of trouble with our own remote over the past week or so and I just can't get it out of my head.

Something like this, y'know?

I used circles and lines to draw the body, and used a rounded rectangle for the center hole. I used polar arrays and mirrors to get the notches in the right places, and plenty of offset curves for my engravings, also using circles and lines for those. CurveBoolean brought everything together nicely.

I tried to save this as an .stl file, but Rhino just tells me "No surface objects to export." and doesn't save it. Hopefully this isn't a big problem - I have the .3dm file with me. It's still a confusing, though, considering I was able to save my slice sheet as an .stl with no problems. People on the Internet just called it a "bug". Hopefully it will still work.

Week 13:

Here is a photo of the laser-cut slots.


Week 15:

Here is a photo of my slot composition.